
| Version | Summary | Created by | Modification | Content Size | Created at | Operation |
|---|---|---|---|---|---|---|
| 1 | Beatrix Zheng | -- | 2593 | 2022-11-21 01:36:31 |
Video Upload Options
Forensic photography may refer to the visual documentation of different aspects that can be found at a crime scene. It may include the documentation of the crime scene, or physical evidence that is either found at a crime scene or already processed in a laboratory. Forensic photography differs from other variations of photography because crime scene photographers usually have a very specific purpose for capturing each image. As a result, the quality of forensic documentation may determine the result of an investigation, in that with the absence of good documentation, investigators may find it impossible to conclude what did or did not happen. Crime scenes can be major sources of physical evidence that is used to associate or link suspects to scenes, victims to scenes, and suspects to victims. Locard's exchange principle is a major concept that helps determine these relationships of evidence. It is the basic tenet of why crime scenes should be investigated. Anything found at a crime scene can be used as physical evidence as long as it is relevant to the case, which is why the documentation of a crime scene and physical evidence in its true form is key for the interpretation of the investigation. Knowing that crucial information for an investigation can be found at a crime scene, forensic photography is a form of documentation that is essential for retaining the quality of discovered physical evidence. Such physical evidence to be documented include those found at the crime scene, in the laboratory, or for the identification of suspects. All forensic photography must consider three elements at a crime scene: the subject, the scale, and a reference object. Also, the overall forensic photographs must be shown a neutral and accurate representation.
1. Features of Forensic Photography
Common types of photography such as creative and artistic photography give a different purpose than forensic photography.
Crime scene photography allows us to capture essential aspects of the presented from the crime scene, including its scope, the focal points of the scene, and any physical or material evidence found at or from a result of it.[1] With the use of crime scene photography, the context of the crime scene can be represented through a series of photographs; aiming to tell the whole story.[1] Such photographs are used to capture the physical environment of the scene and its surroundings, in addition to physical evidence in situ and key areas of the crime scene (e.g., entrances and exits).[1] Moreover, these photographs may be taken at various ranges depending on the content that is being captured.[1] For example, physical evidence (e.g., footprints, wound details, trace evidence, etc.) may require close-up images, whereas the conditions of a room may only require overall and/or midrange photography.[1] Photographs may also be supported with video recordings.[1]
1.1. Evidence Photography
This form of photography is to provide images of the varying types of physical evidence and used as evidence in court,[1][2] part of the case record, or by other investigators;[2] typically of forensic findings during the analysis of various forensic disciplines. Forensic laboratories generally use infrared, ultraviolet (UV), x-ray, or laser radiation in addition to cameras and microscopes, to represent details that would otherwise be invisible to the naked eye.[1] However, it is crucial that such details do not interfere with the appearance and condition of the evidence being documented.[2]
To ensure quality photographs, general evidence is documented under the following conditions:[2]
- The evidence is placed on a clean and distraction-free background (i.e., background paper, butcher paper, neutral countertop, etc.).
- Even illumination. This can be achieved with two light sources of equal power and distance, placed approximately 45 degrees toward the evidence.
- The camera should be placed directly overhead of the evidence. A ladder or scaffolding may be required for larger items.
- Case number and scale present in all photographs.
- All sides of the evidence photographed
- Close-up photographs of relevant details found on the evidence.
1.2. Impression Photography
Photographs of impressions such as fingerprints, footwear impressions, and tool marks require certain standards as they may be analyzed, compared, and searched through a large digital databases.[1] For example, fingerprints are often entered into the Automated Fingerprint Identification System (AFIS). To meet the standards for such material evidence, they must:[1]
- Fill the frame with the impression to take advantage of the camera's resolution;
- Include a scale for accurate calibration;
- Have parallel planes of the subject, scale, and image;
- Be in sharp focus and exposed correctly; and
- Have even illumination of the area of interest.
In addition, it is suggested that these impression images be recorded in camera RAW, although the photographer may decide to edit via Photoshop or another editing software.[1] That will create a TIFF image, but increase the quality of the image.[1]
1.3. Mug Shots
Mug shots are taken for individuals who have been charged with a crime, and once one is created, it is automatically entered into a master database with any existing information on that individual.[1] To maintain consistent quality, standardized lighting, background, and distance is required.[1] In addition to associating filed information, physical features (e.g., hair and eye colour, facial hair, tattoos, etc.) is also associated and appropriate is a photo line-up is required.[1]
2. Methods
All photographs must contain three elements: the subject, a scale, and a reference object. Crime scene photographs should always be in focus, with the subject of the photograph as the main object of the scene. There should always be a scale or ruler present. This will allow the investigators the ability to resize the image to accurately reconstruct the scene. The overall photographs must be a fair and accurate representation of what is seen. Any change in color may misidentify an object for investigators and possibly jurors. (Figure 3.0)
Preliminary overall photographs should attempt to capture the locations of evidence and identifying features of the scene, such as addresses, vehicle identification numbers and serial numbers, footwear/tire mark impressions, and the conditions of the scene. While the purpose of the overall photograph is to document the conditions of the scene and the relationship of objects, the medium range photograph serves to document the appearance of an object.
In all photographs, a scale must be included, as well as a marker to indicate the identity of the object in question. Again, objects of medium-range photographs must be a fair and accurate representation of what is seen. Adjusting the photographic principles or lighting may allow the photographer to achieve this goal.
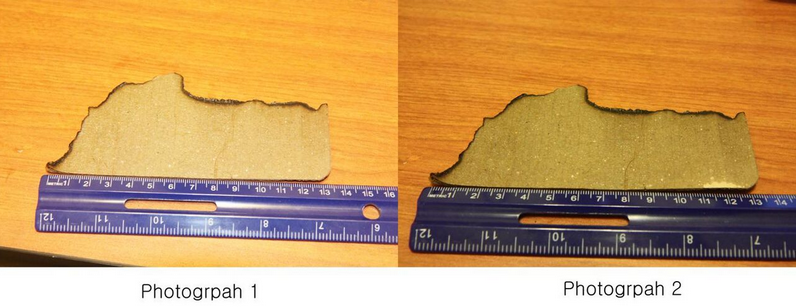
Above picture is Figure 3.1. Which one is the correct representation?
In Figure 3.1, Photograph 2 is a correct representation.
Photograph 1 has too much light. It means that the photographer failed to catch proper light to describe the object. By adjusting the flash, photographer should adjust camera flash to capture the object.
In general, the basic components of macro or evidentiary photography are as follows: If any evidentiary photographs are to be taken for use in a critical comparison examination at a later time, guidelines must be followed in accordance with the best practices of digital evidence.
- The digital image must be captured in a lossless compression format. The two widely accepted lossless compression formats are tagged image file format (TIFF) and RAW. TIFF is a universal file type, whereas RAW files are proprietary based upon the manufacturer of the camera. Specialized software may be required to open and enhance a RAW image.
- The camera must be on a grounded platform, such as a copy stand or tripod. In general, the human body cannot stop natural vibrations with a camera shutter speed slower than 1/60 of a second. Using a grounded platform will allow the subject matter to be in complete focus.
- The camera shutter must be controlled by a remote cord or by using the timer mode. The simple action of depressing the shutter control will cause the camera to vibrate, losing focus of the subject matter.
2.1. Documentation
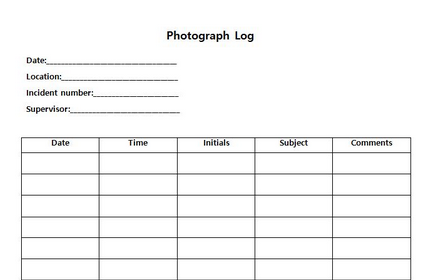
The responding officer must also maintain a photo log if any photographic documentation is taken. The log should contain the date and time of the photograph, the subject matter, and any additional notes. These logs must be maintained within a case file or incident report, as they are a part of the examination record and discoverable material at trial.[3]
2.2. Digital Photography
Photographers must understand principles of photography first. When the photographers take the photographs itself, they must consider three components. The three components are ISO, Shutter speed and aperture.
The International Organization for Standardization (ISO) is an international standard-setting body composed of representatives from various national standards organizations. The actual meaning in photography is a camera’s sensitivity to light
ISO
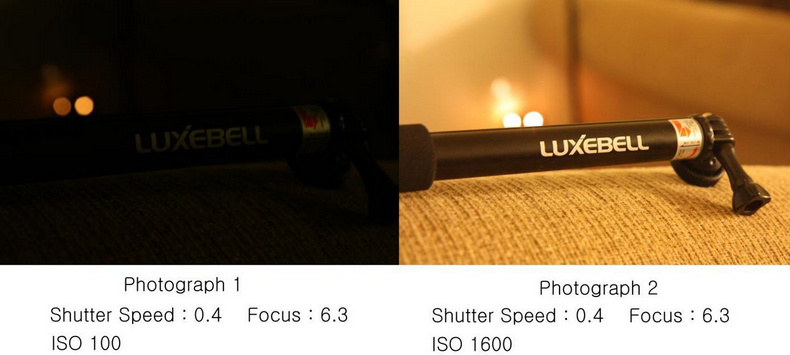
By adjusting ISO, the photographs can be shown differently in same environment. In dark environment, ISO makes light sensor of camera more sensitive. It helps photographers to meet proper light in dark or harsh condition. Among above two photographs, the photograph 2 is a proper representation because it shows clear objects with proper brightness. However, ISO has high possibility to make camera noise which is visual distortion. Too much dependence on ISO can distort the image. For that reason, the photographers must understand ISO before using it.
Shutter speed
Shutter speed is the length of time when the film or digital sensor inside the camera is exposed to light. Object and image can be shown differently by shutter speed. Below are the examples.
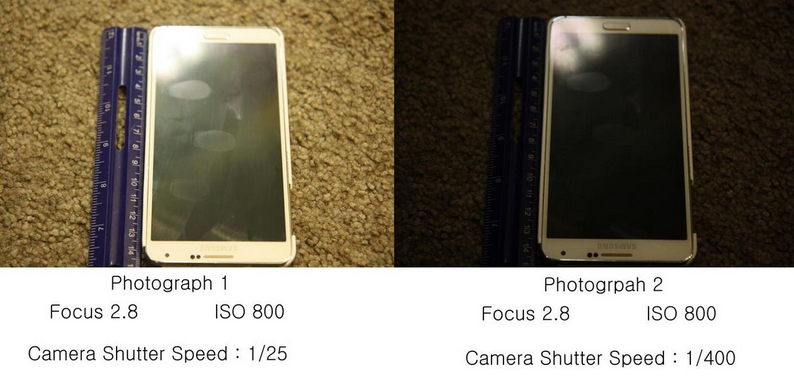
These two photographs are taken under same situation except for camera shutter speed. In above situation, slow shutter speed makes image more clear and bright because the low shutter speed takes more light than high shutter speed. However, the high shutter speed often is necessary for a moving object.
Aperture(f-stop)
Aperture refers to the size of the opening in the lens. A side-effect of opening or closing the aperture is a change in the extent of the image that is seen to be in focus. A smaller aperture (translating to a larger numbered f-stop) means a deep depth of field as seen in photograph 1. A larger aperture (translating to a lower numbered f-stop) means shallower depth of field. In all types of photography the size of the Aperture is commonly referred to as "f-stop", described in terms such as f/1.4, f/5.6, f/16, etc. Which is the ratio of the focal length of the lens to the size of the aperture.[4]
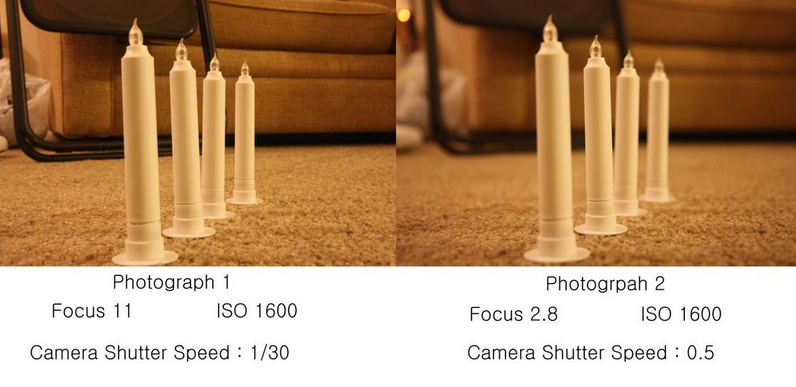
Photograph 1 shows all objects very clearly in focus due to the small aperture used. Photograph 2 shows an object with critical focus but the objects before and after the plane of focus are blurred due to the large aperture.
2.3. Use of Flash
External flash units are helpful tools when responding to a crime scene and for the proper documentation of evidence. The white balance of a photo flash unit is set to mimic daylight to ensure the proper color balance of the subject matter. The photographer must be mindful of the reflections that can occur due to the directionality of the flash and the position of the subject matter. To avoid flash reflections, as demonstrated below examples, the flash must either be removed from the camera body, creating an angle, or bounced off of the ceiling.
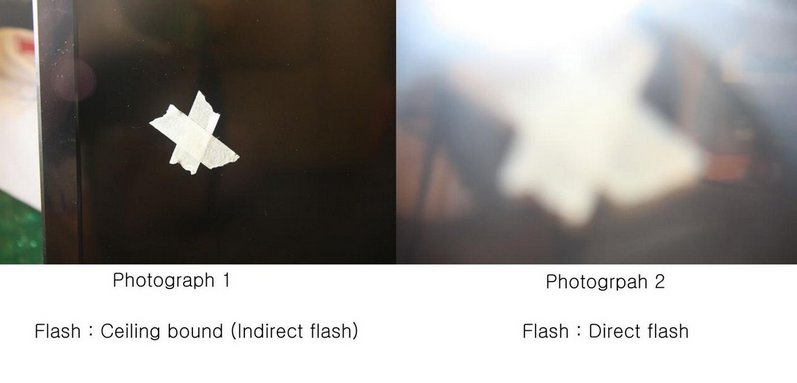
The word 'Photograph' is spelt wrong in the images above.
3. Equipment
The tools required to properly document the crime scene include:[5]
- Notepad
- Clipboard and/or digital tablet device
- Graph paper
- Writing instruments (pens, pencils, markers)
- Still camera with external flash and extra batteries
- Video camera
- Tripod
- Measurement instruments (tape measures, rulers, electronic measuring devices, perspective grids, etc.)
- Evidence identification and position markers or placards
- Photographic log
- Compass
4. Fit for Court
The images must be clear and usually have scales. They serve to not only remind investigators of the scene, but also to provide a tangible image for the court to better enable them to understand what happened. The use of several views taken from different angles helps to minimize the problem of parallax. Overall images do not have scales and serve to show the general layout, such as the house where the murder is thought to have occurred. Context images show evidence in context, like how the knife was next to the sofa. Close up images show fine detail of an artifact, such as a bloody fingerprint on the knife.
Road traffic incident (RTI) photographs show the overall layout at the scene taken from many different angles, with close-ups of significant damage, or trace evidence such as tire marks at a traffic collision. As with crime scene photography, it is essential that the site is pristine and untouched as far as is possible. Some essential intervention, such as rescuing a trapped victim, must be recorded in the notes made at the time by the photographer, so that the authenticity of the photographs can be verified.
As with all evidence a chain of custody must be maintained for crime scene photographs. Sometimes a CSI (forensic photographer) will process his/her own film or there is a specific lab for it. Regardless of how it is done any person who handles the evidence must be recorded. Secure Digital Forensic Imaging methods may be applied to help ensure against tampering and improper disclosure.[6] Accident scene pictures should also be identified and sourced, police photographs taken at the scene often being used in civil cases.
5. Analysis of Historic Photographs
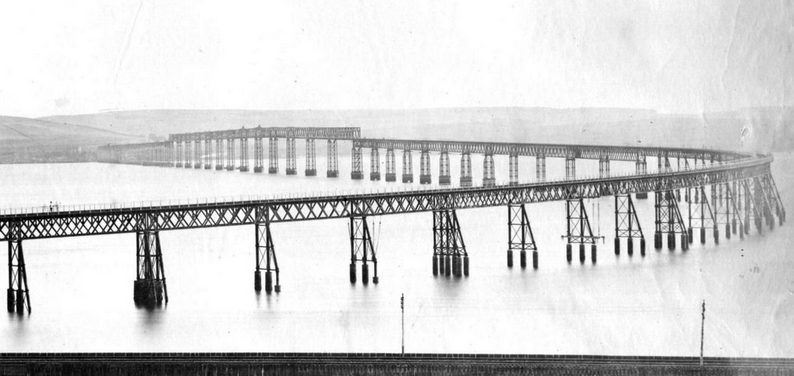
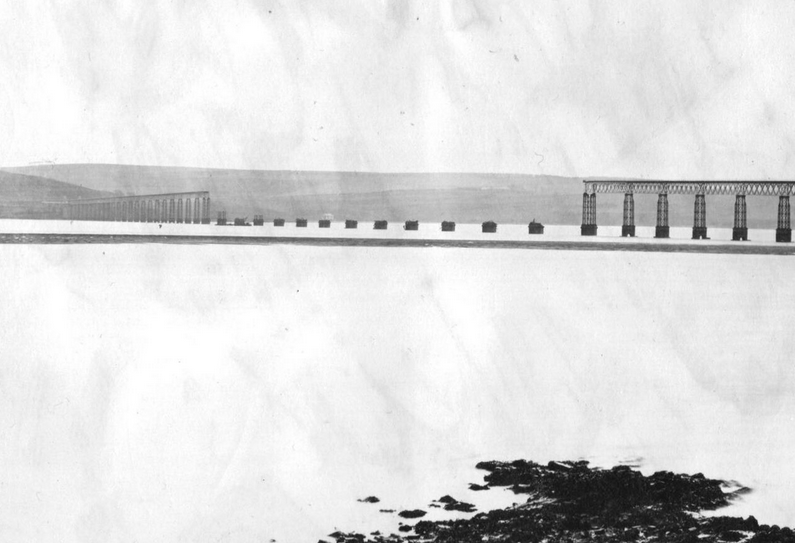
Crime or accident scene photographs can often be re-analyzed in cold cases or when the images need to be enlarged to show critical details. Photographs made by film exposure usually contain much information which may be crucial long after the photograph was taken. They can readily be digitized by scanning, and then enlarged to show the detail needed for new analysis. For example, controversy has raged for a number of years over the cause of the Tay Bridge disaster of 1879 when a half-mile section of the new bridge collapsed in a storm, taking an express train down into the estuary of the river Tay. At least 75 passengers and crew were killed in the disaster.
The set of photographs taken a few days after the accident have been re-analyzed in 1999–2000 by digitalizing them and enlarging the files to show critical details. The originals were of very high resolution since a large plate camera was used with a small aperture, plus a fine-grain film. The re-analyzed pictures shed new light on why the bridge fell, suggesting that design flaws and defects in the cast iron columns which supported the centre section led directly to the catastrophic failure. Alternative explanations that the bridge was blown down by the wind during the storm that night, or that the train derailed and hit the girders are unlikely. The re-analysis supports the original court of inquiry conclusions, which stated that the bridge was "badly designed, badly built and badly maintained".[7]
5.1. Concerns over Scientific Validity
A 2019 ProPublica investigation found that despite frequent use by the FBI, there are considerable concerns over scientific validity of the FBI's analysis of photographic evidence. ProPublica "asked leading statisticians and forensic science experts to review methods image examiners have detailed in court transcripts, published articles and presentations. The experts identified numerous instances of examiners overstating the techniques’ scientific precision and said some of their assertions defy logic."[8]
References
- Nafte, Myriam; Dalrymple, Brian (2021) (in English). Crime and Measurement: Methods in Forensic Investigation. Durham, NC: Carolina Academic Press. pp. 49–70. ISBN 9781531008536.
- Mancini, K., & Sidoriak, J. (2017). Fundamentals of Forensic Photography: Practical Techniques for Evidence Documentation on Location and in the Laboratory (1st ed.). Routledge. https://doi.org/10.4324/9781315693125
- Reitnauer, Andrew R. (2015-06-24). Crime Scene Response and Evidence Collection, In Security Supervision and Management (Fourth ed.). Butterworth-Heinemann. pp. 443–459. ISBN 9780128001134.
- https://www.masterclass.com/articles/photography-101-what-are-f-stops
- Fish, Jacqueline T.; Miller, Larry S.; Braswell, Michael C.; Wallace Jr., Edward W. (2014-01-01). Chapter 3 - Documenting the Crime Scene: Photography, Videography, and Sketching. Boston: Anderson Publishing, Ltd.. pp. 59–83. ISBN 9781455775408.
- Lawrence Memorial Hospital sexual assault exam room with SDFI system http://wellcommons.com/groups/trauma/news/2010/sep/9/lmh-offers-tours-of-new-s/
- Porter, Glenn (2013). "Images as Evidence". Precedent 119 (Nov/Dec): 38–42. http://search.informit.com.au/documentSummary;dn=765333217008521;res=IELHSS. Retrieved 11 August 2014.
- Gabrielson, Ryan (2019-01-17). "The FBI Says Its Photo Analysis Is Scientific Evidence.…" (in en). https://www.propublica.org/article/with-photo-analysis-fbi-lab-continues-shaky-forensic-science-practices.


