| Version | Summary | Created by | Modification | Content Size | Created at | Operation |
|---|---|---|---|---|---|---|
| 1 | Jiang Guo | + 859 word(s) | 859 | 2018-12-23 02:11:38 | | | |
| 2 | Jiang Guo | Meta information modification | 859 | 2020-02-12 05:21:50 | | | | |
| 3 | Jiang Guo | Meta information modification | 859 | 2020-02-12 05:26:35 | | | | |
| 4 | Jiang Guo | Meta information modification | 859 | 2020-02-12 05:28:19 | | | | |
| 5 | Peter Tang | + 4 word(s) | 863 | 2020-11-01 10:59:55 | | |
Video Upload Options
This entry introduces several commonly used residual stress measurement methods.
1. Introduction
Residual stress remains in a body which is stationary and at equilibrium with its surroundings[1]. Indeed, it is one of the main factors affecting the machining accuracy and strength of the workpiece, which is very unfavorable to the performance of the material or the life of the component. On the other hand, compressive stresses are sometimes introduced deliberately, as in shot peening which is used to improve fatigue resistance. Therefore, the detection and evaluation of its status is extremely important in industrial production.
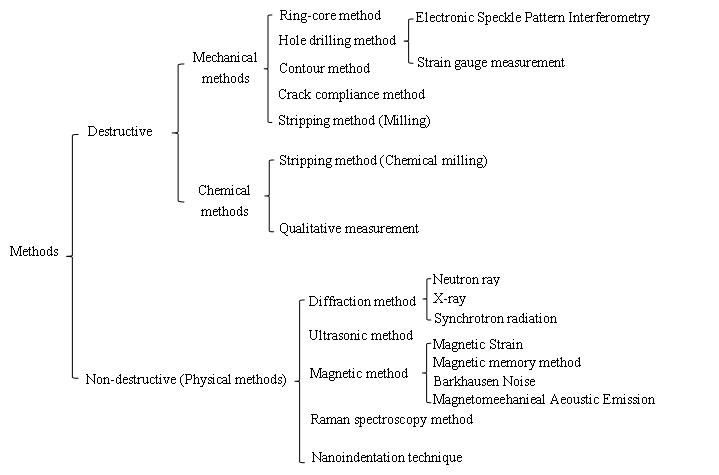
At present, residual stress measurement methods can be generally divided into two categories, one of which is destructive detection method, including mechanical methods and chemical methods, the principle is to remove some or all of the materials in some way, measure the strain or displacement of a specific area, and according to mathematical inversion of residual stress is performed for specific boundary conditions. The other category is non-destructive testing method, which is mainly tested according to the physical properties of the material, that is, the physical method. Regardless of the method, the residual stress can only be calculated by indirectly measured quantities such as strain or displacement.
2. Classification of specific measurement methods

3. Comparison of residual stress test methods
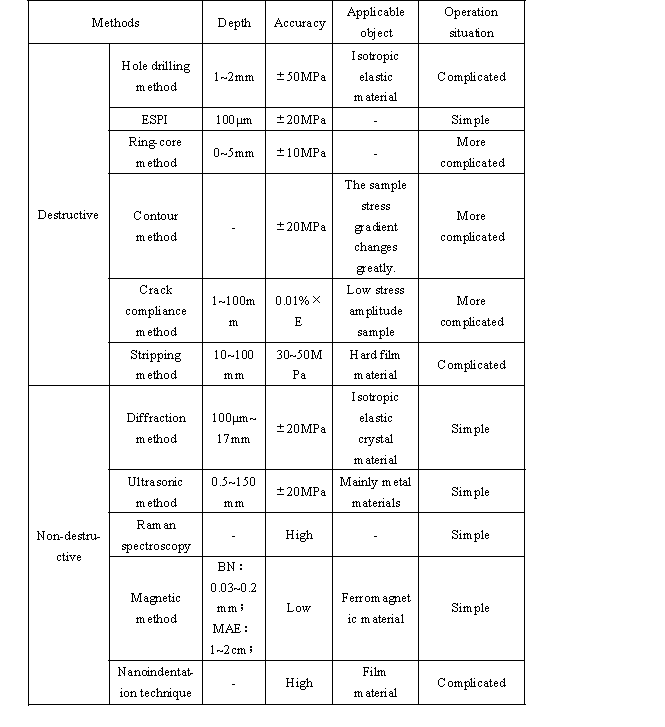
The comparison of residual stress test methods is as follows [2][3][4][5]:

4. Mechanical methods
The hole drilling method is one of the most common surface residual stress testing methods. The method generally uses strain gauges to measure the strain data after drilling in the tested area, which has the advantages of simple operation and low test cost. American Society for Testing Materials (ASTM) has developed a standard assay techniques residual stresses drilling method[6]. In order to reduce the operational error and other factors in the measurement, the test method using the non-contact measurement of the strain method combined with the drilling method has been rapidly developed, such as Electronic Speckle Pattern Interferometry (ESPI) using optical measurement strain. The principle of the ring-core method is similar to the hole drilling method, and the stress in the measured area is released by processing a circular groove. It is widely used in residual stress testing of turbine and turbo generator rotor forgings and has established corresponding standards. In order to measure the residual stress distribution along the depth direction, the workpiece can be removed layer by layer by the stripping method, and the residual stress distribution can be obtained by measuring the strain value using the formula[7]. In addition, there are other new methods, such as the crack compliance method based on the principle of linear elastic fracture mechanics[8][9] and the most accurate destructive detection technique-contour method.
5. Chemical methods
Chemical methods are rarely used in residual stress measurement. In mechanical methods, the residual stress is measured by the stripping method of milling, but the milling process brings errors, and the chemical milling method perfectly solves this problem. In addition, there is a chemical reagent that qualitatively studies the magnitude and type of residual stress based on the time of occurrence of the crack and the time of weight reduction.
6. Physical methods
Diffraction method is the most widely used and most mature technology in nondestructive testing technology, including X-ray diffraction, neutron ray diffraction and X-ray synchrotron radiation. When the Bragg diffraction occurs, the diffraction peak is moved due to the residual stress, and the residual stress can be obtained by the corresponding formula[10]. Ultrasonic stress measurement is based on the theory of acoustic elasticity, using the phenomenon of acoustic birefringence in stressed materials, which is one of the most promising technologies in the development direction of residual stress nondestructive testing[11]. In the Raman spectroscopy method, the stress inside the crystal can be accurately calculated according to the relationship between stress and relative Raman shift[12]. The basic principle of magnetic measurement is to use the magnetostrictive effect of ferromagnetic material to measure the stress. The method includes magnetic memory method, magnetic strain method, Barkhausen Noise(BN) and Magnetomeehanieal Aeoustic Emission(MAE). Nanoindentation technique was proposed and developed by Olive et al[13][14]. It based on the elastic contact mechanics, the hardness test method is used, which has the advantages of non-destructive and can test the mechanical properties of materials in a small local range.
After decades of development and application, the residual stress testing technology has formed a variety of different detection technologies. However, whether it is a traditional test method or a new method, there are some difficulties in the depth measurement of stress and the accurate measurement of the whole field on a two-dimensional plane. In order to improve the detection accuracy and detection efficiency of stress measurement, two or more detection methods are used together, which has become a major development direction of current stress measurement and state evaluation research. Liu et al. combined the magnetic measurement method with the ultrasonic method to dynamically reflect the variation of the magnetostriction coefficient curve of the material with the stress by receiving the signal reflected by the transverse wave in the weld zone under different excitation magnetic field strengths[15]. In the research of two-dimensional stress reconstruction, a variety of research methods have appeared[16][17][18].
References
- P.J. Withers; H.K.D.H. Bhadeshia; Residual stress. Part 1 – Measurement techniques. Materials Science and Technology 2001, 17, 355-365, 10.1179/026708301101509980.
- J. Guo, H. Fu, B. Pan, R. Kang, Recent Progress of Residual Stress Measurement Methods: A Review, Chinese Journal of Aeronautics 2019, 10.1016/j.cja.2019.10.010
- M. Steinzig; G.J. Hayman; M.B. Prime; Verification of a technique for holographic residual stress measurement. ASME Pressure Vessels and Piping Conference 2001:65-70.
- C.G. Xu; J.F. Wang; J.F. Song; H.B. Tian; L.P. Lin; X. Rao; Ultrasonic nondestructive testing and in situ regulation technology of residual stress for oil and gas pipelines.PETROLEUMSCIENCEBULLETIN, 10.3969/j.issn.2096-1693.2016.03.040.
- X.R. Mu; S.C. Wang; Z.G. Jiang; A STUDY OF THE MAGNETOELASTIC INSTRUMENTATION. CHINESE JOURNAL OF SCIENTIFIC INSTRUMENT 1995,(2):161-167, 10.19650/j.cnki.cjsi.1995.02.010.
- American Society for Testing and Materials; E837; Standard test method for determining residual stresses by the hole-drilling strain-gage method, Pennsylvania: ASTM International 2008.
- T.M. Holden; P.J. Withers; Diagnosing Engineering Problems with Neutrons. MRS Bulletin 1999, 24, 17-23, 10.1557/S0883769400053677.
- M.B. Prime; Residual Stress Measurement by Successive Extension of a Slot: The Crack Compliance Method. Applied Mechanics Reviews 1999, 52, 75-96, 10.1115/1.3098926.
- M.B. Prime; Experimental Procedure for Crack Compliance (Slitting) Measurements of Residual Stress. Los Alamos National Laboratory Report 2003, No.LA-UR-03-8629.
- P. J. Webster; P. J. Withers; Neutron and Synchrotron X‐ray Strain Scanning. Strain 2001, 37, 19-33, 10.1111/j.1475-1305.2001.tb01216.x.
- N.S. Rossini; M. Dassisti; K.Y. Benyounis; A.G. Olabi; Methods of measuring residual stresses in components. Materials & Design 2012, 35, 572-588, 10.1016/j.matdes.2011.08.022.
- S.B. Sang; C.Y. Xue; J.J. Xiong; W.D. Zhang; Stress Measurement in MEMS Based on Raman Spectroscopy.CHINA MECHANICAL ENGINEERING 2005,61(z1):461-463, 10.3321/j.issn:1004-132X.2005.z1.166.
- W.C. Oliver; G.M. Pharr; An improved technique for determining hardness and elastic modulus using load and displacement sensing indentation experiments. Journal of Materials Research 1992, 7, 1564-1583, 10.1557/jmr.1992.1564.
- W.C. Oliver; G.M. Pharr; Measurement of hardness and elastic modulus by instrumented indentation: Advances in understanding and refinements to methodology. Journal of Materials Research 2004, 19, 3-20, 10.1557/jmr.2004.19.1.3.
- X.C. Liu; Study on Magnetostrictive and Elastomagnetic Based Sensor Integration Technology for Applications in Steel Wire Rope Inspection. Beijing University of Technology 2013, BeiJing, China.
- H.E. Coules; D.J. Smith; K. Abburi Venkata; C.E. Truman; Harry Coules; A method for reconstruction of residual stress fields from measurements made in an incompatible region. International Journal of Solids and Structures 2014, 51, 1980-1990, 10.1016/j.ijsolstr.2014.02.008.
- T.S. Jun; A.M. Korsunsky; Evaluation of residual stresses and strains using the Eigenstrain Reconstruction Method. International Journal of Solids and Structures 2010, 47, 1678-1686, 10.1016/j.ijsolstr.2010.03.002.
- G. H. Farrahi; S. Ali Faghidian; D.J. Smith; Reconstruction of residual stresses in autofrettaged thick-walled tubes from limited measurements. International Journal of Pressure Vessels and Piping 2009, 86, 777-784, 10.1016/j.ijpvp.2009.03.010.


