1. Indications
Thoracentesis plays a significant role in both diagnosing and treating pleural effusions. In cases where the etiology of a pleural effusion is uncertain, diagnostic thoracentesis is recommended. While specific guidelines are lacking, it is advisable to ensure at least 10 mm of fluid depth for thoracic ultrasound to mitigate complications associated with thoracentesis
[1]. For most scenarios, unilateral pleural effusions should be sampled to evaluate for an exudate
[2]. Bilateral pleural effusions linked to congestive heart failure or other hypervolemic conditions generally do not necessitate sampling. On the other hand, therapeutic thoracentesis is performed to relieve respiratory symptoms and enhance lung mechanics. The drainage of large pleural effusions may be able to enhance oxygenation by re-expanding poorly ventilated alveoli and restoring a normal ventilation-perfusion ratio. Pleural effusion aspiration also leads to improvements in transpulmonary pressure, plateau pressure, and compliance
[1].
2. Contraindications
The only absolute contraindication to performing a thoracentesis is patient refusal. However, several relative contraindications warrant consideration. The primary relative contraindication is a bleeding diathesis. A comprehensive discussion of coagulation disorder assessment and management preceding thoracentesis will follow. Additionally, the presence of localized cutaneous conditions, such as herpes zoster, at the proposed puncture site constitutes another relative contraindication. Lastly, if thoracic ultrasound fails to reveal a safe site for fluid aspiration due to factors such as minimal fluid volume or risk to surrounding structures, then it is advisable to abort the procedure
[1].
3. Preparation
3.1. Informed Consent
Before conducting a thoracentesis, obtaining informed consent from the patient is imperative and should be thoroughly documented. The consent details should be communicated in a language comprehensible to the patient. Many institutions offer pre-drafted consent forms for thoracentesis, outlining the acknowledged risks, benefits, and available alternatives to the procedure. Researchers will address potential complications of thoracentesis in subsequent discussions. Patients must also be informed of their right to withdraw consent at any point before the procedure
[1].
3.2. Anticoagulation and Antiplatelet Therapy
Urgent and emergent thoracentesis should not be deferred due to antithrombotic medication use, provided that the procedure’s benefits outweigh potential bleeding risks
[1]. While every attempt should be made to address coagulation abnormalities resulting from these medications, the intervention should not be delayed. While no consensus guidelines exist for adjusting anticoagulation or antiplatelet therapy before elective thoracentesis, several small studies indicate safe performance in patients actively on clopidogrel, therapeutic unfractionated heparin, and warfarin without increased incidence of bleeding
[3][4]. Nonetheless, clinicians remain cautious about conducting thoracentesis without stopping antithrombotic therapy. Exceptions often apply to aspirin and prophylactic heparin, which can be safely continued through thoracentesis
[4]. Post-procedure day 1 is a suitable time to safely reinstate antithrombotic medications, assuming no immediate bleeding complications arise
[4]. A comprehensive evaluation of procedural delay risk, bleeding risk, and thrombotic risk in the absence of antithrombotic medications should guide the development of an individualized, patient-centric strategy.
3.3. Pre-Procedural Laboratory Data
Before performing a thoracentesis, many centers require routine blood tests, including but not limited to a full blood count, coagulation studies, and electrolyte and liver function tests. However, the British Thoracic Society recommends that a coagulation profile is unnecessary if the patient lacks a history of coagulopathy and is not taking anticoagulants
[1][5]. The
Journal of Vascular and Interventional Radiology classifies thoracentesis as a procedure with low bleeding risk and does not routinely advise platelet counts or coagulation profiles before elective thoracentesis
[3]. While no formal guidelines exist, many clinicians employ thresholds such as an INR below 2.0 and a platelet count above 50,000/µL. Numerous studies demonstrate the safety of performing thoracentesis with less stringent coagulation parameters, and no evidence suggests benefits in transfusing blood products to meet these arbitrary limits
[5]. As with the management of antithrombotic therapy, an all-encompassing analysis of risks versus benefits should direct a personalized approach to patient selection.
3.4. Equipment
Multiple commercial thoracentesis kits are available which contain the necessary supplies to perform needle drainage. Most kits are based on the catheter-over-needle design, which will be described later. It is important to know the essential equipment in order to identify the limitations in one’s commercial kit and gather any missing supplies. If a commercial kit is not available, then the following list outlines the basic materials required to perform a safe and successful thoracentesis
[6]:
-
A sterile tray, sterile drapes, skin antiseptic solution (e.g., iodine or chlorhexidine), sterile 4 × 4 gauze, sterile gown, sterile gloves, eye protection, mask, medical cap, sterile ultrasound probe cover, sterile ultrasound gel, and sterile dressing;
-
Ultrasound with both a low-frequency and high-frequency transducer;
-
Local anesthetic, preferably 5–10 mL of lidocaine 1% (10 mg/mL) without epinephrine;
-
A Luer lock syringe (10–20 mL), 18-gauge needle, and 22-gauge or 25-gauge needle for local anesthetic infiltration;
-
A 60 mL Luer lock syringe, 20-gauge or 22-gauge needle, over-the-needle catheter (6–8 Fr catheter with a 16–20-gauge needle), 3-way stop cock, intravenous tubing, scalpel, and collection chamber such as a 1000 mL suction cannister for needle insertion and pleural fluid drainage;
-
Iced blood gas syringe, aerobic and anaerobic blood culture bottles, a 50 mL clear collection cup, and a plain collection tube for sample collection and storage.
4. Procedure
4.1. Ultrasound Guidance
The integration of ultrasound guidance has significantly enhanced the safety and efficacy of thoracentesis
[7]. For evaluating the puncture site, the preferred ultrasound probe is the low-frequency transducer, such as a convex or phased array probe. The probe should be placed transversely between two ribs. To minimize complications, it is important to identify the diaphragm and select the region that is a maximum distance between the visceral and parietal pleura for puncture
[8].
Two primary ultrasound-guided thoracentesis techniques have been described. The first is the direct needle guidance approach, which involves real-time visualization of the needle as it enters the pleural space. After determining the aspiration site using the previously outlined techniques, the low-frequency transducer is exchanged for a high-frequency linear probe. This linear probe is positioned transversely between two ribs to visualize needle entry into the pleural space. It is crucial to visualize the entire trajectory of the needle from skin puncture to pleural space entry. This technique is more complicated due to the simultaneous operation of both the ultrasound probe and needle, along with the close positioning of the ultrasound probe to the needle path. The second technique is referred to as site marking. Here, the high-frequency transducer is used to identify the site for pleural aspiration, which is then marked for needle insertion. In this approach, preventing patient repositioning after marking the site is vital to prevent shifts in pleural fluid
[8].
Numerous studies have compared blind pleural aspiration to ultrasound-guided procedures. They have consistently demonstrated superior results with the latter
[1][7][9]. For instance, one study revealed a drop in pneumothorax occurrence from 18% in blind thoracentesis to 3% in ultrasound-guided thoracentesis. The diagnostic yield also improves with ultrasound guidance, as evidenced by a decrease from 33% to 0% in “dry taps” in a small, randomized controlled trial
[9]. These findings are accentuated in studies specifically focusing on smaller pleural effusions. While ultrasound guidance has long been recognized for its reduction in pneumothorax risk, its impact on bleeding risk has not been previously emphasized.
The application of Doppler with thoracic ultrasound enables visualization of intercostal arteries, potentially allowing proceduralists to avoid vessel damage. Additionally, thoracic ultrasound is useful for assessing the presence of lung sliding prior to thoracentesis. This evaluation helps clinicians rule out post-procedure pneumothorax if lung sliding is noted both before and after the procedure
[8].
4.2. Local Anesthesia
Starting with the injection of local anesthesia, the entire procedure should adhere to the aseptic technique. First, 1% lidocaine (10 mg/mL) without epinephrine should be drawn into a 10 mL Luer lock syringe with the use of an 18-gauge needle. A maximum of 3 mg/kg of lidocaine should be prepared, as higher doses can result in toxicity. The, the 18-gauge needle should be removed and replaced with a finer needle, such as a 22-gauge or 25-gauge. Local anesthetic is then infiltrated into the skin and subcutaneous tissues surrounding the ultrasound-guided puncture site. The needle is then advanced through the subcutaneous tissue layers toward the parietal pleura while injecting small amounts of local anesthetic along the tract. It is important to apply negative pressure to the syringe prior to injection to ensure lidocaine will not be injected into a blood vessel. Once the pleural space is accessed, as confirmed by a flash of pleural fluid within the syringe or directly visualized via ultrasound guidance, the remainder of the local anesthetic should be injected over the parietal pleura. Particular attention should be paid to the skin, periosteum, and pleura, which are the most highly innervated tissue. Opting for 1% lidocaine is preferred, as larger volumes of anesthetic increase the effective anesthetic area. Due to its increased concentration, a solution of 2% lidocaine would need to be given in smaller volumes to avoid toxicity. This diminishes the effective anesthetic area, potentially leading to increased patient discomfort
[6]. The procedure may also be performed without the use of local anesthetic in certain clinical scenarios.
4.3. Accessing Pleural Space
Diagnostic thoracentesis can be performed with a 60 mL Luer lock syringe and a 20- or 22-gauge needle. The needle is advanced through the tract formed during local anesthetic infiltration. If using the site marking technique, then negative pressure is applied to the syringe throughout advancement through the tract. Upon entry into the pleural space, pleural fluid will fill the syringe. If using direct visualization, then there is no need to apply negative pressure until the needle is visualized entering the pleural space. After obtaining a 50–60 mL sample, the needle can be withdrawn and a sterile dressing applied. Therapeutic thoracentesis is most often performed using the catheter-over-needle technique. A small incision should be made at the marked site where the local anesthetic needle was inserted. The incision should accommodate insertion of the needle-over-catheter system, which classically features a 6–8 Fr catheter over a 16–20-gauge needle. The needle and catheter system are then advanced through the tract previously anesthetized. Upon entry into the pleural space, the catheter is advanced over the needle. Most catheters are marked with a black line which must be advanced until it is subcutaneous to ensure the proper position and function of the catheter within the pleural space. Once the catheter is advanced into the pleural space, the needle may be withdrawn and discarded appropriately
[1][6].
4.4. Pleural Manometry
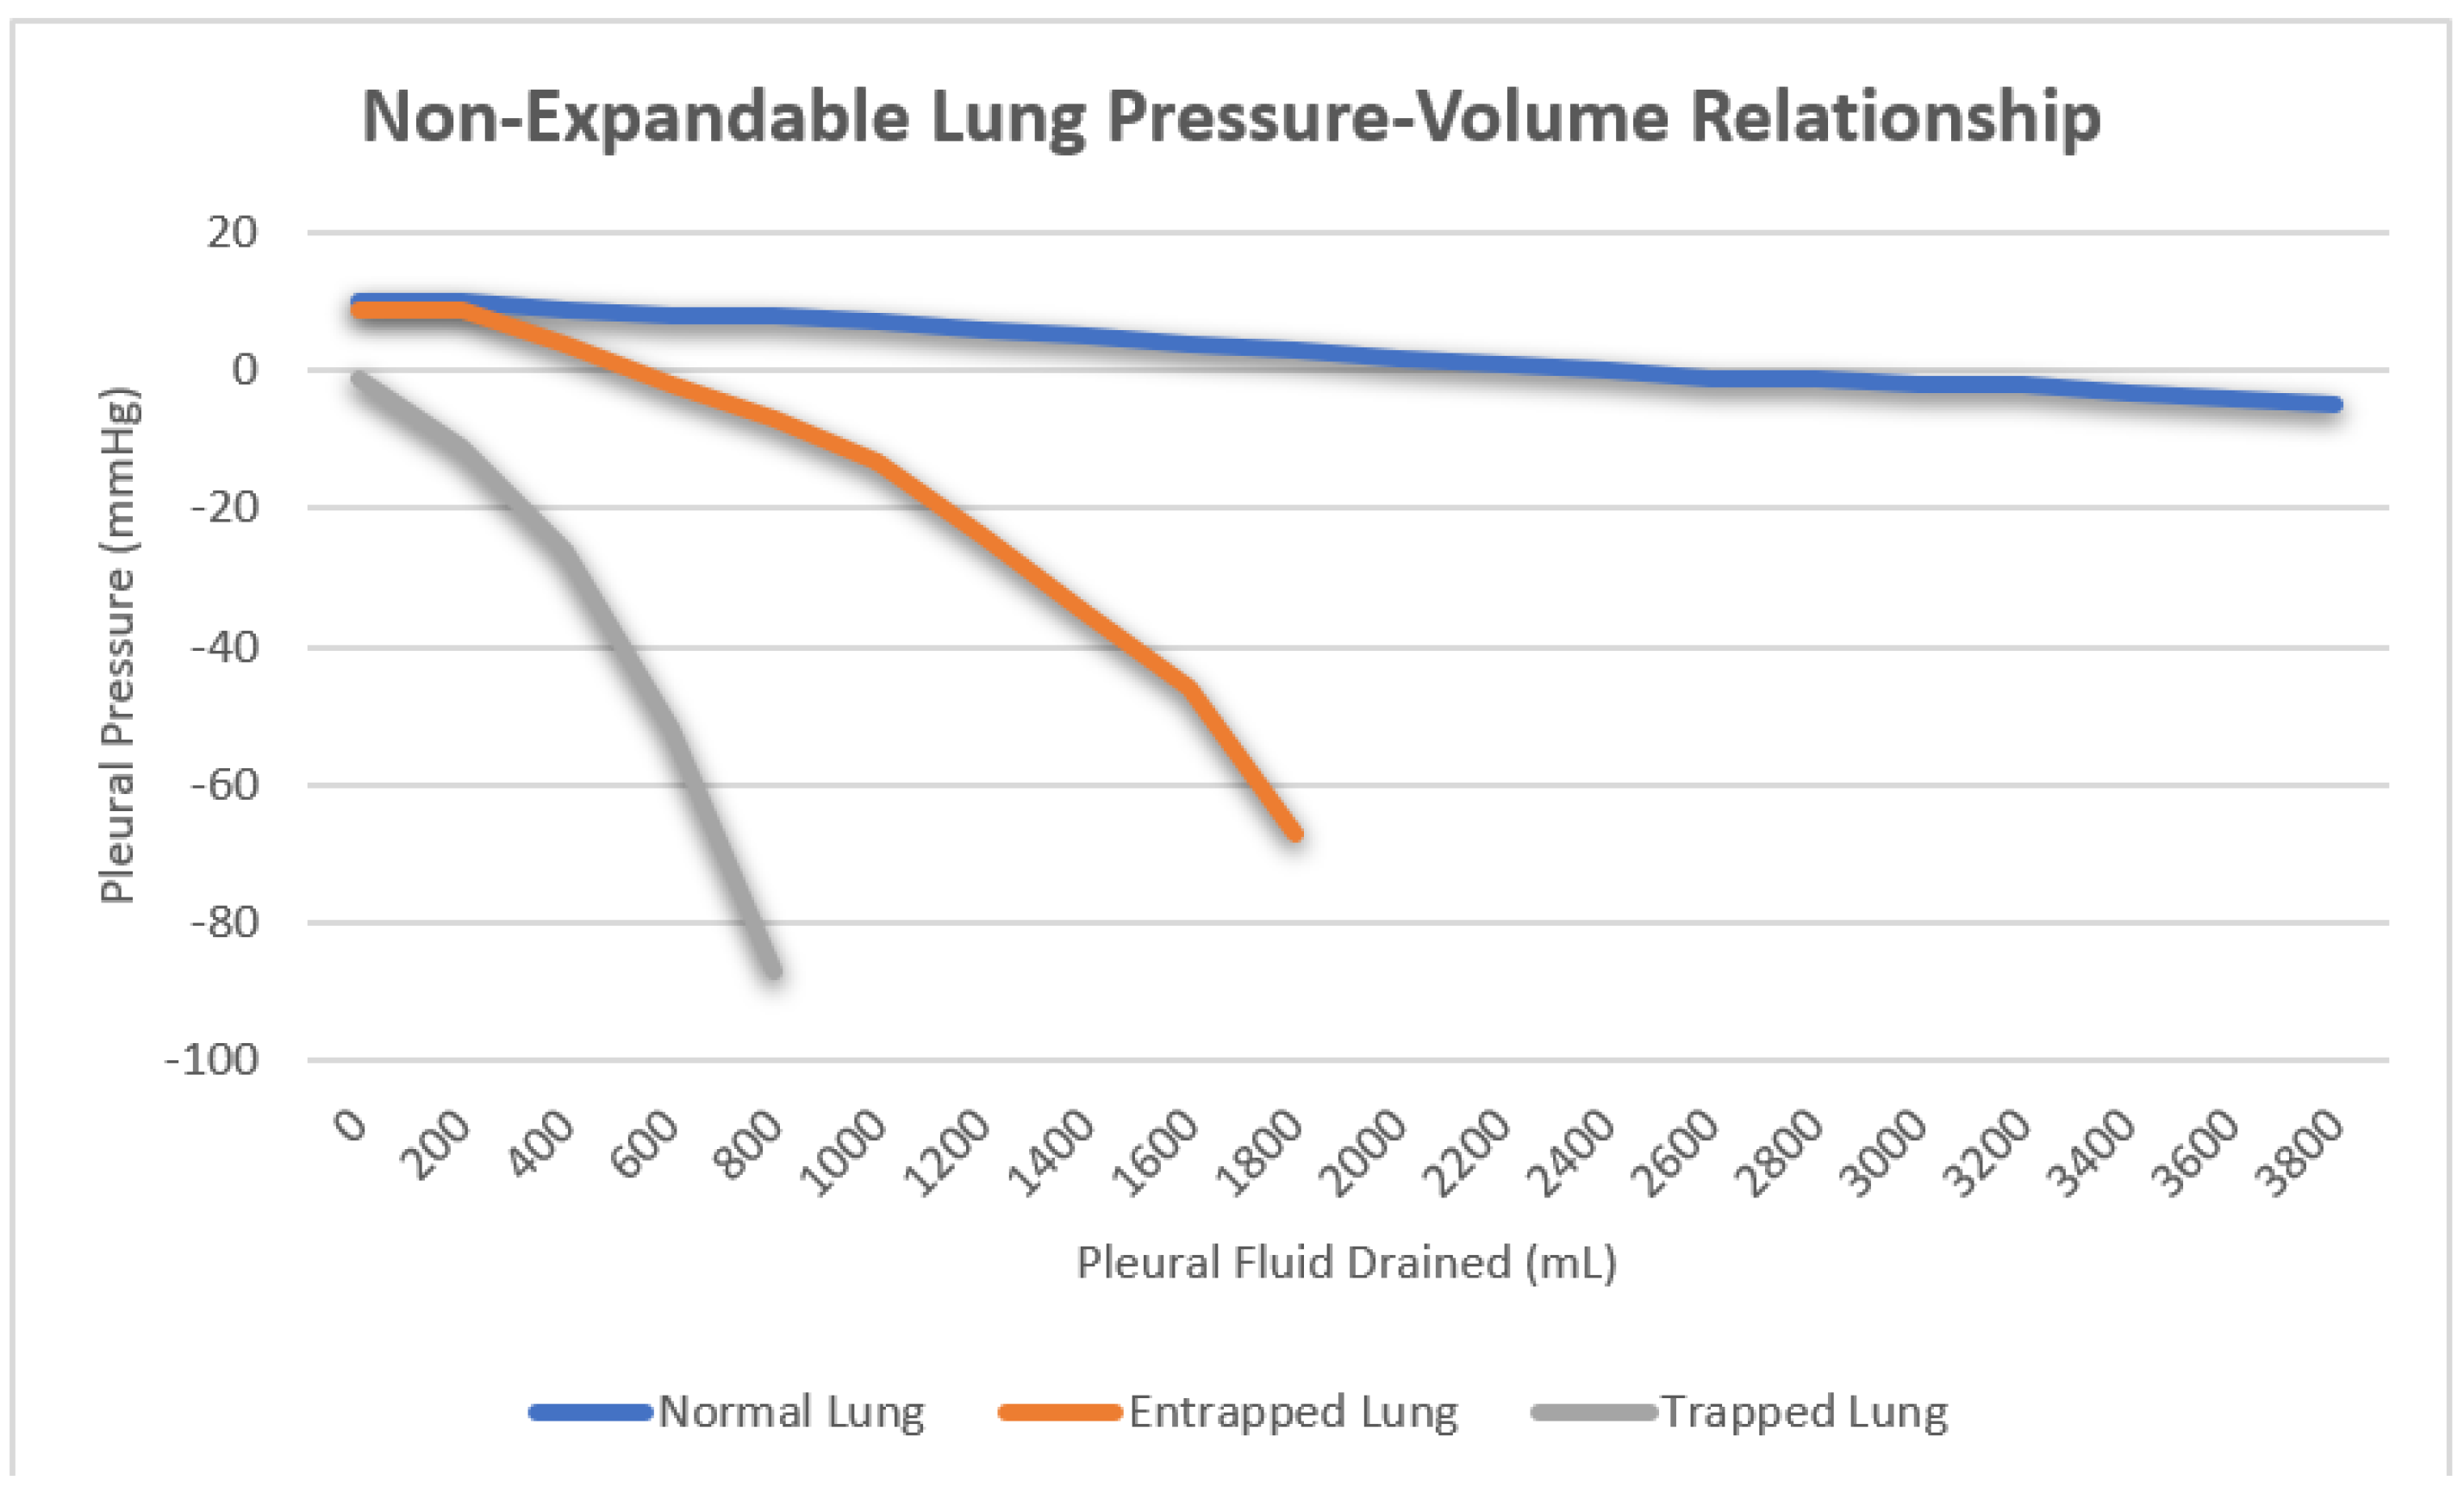
Once the catheter is appropriately positioned within the pleural space, pleural manometry can be conducted using one of three methods. The original U-tube water manometry technique has fallen out of favor due to the improved ease and accuracy of more modern approaches. Hemodynamic electronic transducers and digital manometers have replaced U-tube water manometry, with hemodynamic electronic transducers emerging as the preferred method. All three methods offer pleural pressure measurements throughout the drainage process, which prove valuable for evaluating a non-expandable lung
[10]. Non-expandable lung can be further categorized into lung entrapment and trapped lungs. In a healthy lung, the initial pleural pressure is positive, exhibiting a minimal decrease during fluid aspiration as the lung re-expands to occupy the space previously occupied by pleural effusion. Lung entrapment arises from visceral restriction due to an active pleural inflammatory process. Initially, the pleural pressure is positive and experiences a slight decrease as the lung re-expands, mirroring normal lung behavior. However, the progressive visceral restriction eventually prevents full lung re-expansion, causing a sharp drop in pleural pressure after fluid removal surpasses the point of maximum lung expansion. This phenomenon typically manifests after draining larger volumes in the range of one or more liters. Conversely, a trapped lung results from visceral thickening due to impaired pleural space healing resulting from a remote pleural process. Here, lung re-expansion is severely limited, creating a vacuum within the pleural space. Consequently, the initial pleural pressure is negative, and its sharp decline occurs rapidly with minimal fluid removal, often as little as 50–100 mL of fluid (
Figure 1). Pleural manometry has also been proposed as a method to reduce the risk of re-expansion pulmonary edema following large volume thoracentesis. There are currently no data supporting the use of pleural manometry to affect any patient-related outcomes, and its use is strictly academic
[10].
Figure 1. Three distinct pressure/volume curves representing the mean pleural pressure as volume is removed from the pleural space in normal lung, lung entrapment and trapped lung respectively.
4.5. Sample Collection
As pleural fluid is withdrawn for analysis, its appearance should be documented. Terms such as serous, blood-tinged, serosanguinous, frank blood, purulent, frank pus, turbid, and milky can provide preliminary insights into the underlying cause even before formal analysis. It is advisable to collect three distinct samples for microbiological, biochemical, and cytological examinations. In cases of diagnostic thoracentesis, where the aspirated fluid is limited, judiciously distribute the fluid among these samples. Following British Thoracic Society recommendations, microbiological analysis necessitates only 5–10 mL, biochemical analysis requires 2–5 mL, and the remaining portion should be allocated for cytological analysis
[1]. To enhance the yield, specific containers should be used for certain samples, as elaborated in the pleural fluid analysis section. Briefly, microbiological samples should be collected in both aerobic and anaerobic blood culture bottles
[11]. For pH analysis, fluid should be collected in arterial blood gas syringes on ice and analyzed with a blood gas analyzer
[12]. Cytology samples are best preserved in clear, plain containers, while biochemical samples can be collected in plain containers or serum blood collection tubes
[1].
4.6. Fluid Drainage
When performing therapeutic thoracentesis to drain large-volume pleural effusions, the drainage speed and volume should be approached with caution. A slower removal rate is theoretically preferred to promote gradual lung re-expansion and mitigate the risk of re-expansion pulmonary edema. Multiple options for drainage include gravity drainage, hand syringe drainage via a three way stop-cock, and wall suction and vacuum bottle drainage
[6]. There are no consensus recommendations for one method over the other, and much controversy exists regarding the preferred method. The maximum allowable drainage volume remains a topic of debate as well. Historically, a recommended upper limit of 1.5 L was advised for removal in a single thoracentesis. Larger drainage volumes were linked to increased incidence of re-expansion pulmonary edema and post-procedure pneumothorax. There is considerable mortality risk associated with re-expansion pulmonary edema and the robust evidence supporting minimal complication rates when draining less than 1.5 L
[1][13]. Yet, studies have indicated reasonable safety even with larger drainage volumes, reaching up to 6.5 L in certain instances
[10]. Irrespective of the drainage volume chosen, the thoracentesis should be promptly stopped if the patient develops chest pain, tightness, or breathlessness, as these symptoms might herald impending re-expansion pulmonary edema. Additionally, the procedure should be concluded once no more fluid can be effectively aspirated.
4.7. Needle Removal and Dressing
After the completion of fluid aspiration, the catheter can be safely removed. To prevent air entry into the pleural space, the patient should be guided to perform a maneuver that raises intrathoracic pressure as the catheter is withdrawn. This can be achieved by instructing the patient to hum continuously while the catheter is being removed. As the catheter is withdrawn, the humming assists in expelling any air present in the pleural space. Once the catheter has been successfully removed, a sterile dressing should be applied to the puncture site for proper wound care
[6].
5. Post-Procedural Care
Routine post-procedural chest radiography is not necessary following an uncomplicated thoracentesis
[1]. However, it is advisable if the patient continues to experience respiratory symptoms after the procedure, if multiple attempts were made during the aspiration, or if the operator perceives any complications. Interestingly, studies have shown that clinicians’ predictions of pneumothorax occurrence post-thoracentesis are quite accurate
[14]. Despite this, many clinicians still opt for routine post-procedural imaging. Exceptions exist, such as in determining the next steps for malignant effusions, but these nuances are beyond the scope of this research
[15]. An alternative approach which is gaining traction involves using thoracic ultrasound both before and after the procedure to confirm the presence of lung sliding, effectively ruling out a post-procedural pneumothorax. After the procedure, it is recommended to monitor vital signs and observe the patient for a brief period. Although there is no specific guideline for the duration of monitoring, patients without complications or symptoms typically do not require extended observation.
6. Complications
The three primary complications associated with thoracentesis are pneumothorax, hemothorax, and re-expansion pulmonary edema
[14]. Both operator experience and ultrasound guidance have been shown to reduce the incidence of these complications
[1].
Pneumothorax is the most frequent complication, with reported incidences varying across studies. Historically, the rate was around 18%, but with ultrasound guidance, this has decreased to approximately 3%. Recent estimates suggest an incidence of 0–6%, although pinpointing the exact incidence is challenging due to factors like a non-expandable lung and inadvertent air introduction. Management of post-thoracentesis pneumothorax ranges from chest tube placement (34.1% in one review) to conservative medical approaches, depending on the case. Overall, less than 2% of all thoracenteses require tube thoracostomy due to a complication
[14].
Hemothorax, a rare but serious complication, occurs in less than 1% of cases. The risk can be minimized by selecting the puncture site at the superior rib margin. While Doppler ultrasound aids in identifying and preventing intercostal artery laceration, its impact on reducing bleeding complications remains uncertain.
Re-expansion pulmonary edema, marked by new alveolar infiltrates and hypoxemia within 24 h of the procedure, is an infrequent occurrence (less than 1%). Though asymptomatic cases are more common, symptomatic instances carry a substantial mortality rate of around 20%
[13]. Several treatments, including continuous positive airway pressure, diuretics, and steroids, are used for symptomatic re-expansion pulmonary edema, but their efficacy is not strongly supported by data.
This entry is adapted from the peer-reviewed paper 10.3390/jor3040020