Tensile testing, also known as tension testing, is a fundamental materials science and engineering test in which a sample is subjected to a controlled tension until failure. Properties that are directly measured via a tensile test are ultimate tensile strength, breaking strength, maximum elongation and reduction in area. From these measurements the following properties can also be determined: Young's modulus, Poisson's ratio, yield strength, and strain-hardening characteristics. Uniaxial tensile testing is the most commonly used for obtaining the mechanical characteristics of isotropic materials. Some materials use biaxial tensile testing. The main difference between these testing machines being how load is applied on the materials.
- biaxial tensile
- tensile testing
- materials science
1. Purposes of Tensile Testing
Tensile testing might have a variety of purposes, such as:
- Select a material or item for an application
- Predict how a material will perform in use: normal and extreme forces.
- Determine if, or verify that, the requirements of a specification, regulation, or contract are met
- Decide if a new product development program is on track
- Demonstrate proof of concept
- Demonstrate the utility of a proposed patent
- Provide standard data for other scientific, engineering, and quality assurance functions
- Provide a basis for Technical communication
- Provide a technical means of comparison of several options
- Provide evidence in legal proceedings
2. Tensile Specimen


The preparation of test specimens depends on the purposes of testing and on the governing test method or specification. A tensile specimen usually has a standardized sample cross-section. It has two shoulders and a gauge (section) in between. The shoulders and grip section are generally larger than the gauge section by 33% [1] so they can be easily gripped. The gauge section's smaller diameter also allows the deformation and failure to occur in this area.[2][3]
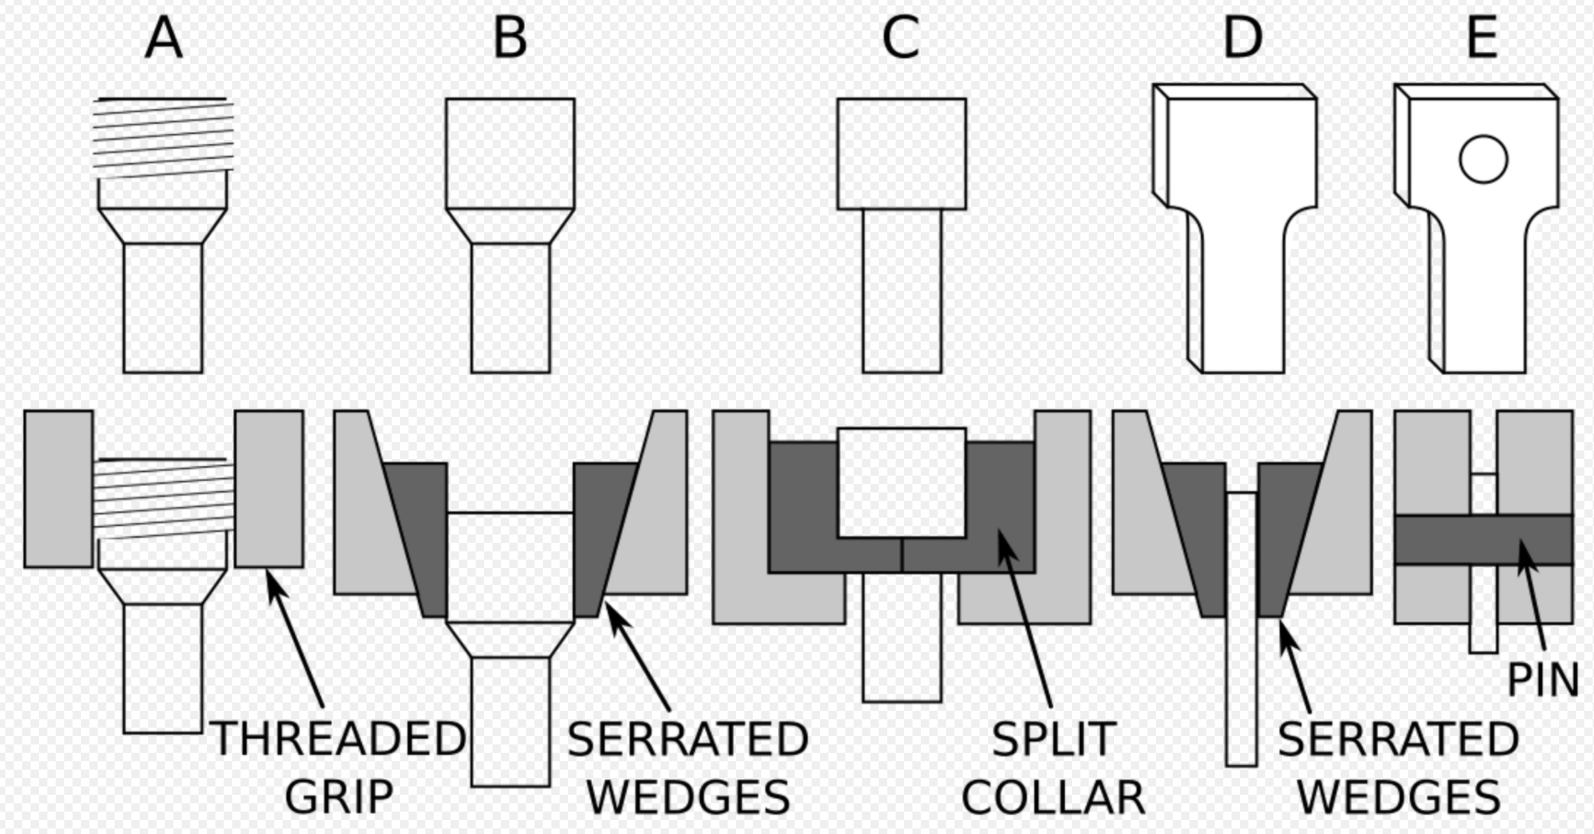
The shoulders of the test specimen can be manufactured in various ways to mate to various grips in the testing machine (see the image below). Each system has advantages and disadvantages; for example, shoulders designed for serrated grips are easy and cheap to manufacture, but the alignment of the specimen is dependent on the skill of the technician. On the other hand, a pinned grip assures good alignment. Threaded shoulders and grips also assure good alignment, but the technician must know to thread each shoulder into the grip at least one diameter's length, otherwise the threads can strip before the specimen fractures.[4]
In large castings and forgings it is common to add extra material, which is designed to be removed from the casting so that test specimens can be made from it. These specimens may not be exact representation of the whole workpiece because the grain structure may be different throughout. In smaller workpieces or when critical parts of the casting must be tested, a workpiece may be sacrificed to make the test specimens.[5] For workpieces that are machined from bar stock, the test specimen can be made from the same piece as the bar stock.
For soft and porous materials, like electrospun nonwovens made of nanofibers, the specimen is usually a sample strip supported by a paper frame to favour its mounting on the machine and to avoid membrane damaging.[6][7]

A. A Threaded shoulder for use with a thread
B. A round shoulder for use with serrated grips
C. A butt end shoulder for use with a split collar
D. A flat shoulder for used with serrated grips
E. A flat shoulder with a through hole for a pinned grip

The repeatability of a testing machine can be found by using special test specimens meticulously made to be as similar as possible.[5]
A standard specimen is prepared in a round or a square section along the gauge length, depending on the standard used. Both ends of the specimens should have sufficient length and a surface condition such that they are firmly gripped during testing. The initial gauge length Lo is standardized (in several countries) and varies with the diameter (Do) or the cross-sectional area (Ao) of the specimen as listed
| Type specimen | United States(ASTM) | Britain | Germany |
|---|---|---|---|
| Sheet ( Lo / √Ao) | 4.5 | 5.65 | 11.3 |
| Rod ( Lo / Do) | 4.0 | 5.00 | 10.0 |
The following tables gives examples of test specimen dimensions and tolerances per standard ASTM E8.
| All values in inches | Plate type (1.5 in. wide) | Sheet type (0.5 in. wide) | Sub-size specimen (0.25 in. wide) |
|---|---|---|---|
| Gauge length | 8.00±0.01 | 2.00±0.005 | 1.000±0.003 |
| Width | 1.5 +0.125–0.25 | 0.500±0.010 | 0.250±0.005 |
| Thickness | 0.188 ≤ T | 0.005 ≤ T ≤ 0.75 | 0.005 ≤ T ≤ 0.25 |
| Fillet radius (min.) | 1 | 0.25 | 0.25 |
| Overall length (min.) | 18 | 8 | 4 |
| Length of reduced section (min.) | 9 | 2.25 | 1.25 |
| Length of grip section (min.) | 3 | 2 | 1.25 |
| Width of grip section (approx.) | 2 | 0.75 | 3⁄8 |
| All values in inches | Standard specimen at nominal diameter: | Small specimen at nominal diameter: | |||
|---|---|---|---|---|---|
| 0.500 | 0.350 | 0.25 | 0.160 | 0.113 | |
| Gauge length | 2.00±0.005 | 1.400±0.005 | 1.000±0.005 | 0.640±0.005 | 0.450±0.005 |
| Diameter tolerance | ±0.010 | ±0.007 | ±0.005 | ±0.003 | ±0.002 |
| Fillet radius (min.) | 3⁄8 | 0.25 | 5⁄16 | 5⁄32 | 3⁄32 |
| Length of reduced section (min.) | 2.5 | 1.75 | 1.25 | 0.75 | 5⁄8 |
3. Equipment

Tensile testing is most often carried out at a material testing laboratory. The ASTM D638 is among the most common tensile testing protocols. The ASTM D638 measures plastics tensile properties including ultimate tensile strength, yield strength, elongation and Poisson's ratio.
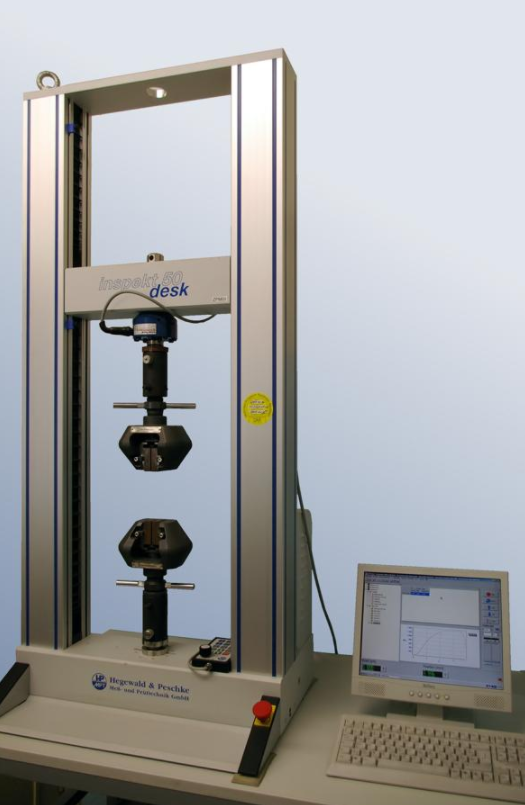
The most common testing machine used in tensile testing is the universal testing machine. This type of machine has two crossheads; one is adjusted for the length of the specimen and the other is driven to apply tension to the test specimen. There are two types: hydraulic powered and electromagnetically powered machines.[3]
The electromechanical machine uses an electric motor, gear reduction system and one, two or four screws to move the crosshead up or down. A range of crosshead speeds can be achieved by changing the speed of the motor. The speed of the crosshead, and consequently the load rate, can be controlled by a microprocessor in the closed-loop servo controller. A hydraulic testing machine uses either a single- or dual-acting piston to move the crosshead up or down. Manually operated testing systems are also available. Manual configurations require the operator to adjust a needle valve in order to control the load rate. A general comparison shows that the electromechanical machine is capable of a wide range of test speeds and long crosshead displacements, whereas the hydraulic machine is a cost-effective solution for generating high forces.[9]
The machine must have the proper capabilities for the test specimen being tested. There are four main parameters: force capacity, speed, precision and accuracy. Force capacity refers to the fact that the machine must be able to generate enough force to fracture the specimen. The machine must be able to apply the force quickly or slowly enough to properly mimic the actual application. Finally, the machine must be able to accurately and precisely measure the gauge length and forces applied; for instance, a large machine that is designed to measure long elongations may not work with a brittle material that experiences short elongations prior to fracturing.[4]
Alignment of the test specimen in the testing machine is critical, because if the specimen is misaligned, either at an angle or offset to one side, the machine will exert a bending force on the specimen. This is especially bad for brittle materials, because it will dramatically skew the results. This situation can be minimized by using spherical seats or U-joints between the grips and the test machine.[4] If the initial portion of the stress–strain curve is curved and not linear, it indicates the specimen is misaligned in the testing machine.[10]
The strain measurements are most commonly measured with an extensometer, but strain gauges are also frequently used on small test specimen or when Poisson's ratio is being measured.[4] Newer test machines have digital time, force, and elongation measurement systems consisting of electronic sensors connected to a data collection device (often a computer) and software to manipulate and output the data. However, analog machines continue to meet and exceed ASTM, NIST, and ASM metal tensile testing accuracy requirements, continuing to be used today.
4. Process


The test process involves placing the test specimen in the testing machine and slowly extending it until it fractures. During this process, the elongation of the gauge section is recorded against the applied force. The data is manipulated so that it is not specific to the geometry of the test sample. The elongation measurement is used to calculate the engineering strain, ε, using the following equation:[3]
- [math]\displaystyle{ \varepsilon =\frac{\Delta L}{L_0}=\frac{L-L_0}{L_0} }[/math]
where ΔL is the change in gauge length, L0 is the initial gauge length, and L is the final length. The force measurement is used to calculate the engineering stress, σ, using the following equation:[3]
- [math]\displaystyle{ \sigma = \frac{F_n}{A} }[/math]
where F is the tensile force and A is the nominal cross-section of the specimen. The machine does these calculations as the force increases, so that the data points can be graphed into a stress–strain curve.[3]
When dealing with porous and soft materials, as electrospun nanofibrous membranes, the application of the above stress formula is problematic. The membrane thickness, indeed, is dependent on the pressure applied during its measurement, leading to variable thicknesses value. As a consequence, the obtained stress-strain curves show high variability. In this case, the normalization of load with respect to the specimen mass instead of the cross-section area (A) is recommended to obtain reliable tensile results.[11]
5. Tensile Testing Creep
Tensile testing can be used to test creep in materials, a slow plastic deformation of the material from constant applied stresses over extended periods of time. Creep is generally aided by diffusion and dislocation movement. While there are many ways to test creep, tensile testing is useful for materials such as concrete and ceramics that behave differently in tension and compression, and thus possess different tensile and compressive creep rates. As such, understanding the tensile creep is important in the design of concrete for structures that experience tension, such as water holding containers, or for general structural integrity.[12]
Tensile testing of creep generally follows the same testing process as standard testing albeit generally at lower stresses to remain in the creep domain rather than plastic deformation. Additionally, specialized tensile creep testing equipment may include incorporated high temperature furnace components to aid diffusion.[13] The sample is held at constant temperature and tension, and strain on the material is measured using strain gauges or laser gauges. The measured strain can be fitted with equations governing different mechanisms of creep, such as power law creep or diffusion creep (see creep for more information). Further analysis can be obtained from examining the sample post fracture. Understanding the creep mechanism and rate be able to aid materials selection and design.
It is important to note that sample alignment is important for tensile testing creep. Off centered loading will result in a bending stress being applied to the sample. Bending can be measured by tracking strain on all sides of the sample. The percent bending can then be defined as the difference between strain on one face ([math]\displaystyle{ \varepsilon_1 }[/math]) and the average strain ([math]\displaystyle{ \varepsilon_0 }[/math]): [14]
[math]\displaystyle{ \text{Percent Bending} = \frac{\varepsilon_1 - \varepsilon_0}{\varepsilon_0} \times 100 }[/math]
Percent bending should be under 1% on the wider face of loaded samples, and under 2% on the thinner face. Bending can caused by misalignment on the loading clamp and asymmetric machining of samples.[14]
6. Standards
6.1. Metals
- ASTM E8/E8M-13: "Standard Test Methods for Tension Testing of Metallic Materials" (2013)
- ISO 6892-1: "Metallic materials. Tensile testing. Method of test at ambient temperature" (2009)
- ISO 6892-2: "Metallic materials. Tensile testing. Method of test at elevated temperature" (2011)
- JIS Z2241 Method of tensile test for metallic materials
- MPIF Test Standard 10: "Method for the Tensile Properties of Powder Metallurgy (PM) Materials" Standard Test Methods for Tension Testing of Metallic Materials" (2015)
6.2. Composites
- ASTM D 3039/D 3039M: "Standard Test Method for Tensile Properties of Polymer Matrix Composite Materials"
6.3. Flexible Materials
- ASTM D638 Standard Test Method for Tensile Properties of Plastics
- ASTM D828 Standard test method for tensile properties of paper and paperboard using constant-rate-of-elongation apparatus
- ASTM D882 Standard test method for tensile properties of thin plastic sheeting
- ISO 37 rubber, vulcanized or thermoplastic—determination of tensile stress–strain properties
The content is sourced from: https://handwiki.org/wiki/Engineering:Uniaxial_tensile_test
References
- Common Material Tests. The Engineering Archive. (n.d.). https://theengineeringarchive.com/material-science/page-common-material-tests.html
- Davis, Joseph R. (2004). Tensile testing (2nd ed.). ASM International. ISBN 978-0-87170-806-9. https://books.google.com/books?id=5uRIb3emLY8C.
- Davis 2004, p. 2.
- Davis 2004, p. 9.
- Davis 2004, p. 8.
- Maccaferri, Emanuele (2021). "How Nanofibers Carry the Load: Toward a Universal and Reliable Approach for Tensile Testing of Polymeric Nanofibrous Membranes". Macromolecular Materials and Engineering. doi:10.1002/mame.202100183. https://dx.doi.org/10.1002%2Fmame.202100183
- How to correctly prepare nanofibrous mat specimens for tensile testing. youtube.com https://www.youtube.com/watch?v=tVnjZ3O_Pjo&ab_channel=EmanueleMaccaferri
- Davis 2004, p. 52.
- Gedney, 2005
- Davis 2004, p. 11.
- Maccaferri, Emanuele (2021). "How Nanofibers Carry the Load: Toward a Universal and Reliable Approach for Tensile Testing of Polymeric Nanofibrous Membranes". Macromolecular Materials and Engineering. doi:10.1002/mame.202100183. https://dx.doi.org/10.1002%2Fmame.202100183
- "Tensile Creep of Concrete: Study of Its Sensitivity to Basic Parameters - ProQuest" (in en). https://www.proquest.com/openview/388d94fe1a31d5eb616b2bc80f91d718/1?pq-origsite=gscholar&cbl=37076&casa_token=DqYesUgZ684AAAAA:9aLapYWso72CQiW3WQCyEihepnVQF1dObg72JLNYQg7onvM9wmr6U4rkG2xLFh8FH8ZmMz2PxB92.
- "Lever Arm Test Systems". https://www.mltest.com/index.php/applied-test-systems/creep-stress-rupture-testing/lever-arm-test-systems.
- Carroll, Daniel F.; Wiederhorn, Sheldon M.; Roberts, D. E. (1989). "Technique for Tensile Creep Testing of Ceramics +" (in en). Journal of the American Ceramic Society 72 (9): 1610–1614. doi:10.1111/j.1151-2916.1989.tb06291.x. ISSN 0002-7820. https://onlinelibrary.wiley.com/doi/10.1111/j.1151-2916.1989.tb06291.x.
