Your browser does not fully support modern features. Please upgrade for a smoother experience.
Please note this is an old version of this entry, which may differ significantly from the current revision.
JL coding is a symmetry language of block-based, to solve the difficulties encountered by novice programmers in the past from block-based to text-based programming and to make it easier for non-programmers to learn text-based programming.
- JLcoding
- object
- functions
- text-based programming
- block-based programming
- early programming learning
1. JLcoding
Compared to Scratch, which has a longer history, JLcoding is a programming language that is still new. JLcoding was launched in 2017 and is an open-source language that combines the interactivity and syntax of “scripting” languages, such as Python, Matlab, and R, but with the speed of “compiled” languages such as Fortran and C [1]. Much of the motivation for the development and use of JLcoding is devoted to solving two language problems that both beginners and professional programmers encounter. In scripting languages such as Python, the user types the code line by line into the editor, and the language interprets and runs it, then returns the result immediately; however, in languages such as C and Fortran, code must be compiled before it can be executed. Scripting languages such as Python are easier to use, whereas languages such as C and Fortran produce faster code. As a result, programmers often develop algorithms in a scripting language, then translate them into C or Fortran. JLcoding can solve the two language problems because it runs similar to C but reads similar to Python [1][2][3].
2. Environment of JLcoding
Figure 1 shows the starting view of the JLcoding. The beginning of JLcoding is the object. The system includes many examples, functions, and templates to help the students quickly understand the logic of coding. The coding environment of JLcoding is shown in Figure 2.
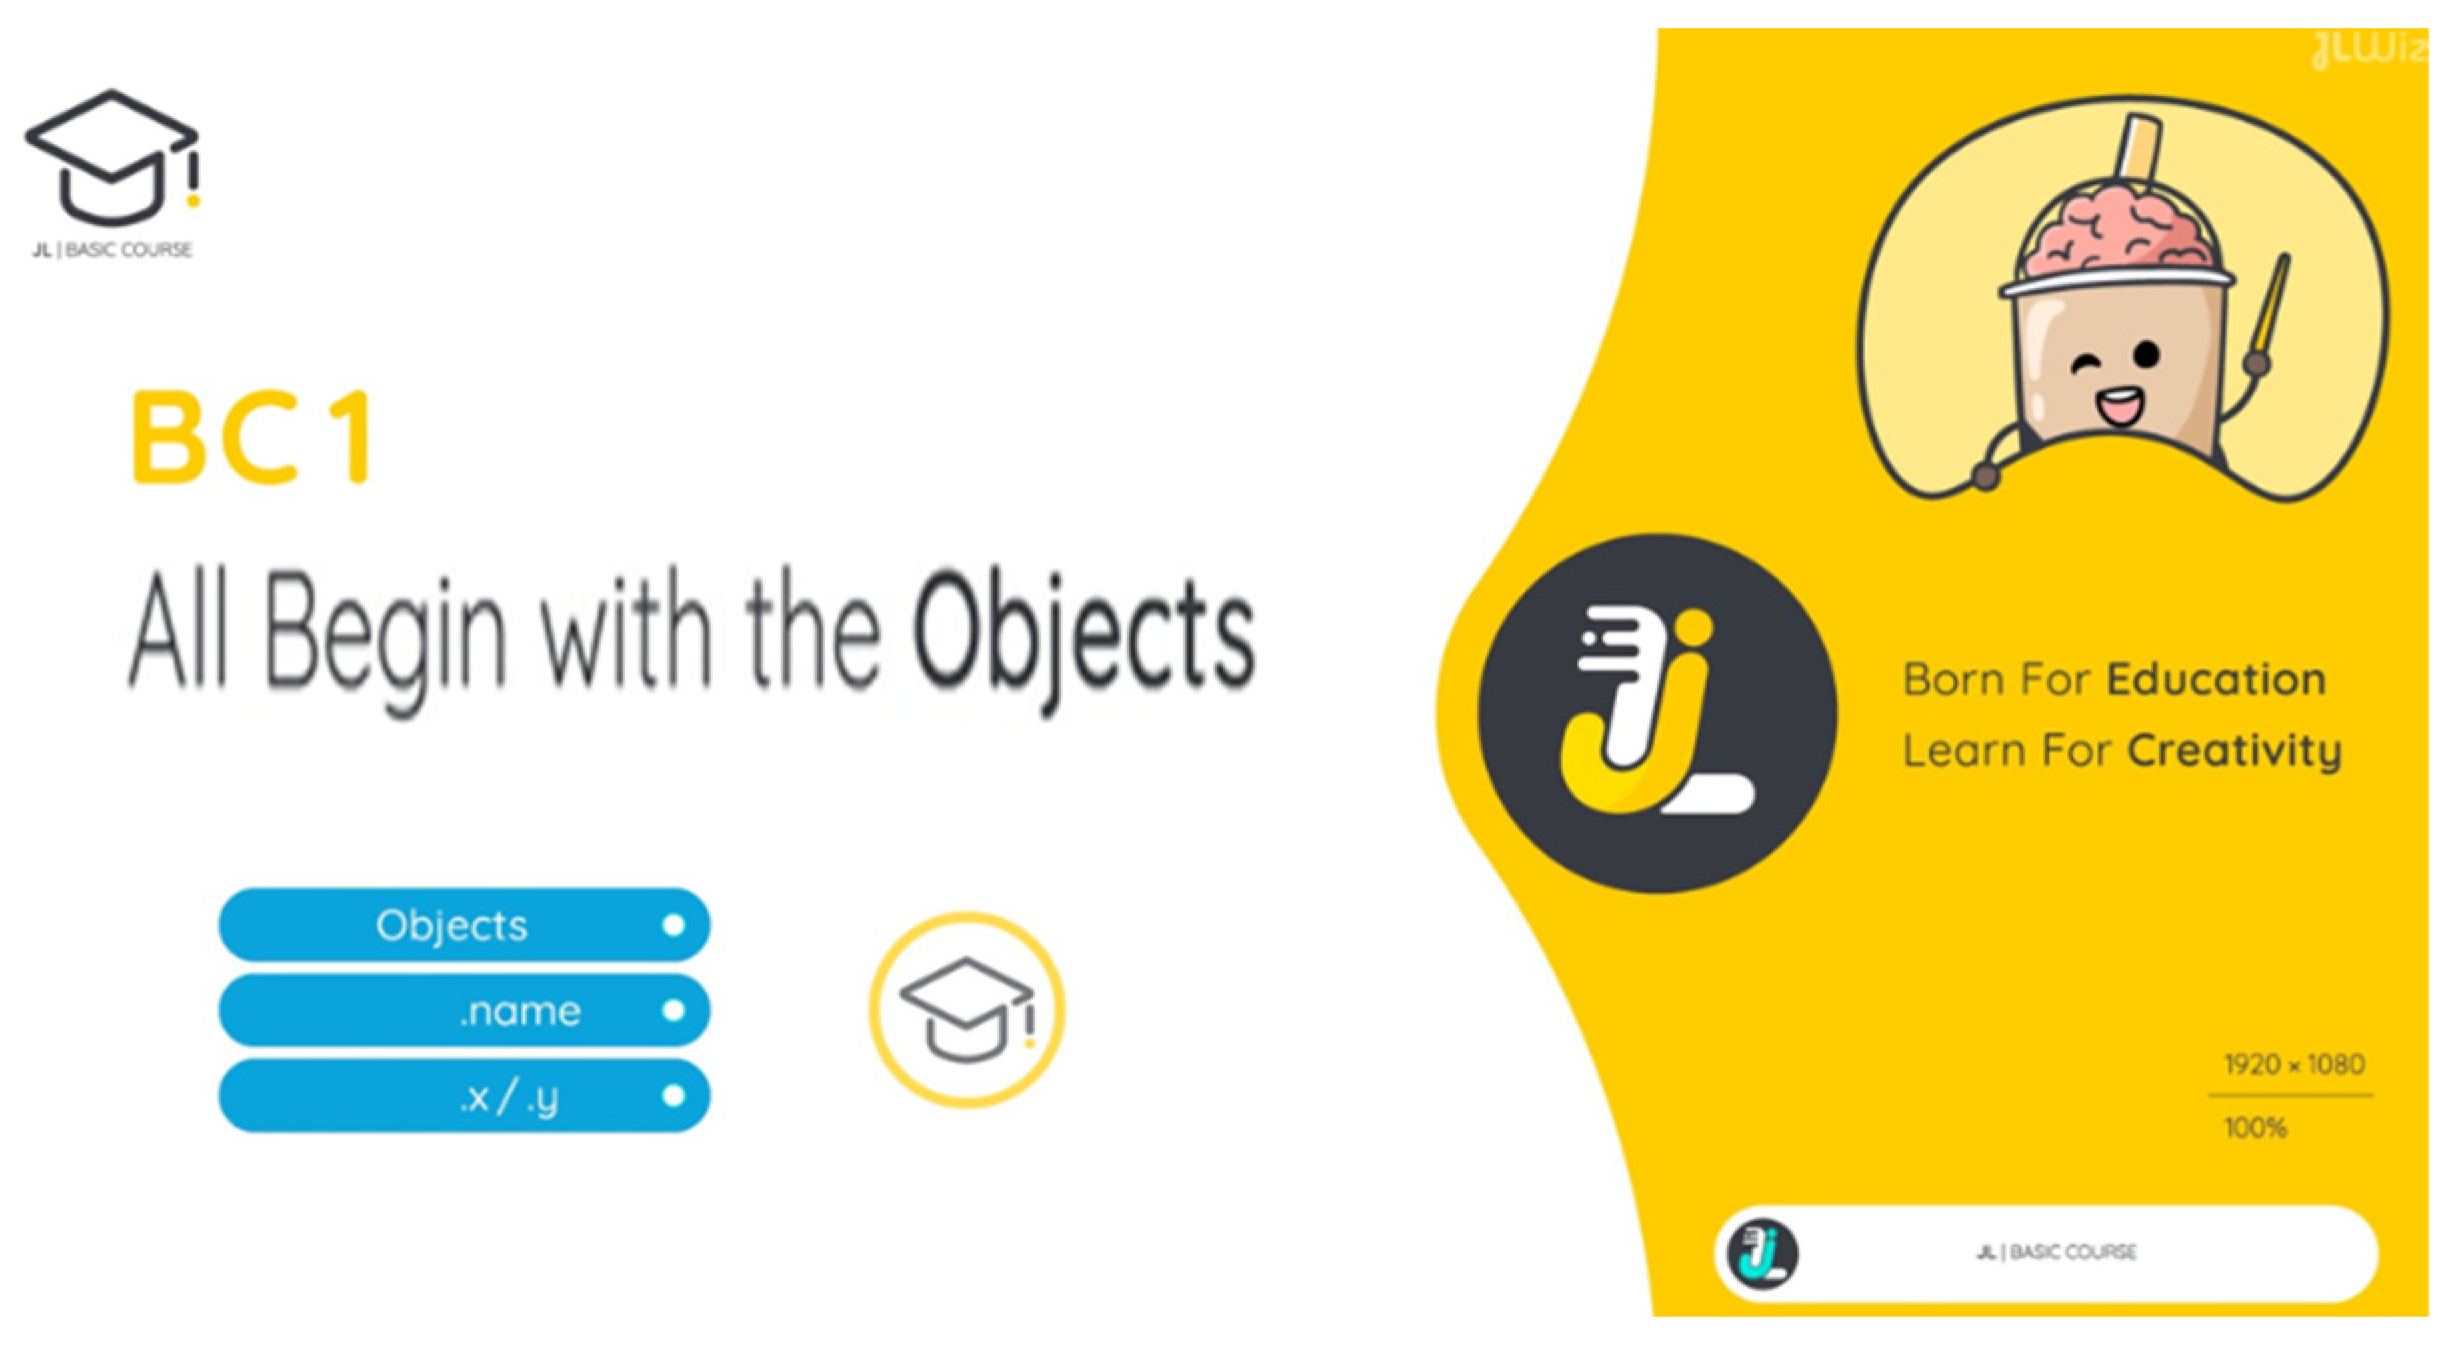
Figure 1. The starting view of JLcoding.
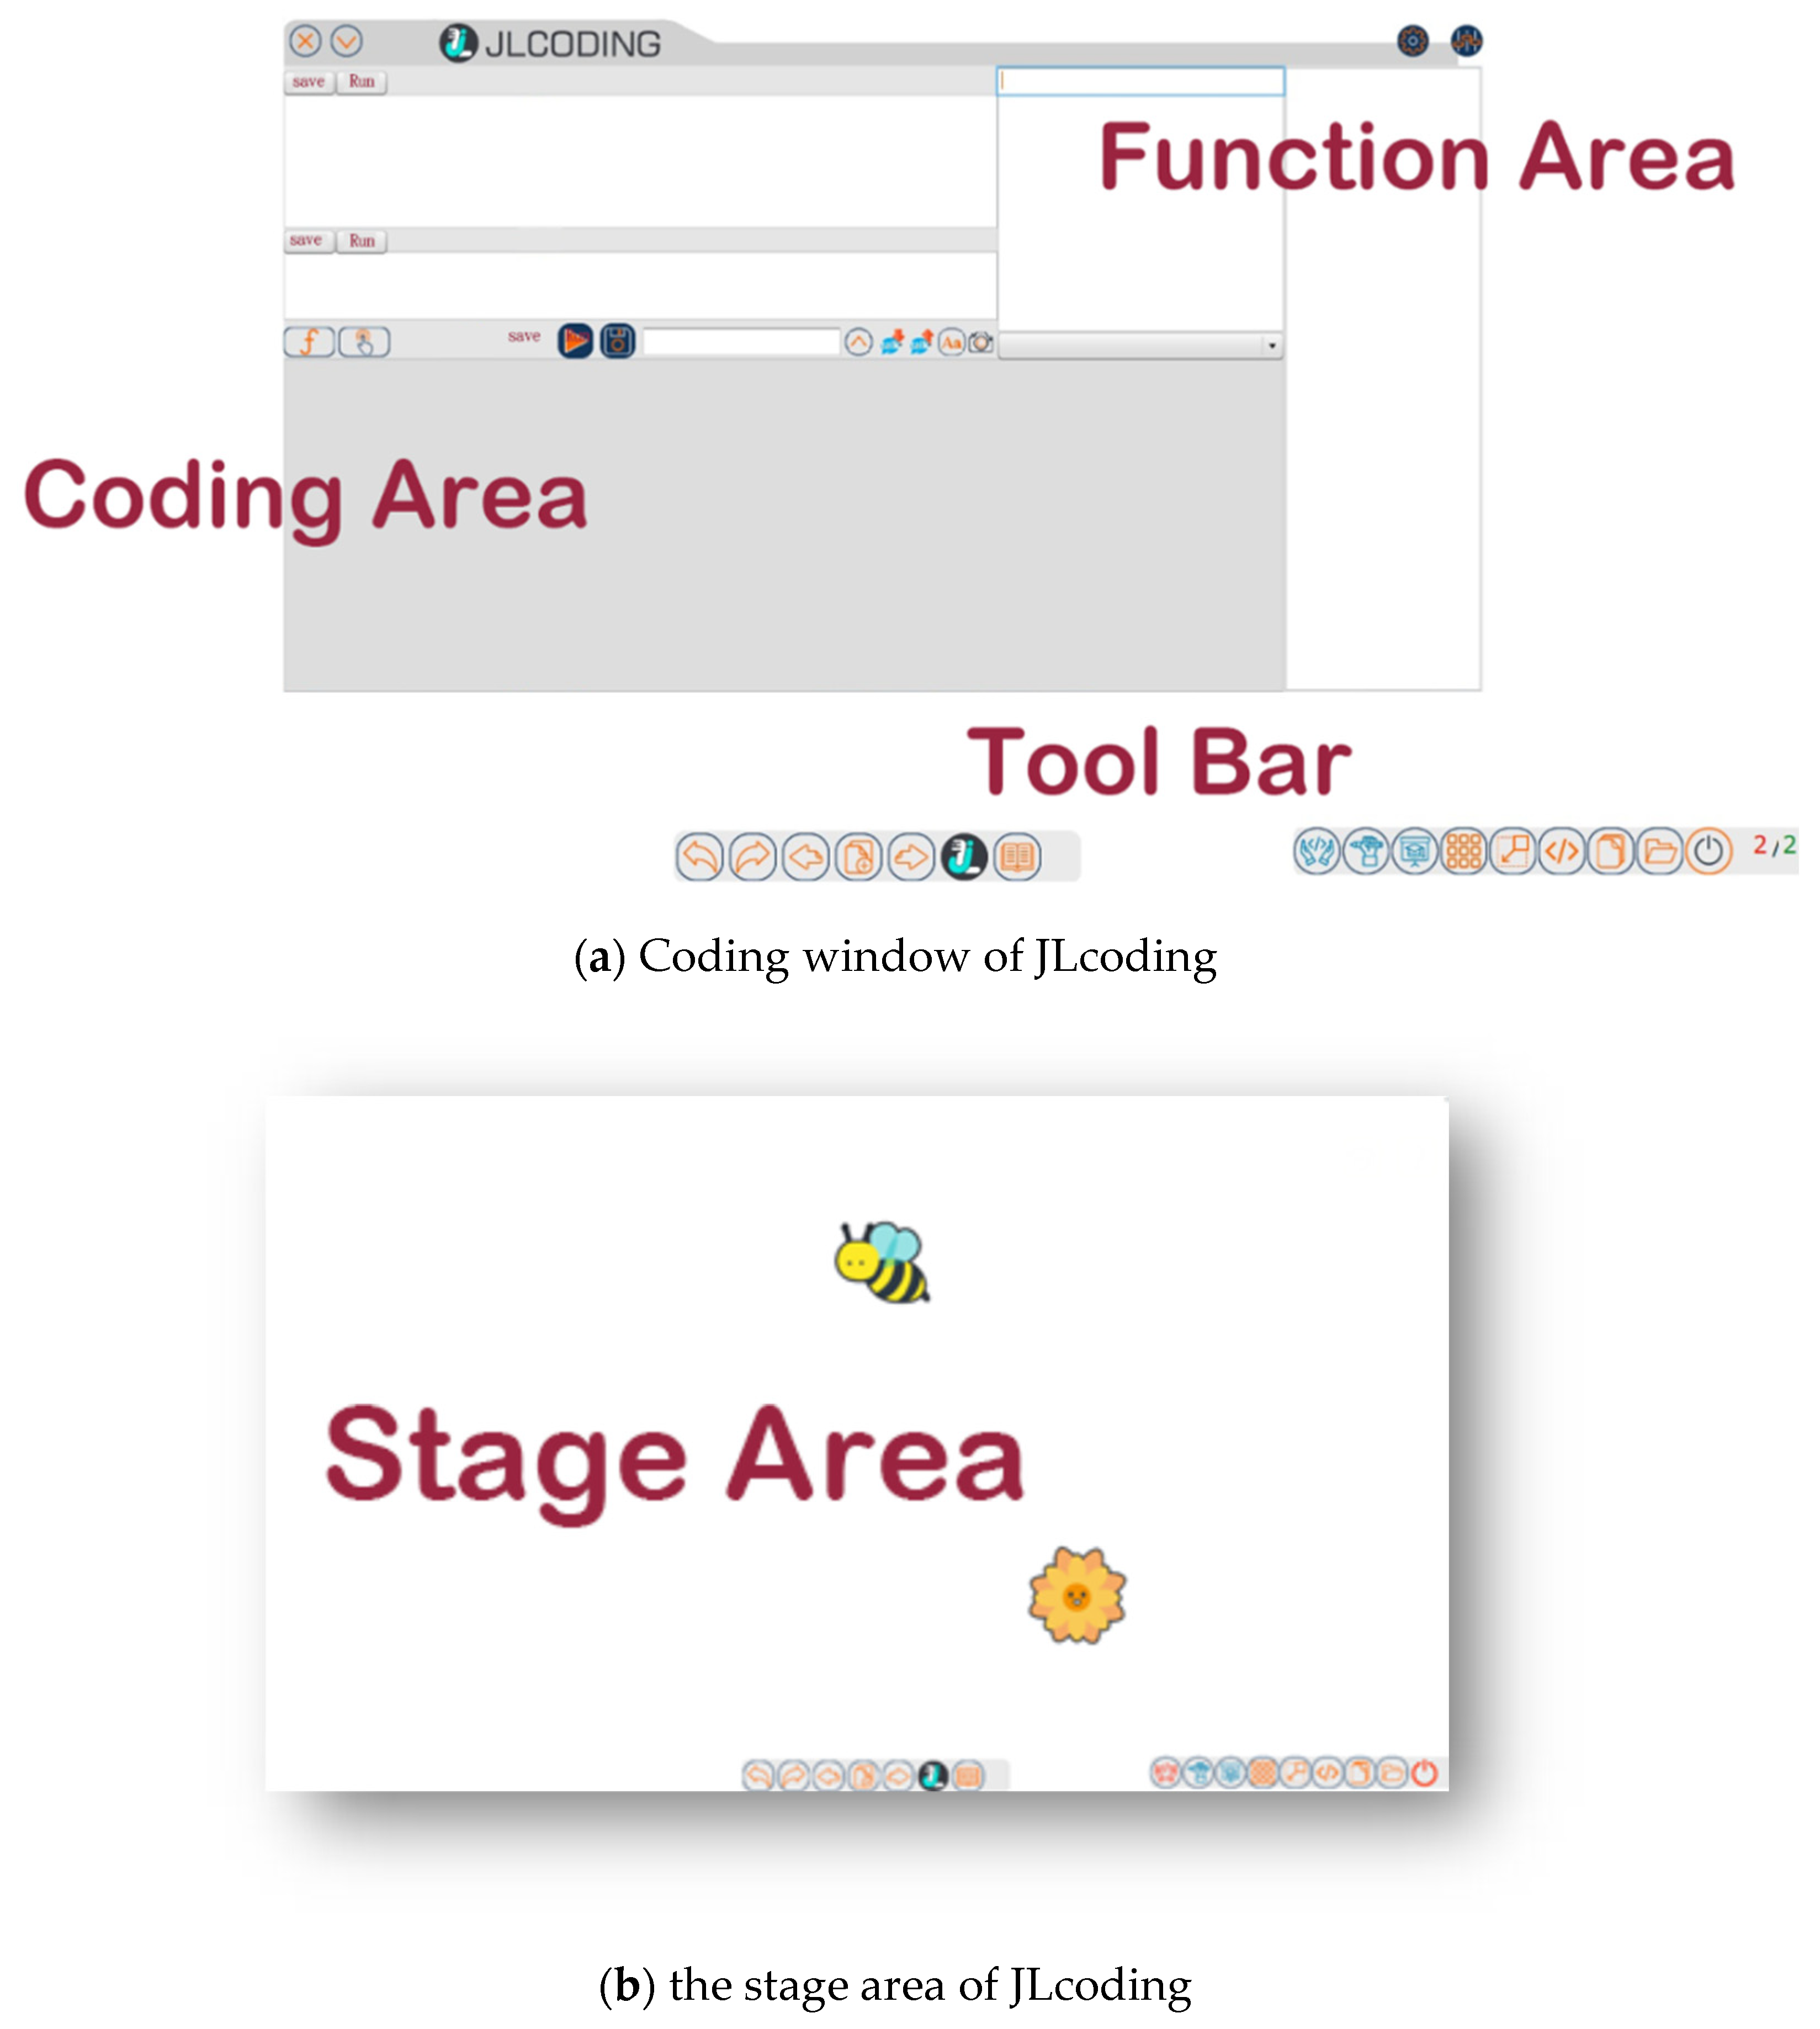
Figure 2. Coding environment of JLcoding.
The coding area in Figure 2a is the main area to type the codes. The function area in Figure 2a gives the entire function used in the coding area. This method finds the keyword from the function area. The code structure of the keyword will be shown in the coding area. The stage area in Figure 2b shows the running results of the codes. For example, in Figure 3, we select the keyword “if” from the function area. The coding area will automatically show the structure of “if”.
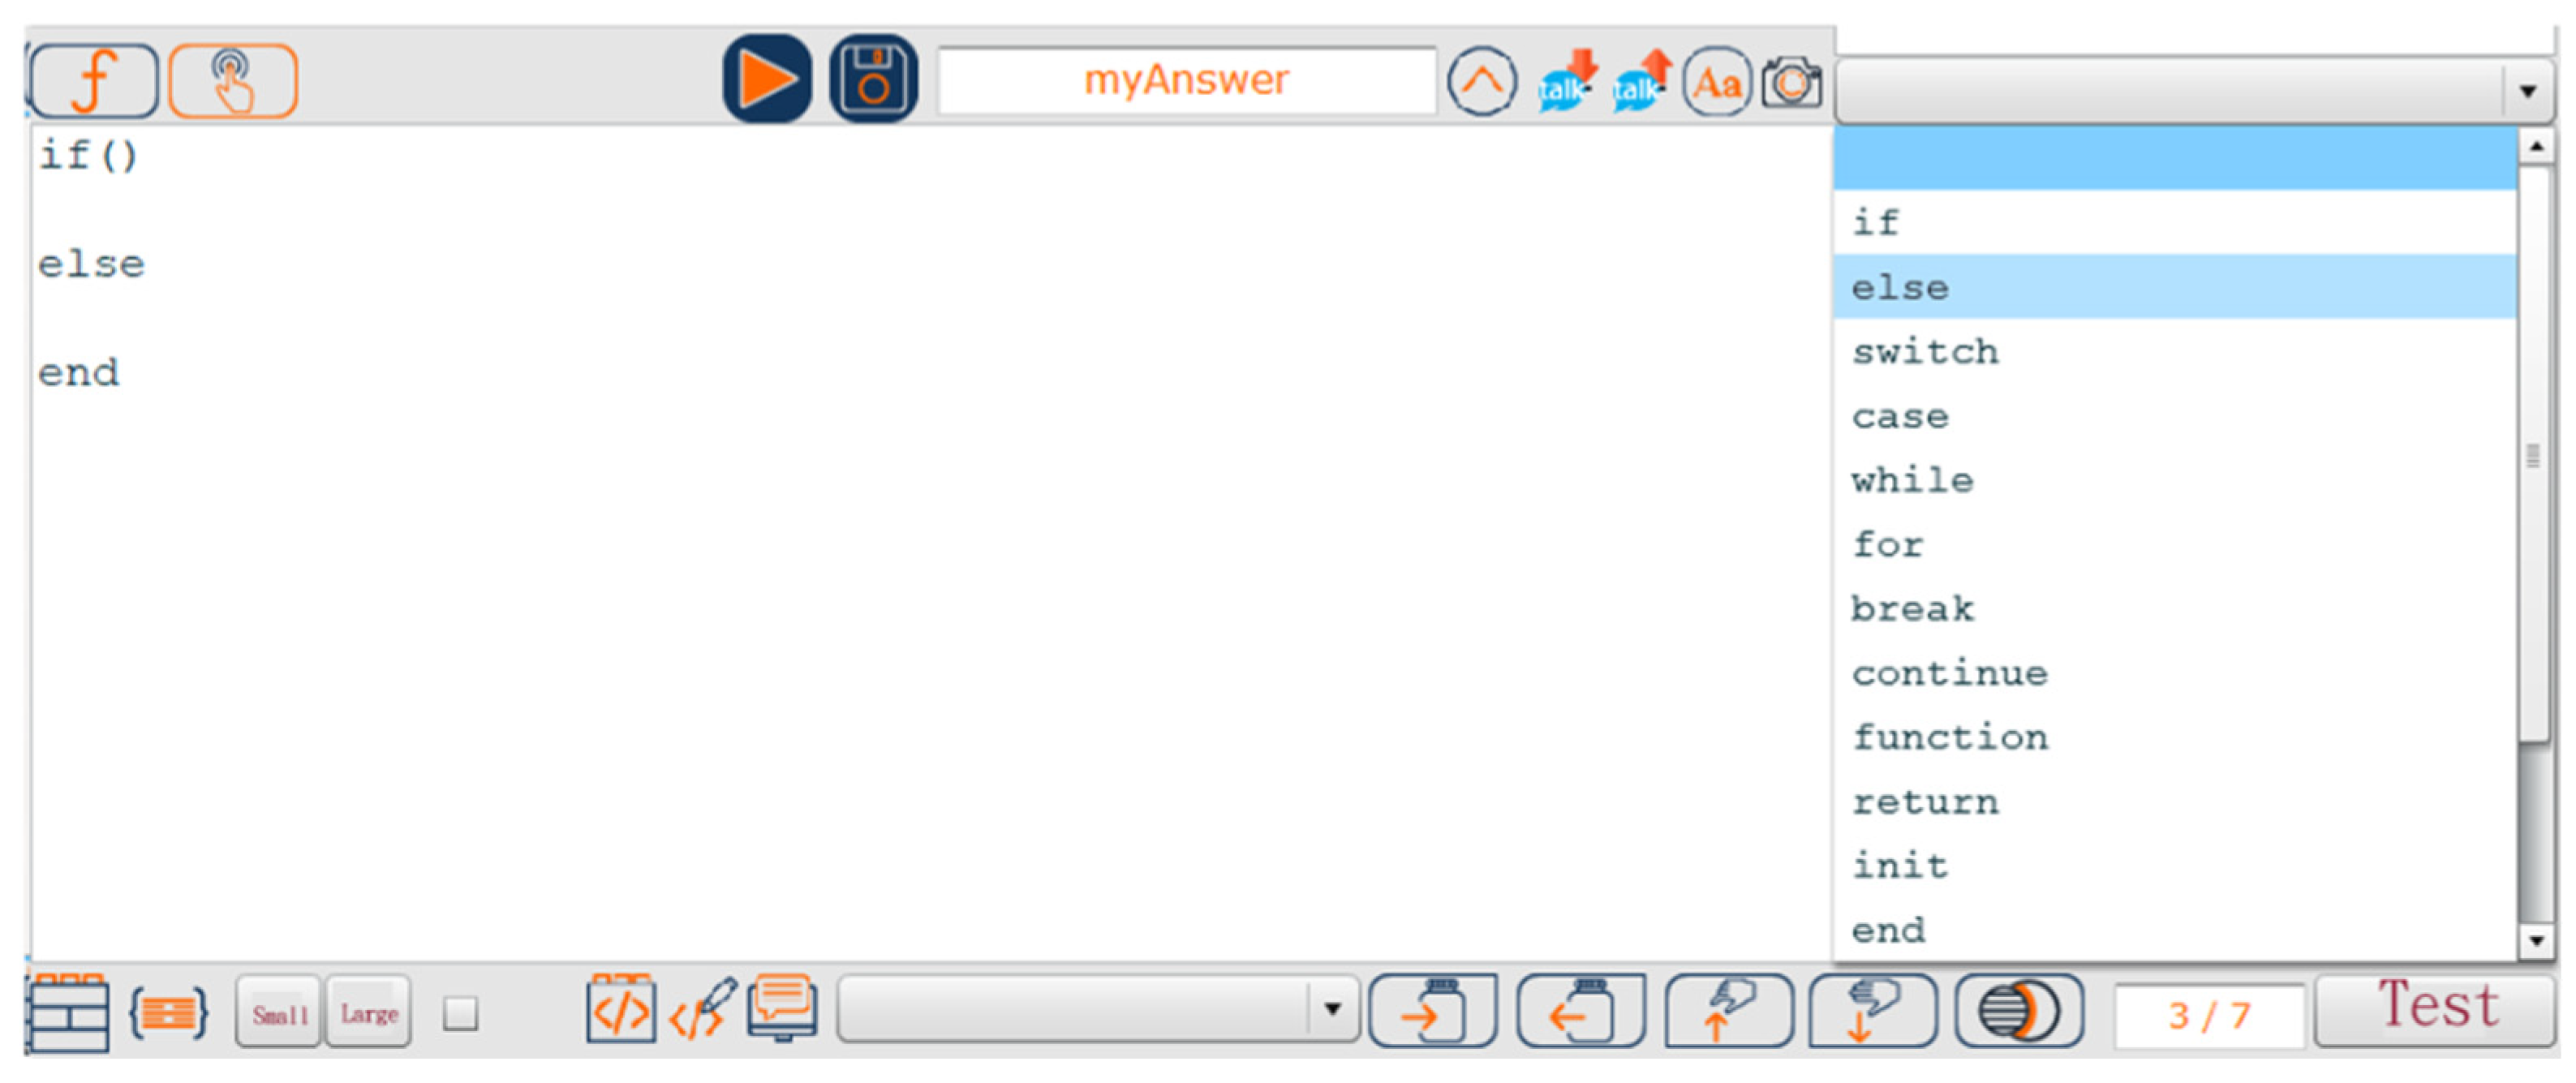
Figure 3. Keywords in the function area.
3. Coding Example of JLcoding
According to the definition of a 12-year national basic education syllabus in Taiwan for junior high school students to learn computer science courses, the students need to understand computer data forms, variables, input/output, arithmetic operations, logical operations, selection structures, and repetition in the field of programming; therefore, this study considers all requirements in the syllabus to design the JLcoding language. After learning the courses, the student has the basic knowledge required to write the program. Typically, the structure of JLcoding is similar to a text-based program such that the student can learn the basic logical structure of text-based programming at the same time.
This sub-section shows some coding examples by using JLcoding and compares them with the coding environment of Scratch.
3.1. Set Variable
The first example demonstrates how to move the object—a bee—from left to right. In Scratch, the block functions “set x to” and “set y to” are used to move the bee from the position (0, 0) to the position (100, 100)—as shown in Figure 4.
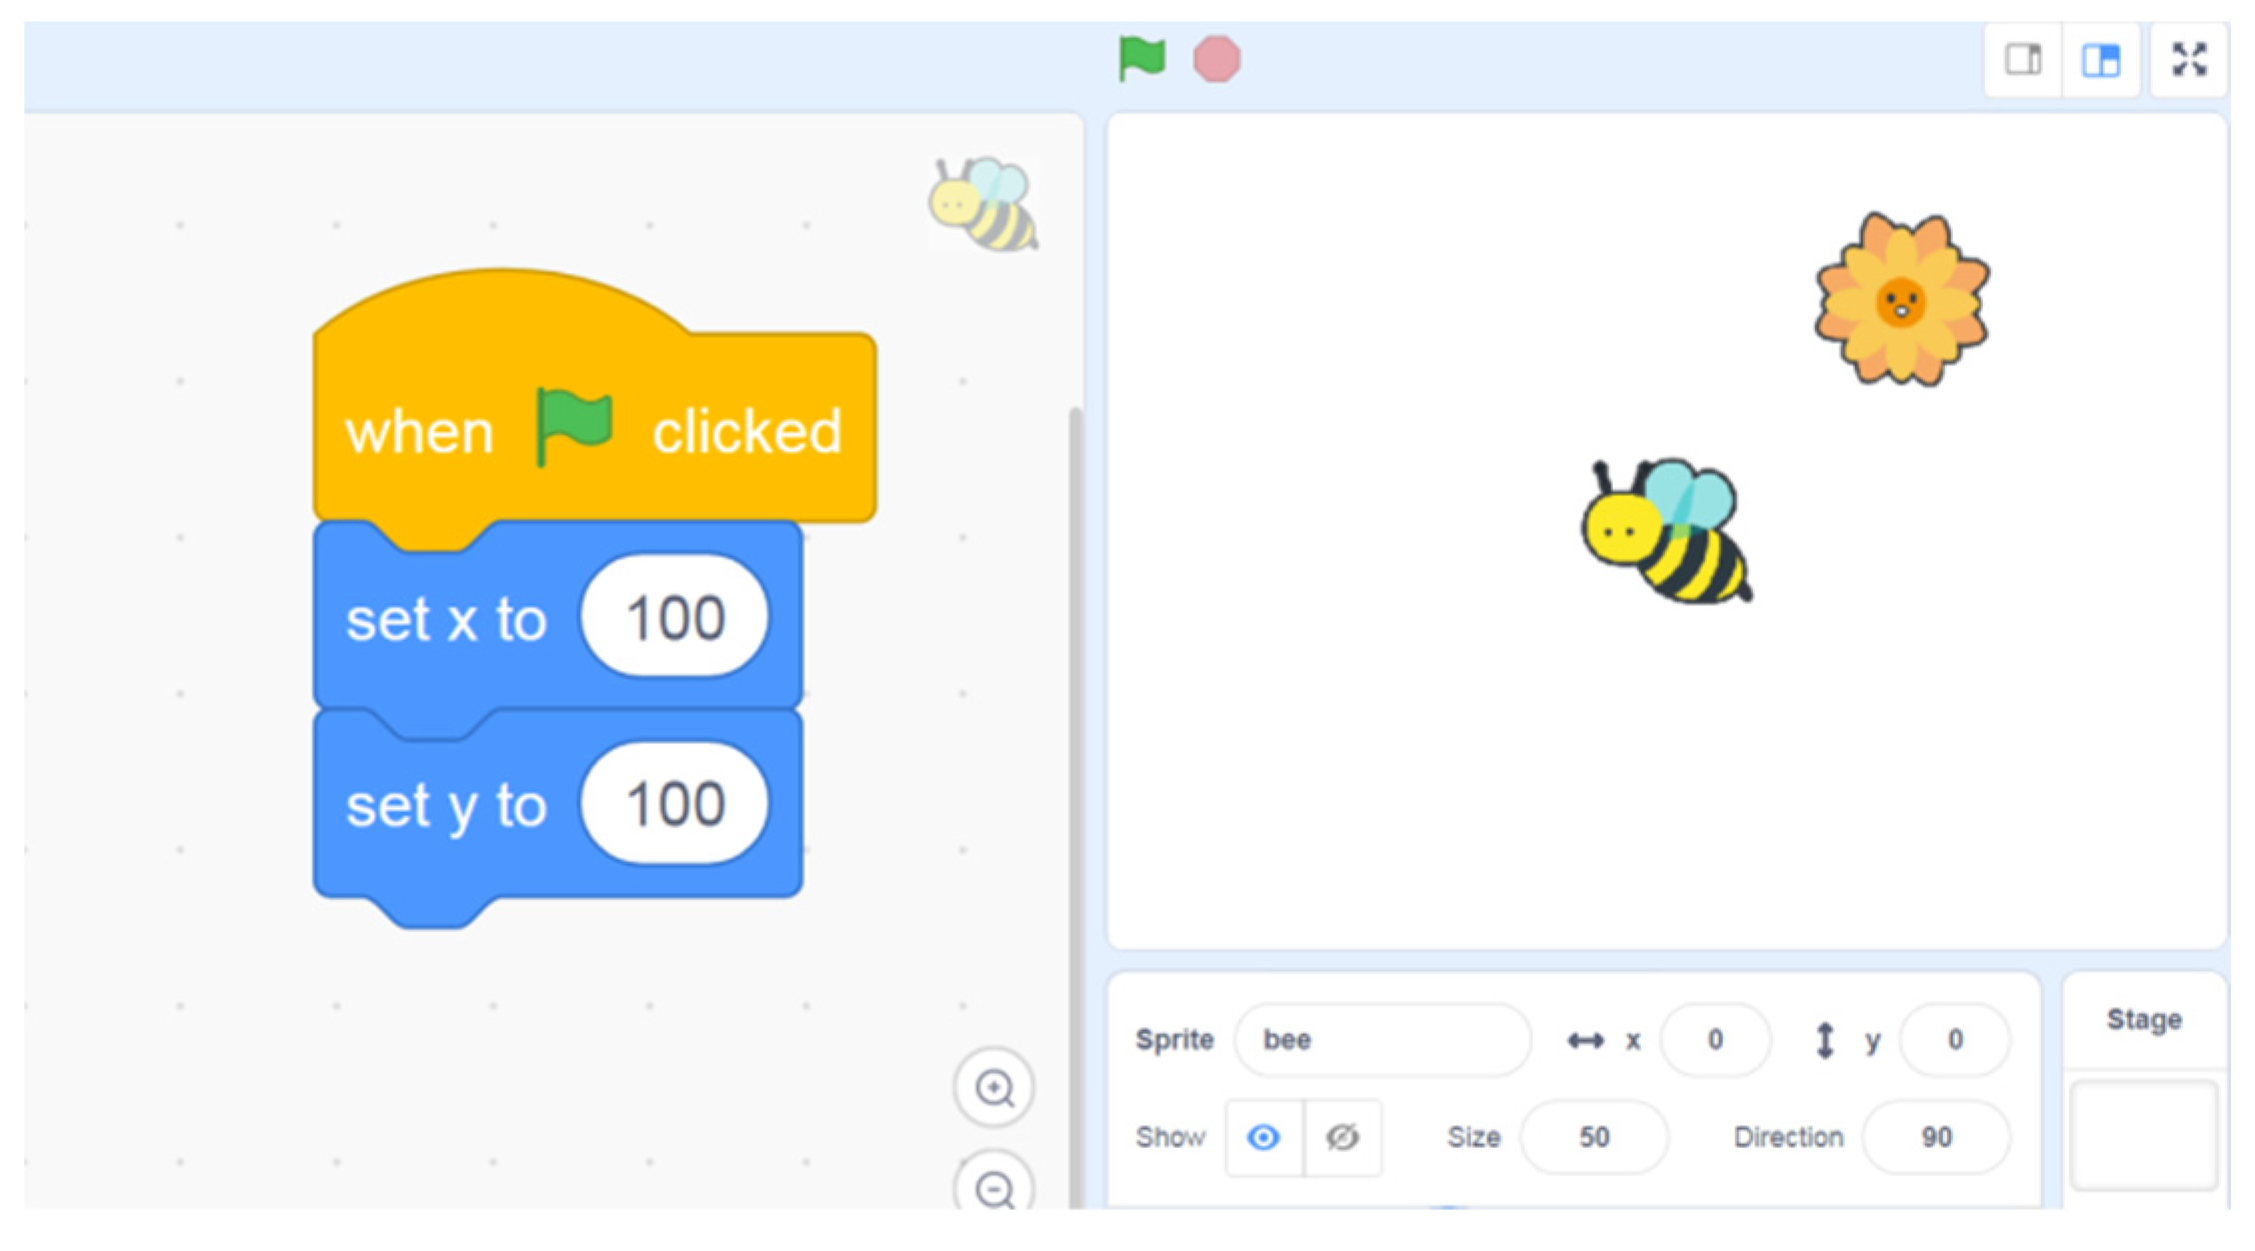
Figure 4. Move a bee from left to right by using Scratch.
Instead of the block function, JLcoding uses the object-orient concept to design the attribute of the object. Figure 5a shows the beginning position of the bee. The initial position of the bee is set to be (900, 200). JLcoding uses “bee. x” and “bee. y” to set the position of the object bee. Figure 5b shows how to code the moving operator in the coding area. Figure 5c is the final running result.
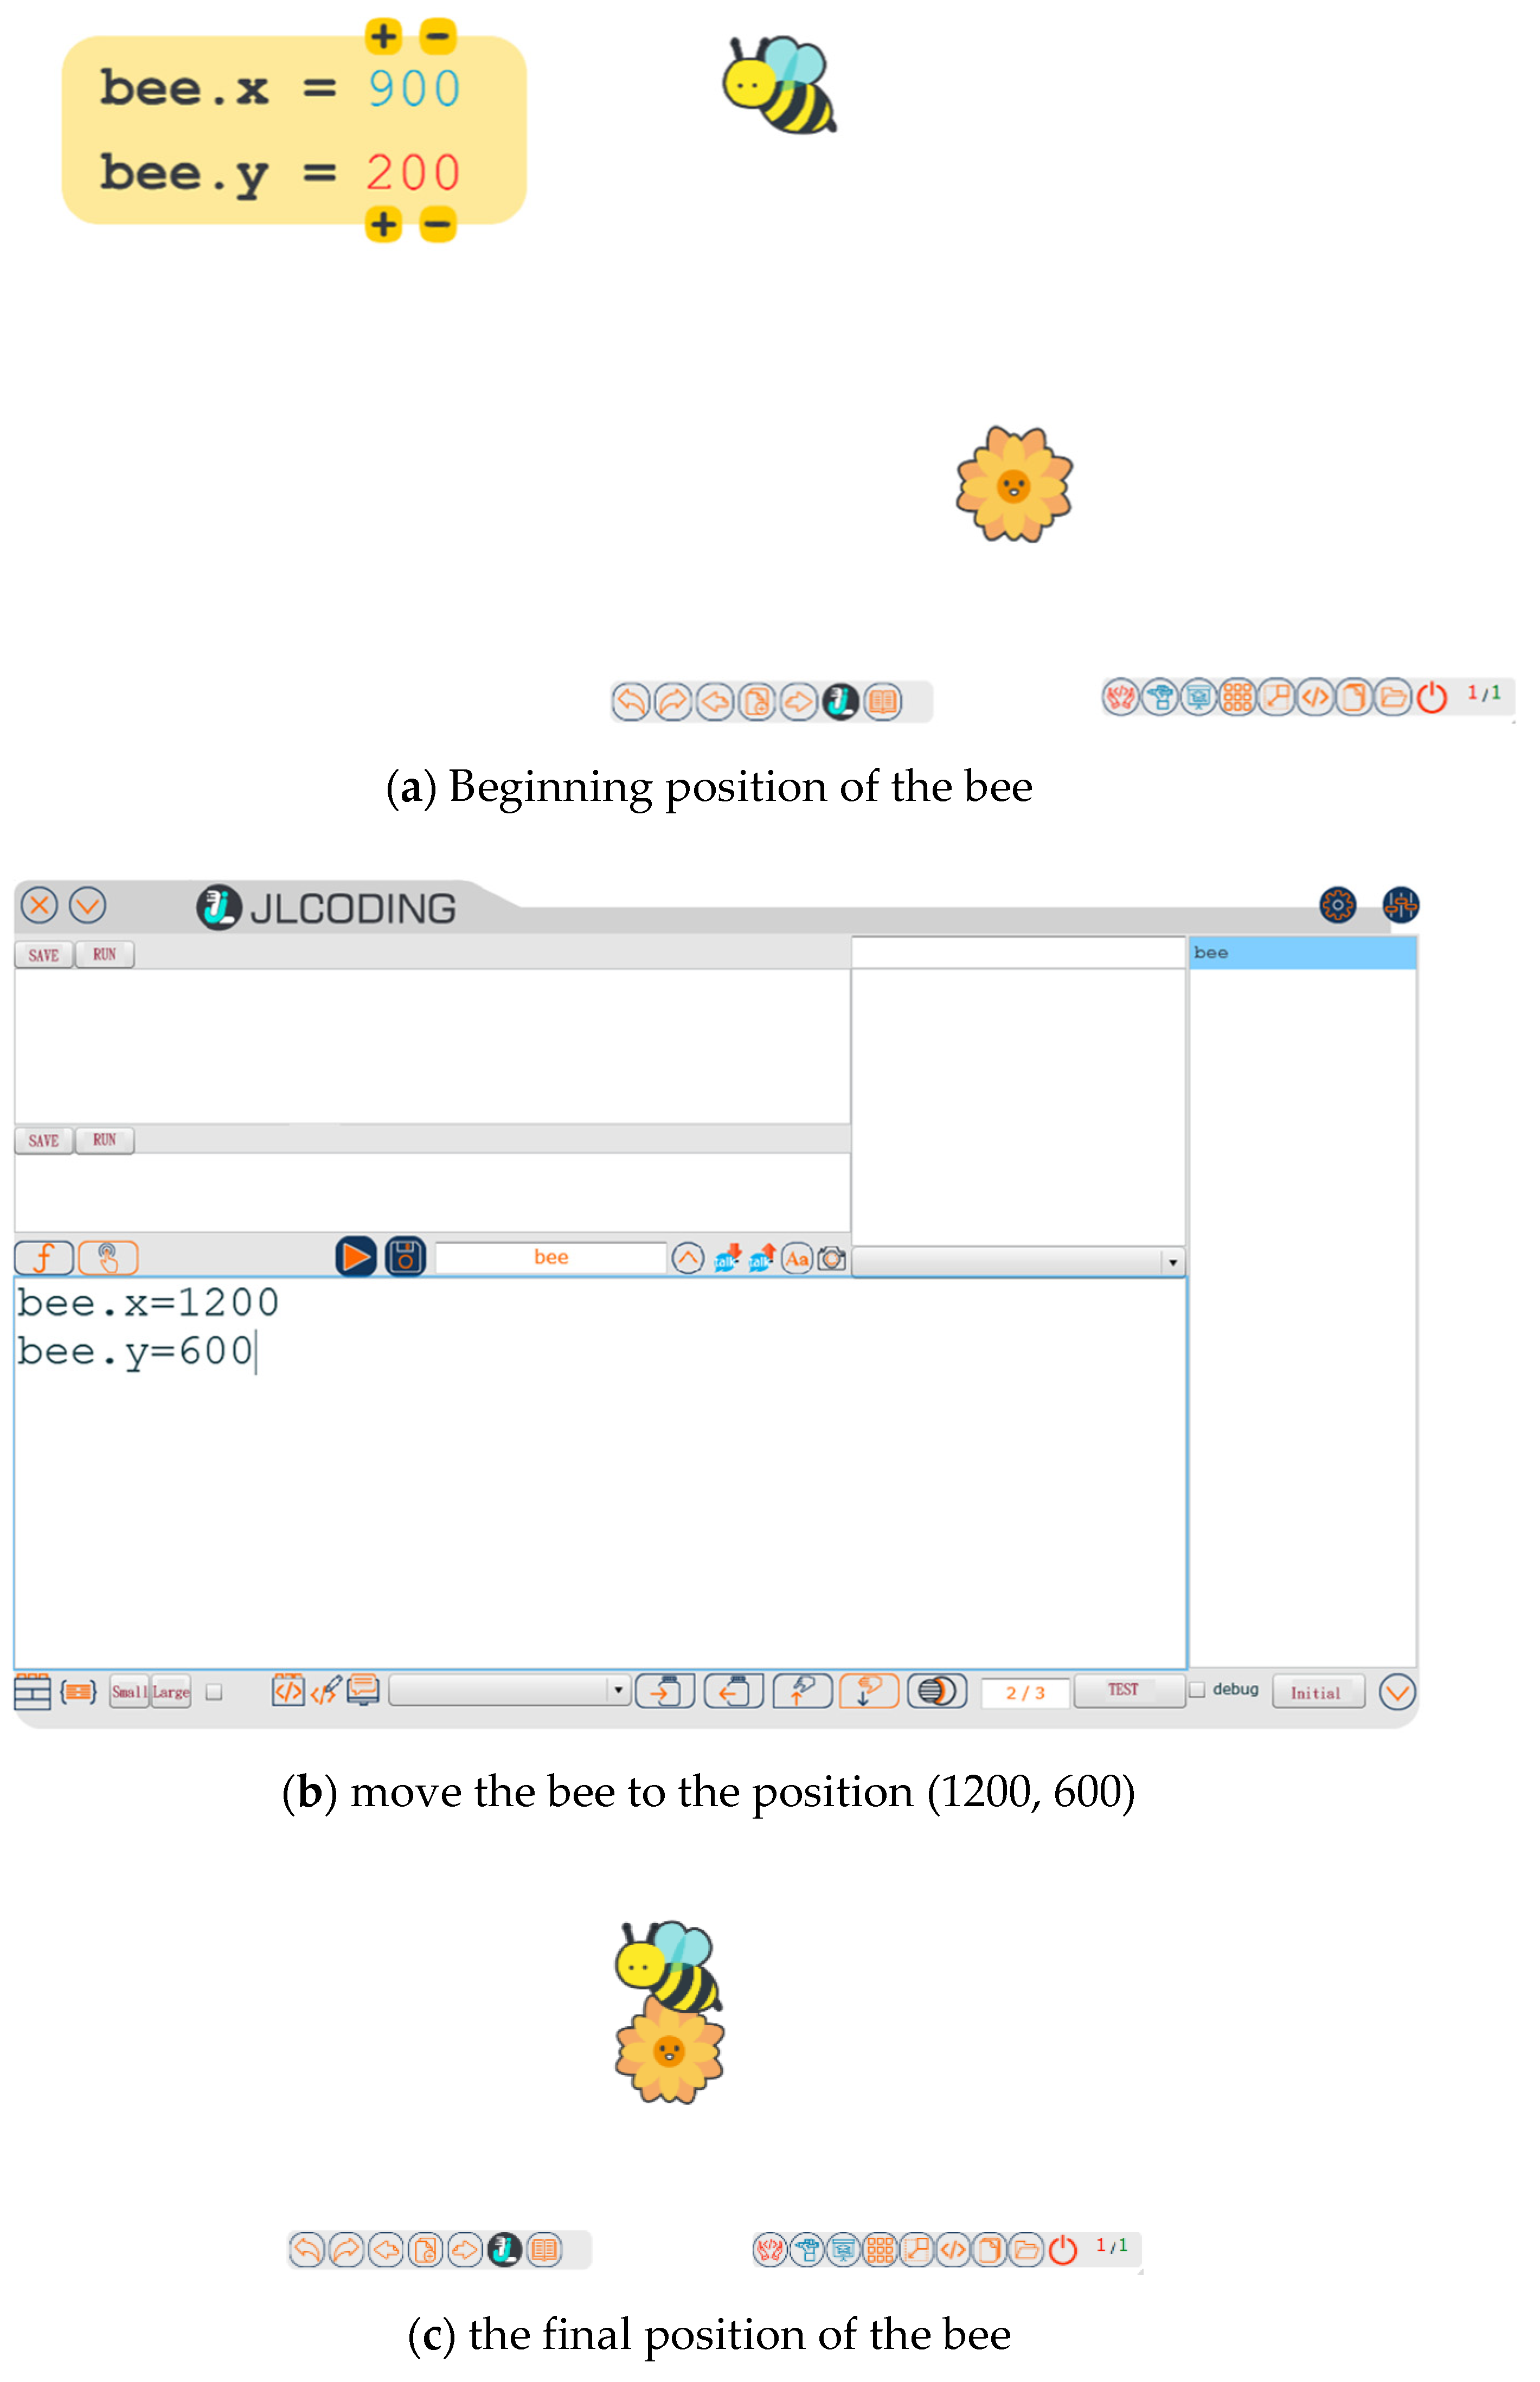
Figure 5. The coding example of JLcoding to move the bee.
3.2. Input and Output
In Scratch, the event block creates a way to interact with the program and the user. The user uses the mouse and keyboard to control the object. The square in the code area on the left of Figure 6 indicates that when the space key of the keyboard is clicked, the program says “Hello!” for 5 s. The user uses the space key as the input to control the program execution, and the text will appear on the upper right of the duck for 5 s to achieve the output.
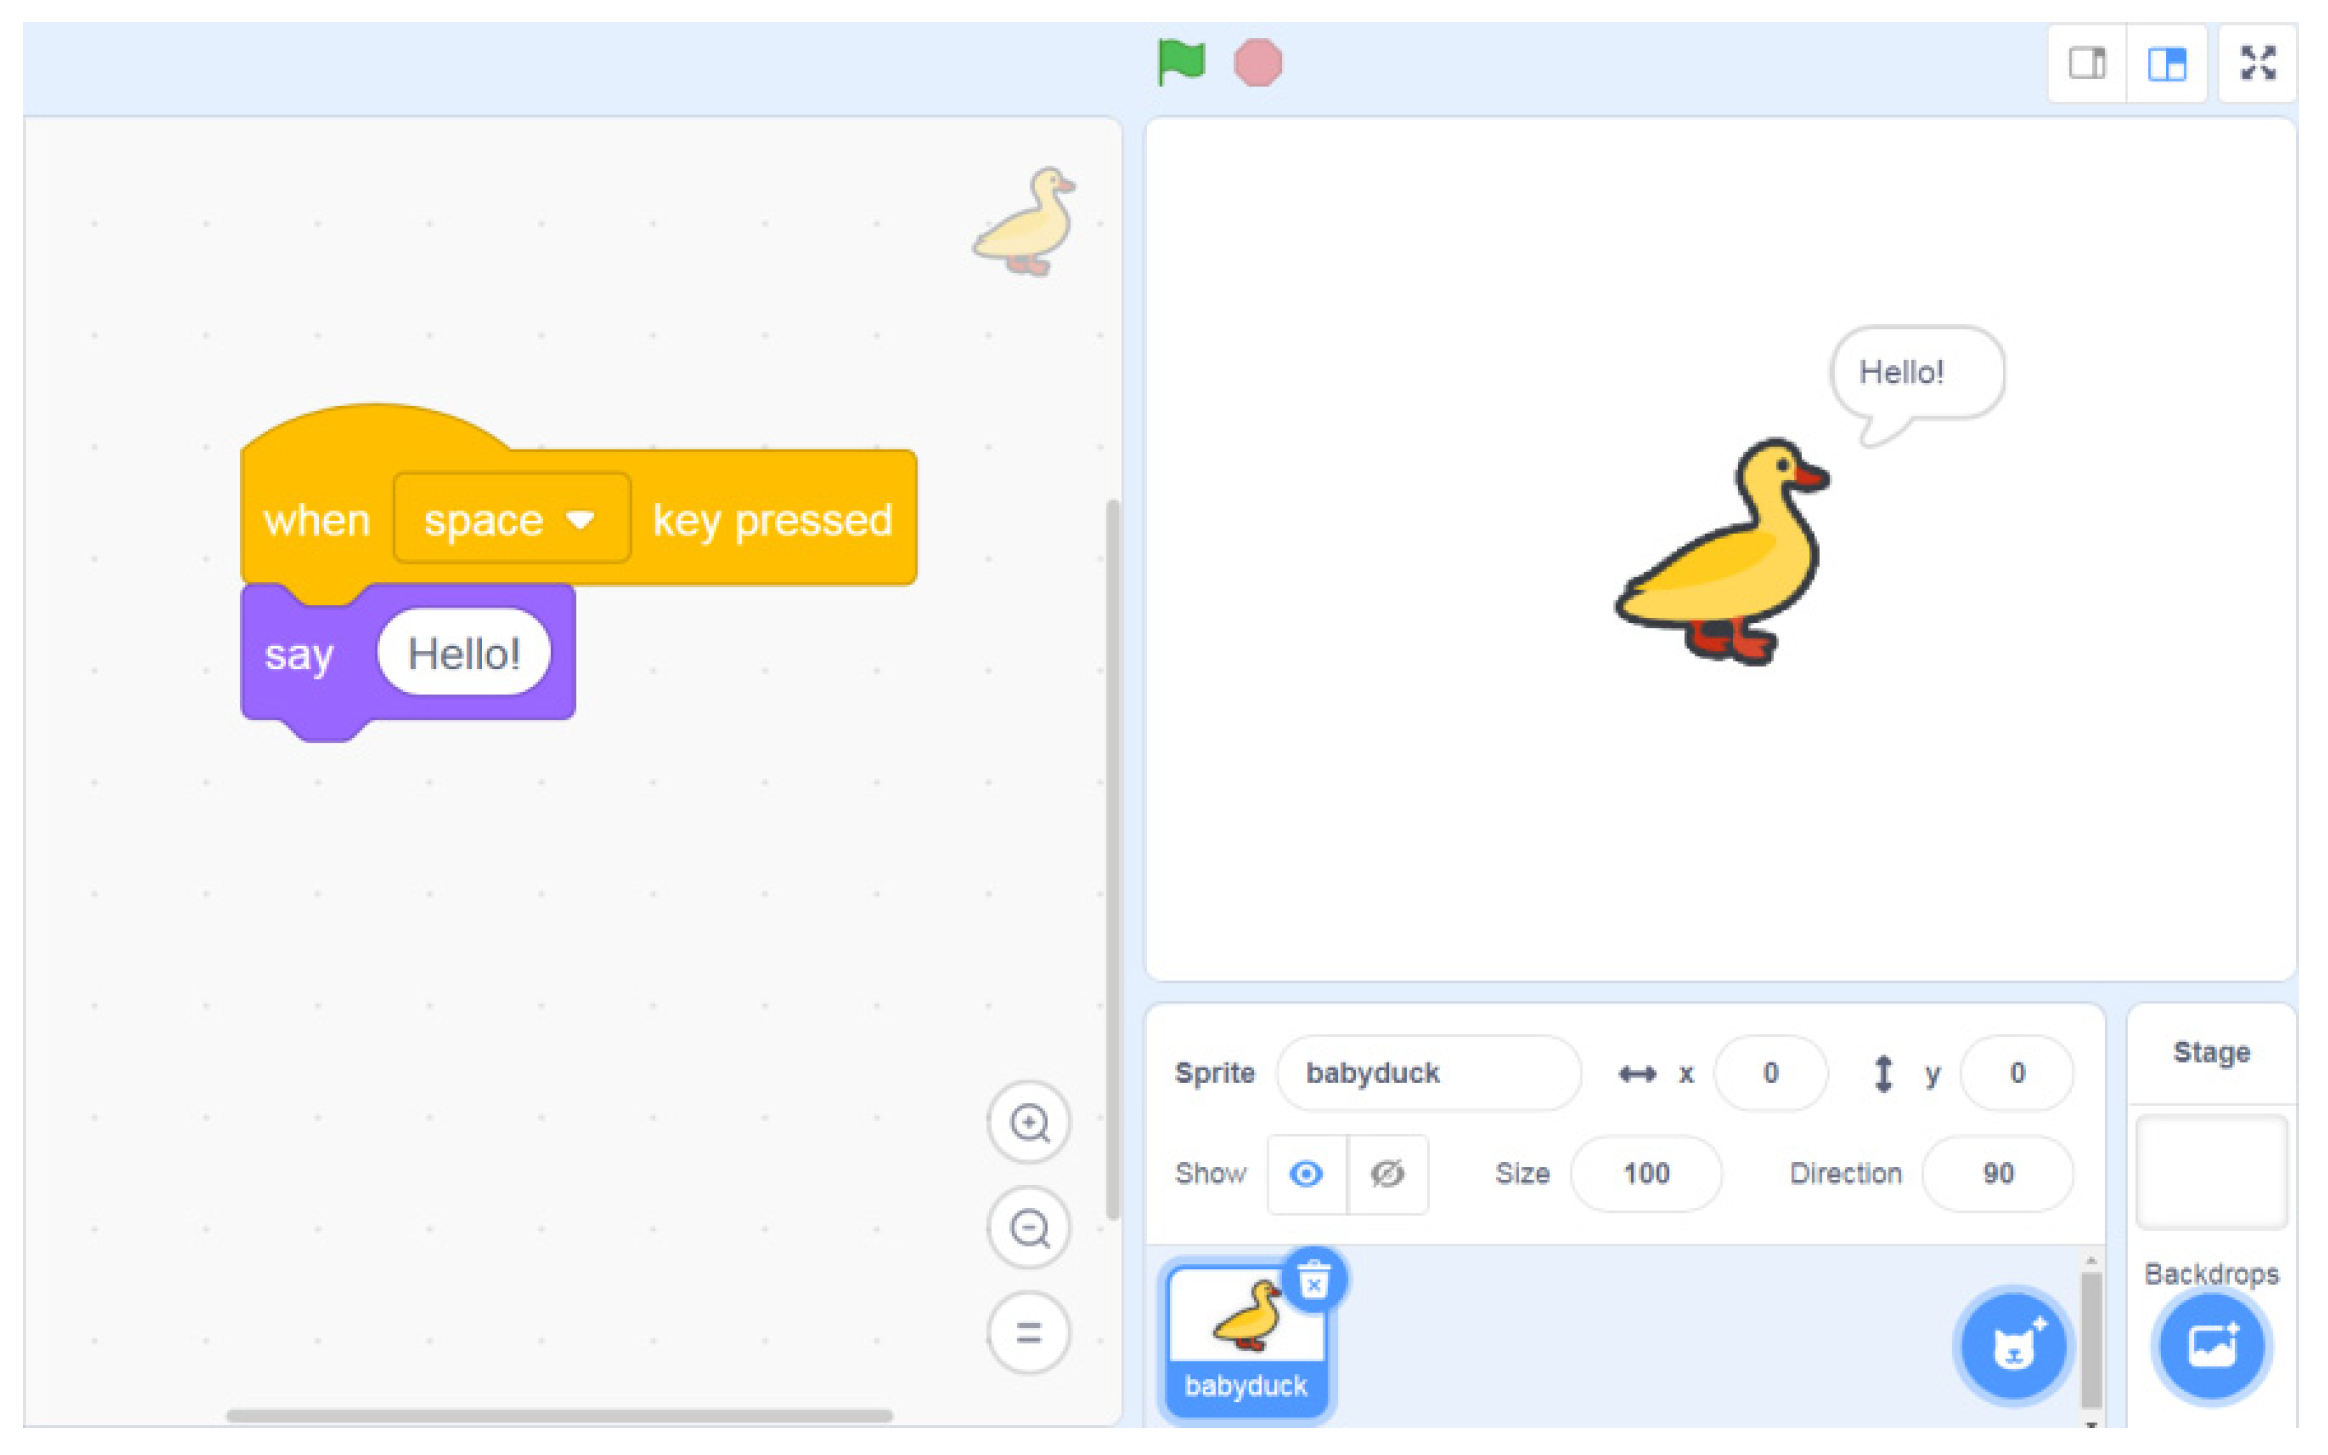
Figure 6. Input and output by using Scratch.
On the other hand, JLcoding does not use the events box for input; it uses buttons instead. Users can interact by setting the object as a button and entering the program that will be executed when the button is pressed in the coding area. The example in Figure 7 shows that after clicking the duck button, the program says “Hello!” for a period of time. When the user presses the button with the mouse, the text will appear above the duck as output.
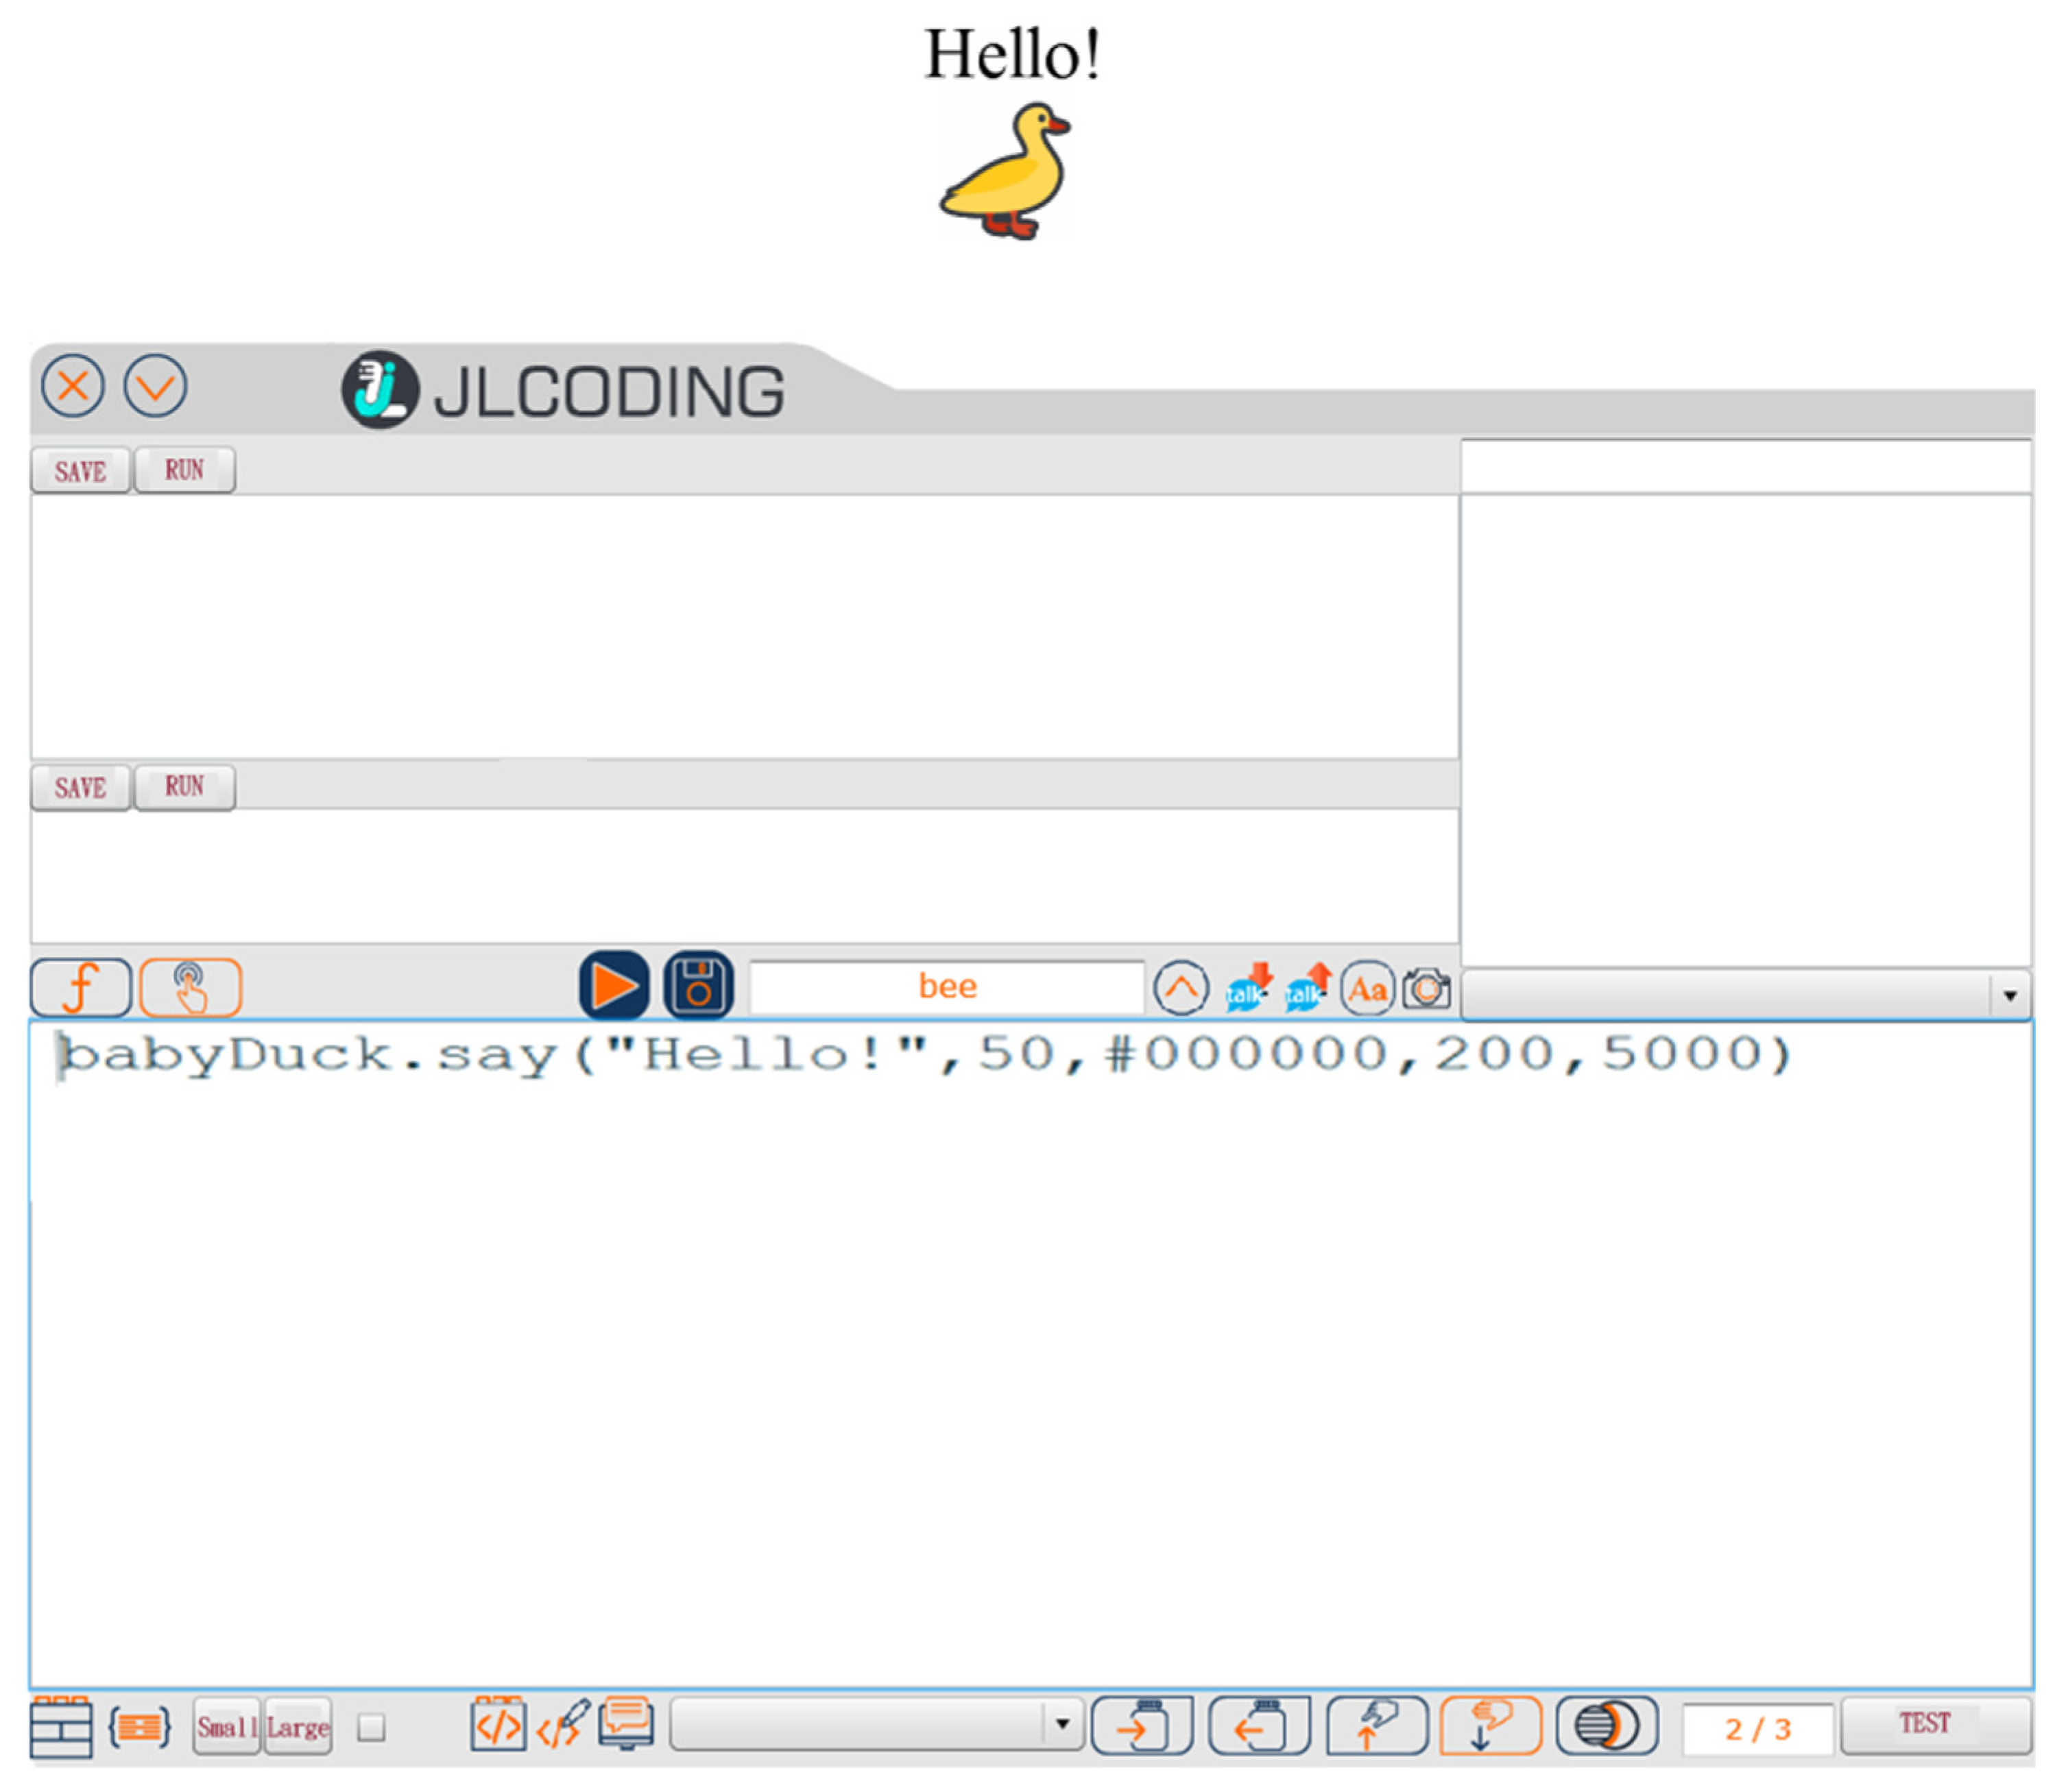
Figure 7. Input and output by using JLcoding.
3.3. Arithmetic
Figure 8 shows an example of how to calculate the required variables in Scratch. The program moves the blue duckling to the back of the duckling team while maintaining the same distance as the other ducklings. The code in Figure 8a shows the code in the fourth duckling that obtains the X-coordinate and Y-coordinate of the duckling. After obtaining the coordinates of the fourth duckling, use “ message1” to drive the code in Figure 8b to obtain the coordinates of the third duckling. Similarly, “message 2” is performed after the coordinates are obtained to drive the code in Figure 8c to calculate the moving position of the blue duckling. Figure 8c will calculate the X coordinate as (the 4th duckling’s X coordinate)—(the distance between the 3rd duckling’s X coordinate and the 4th duckling’s X coordinate), and the Y coordinate using the same coordinates as the 4th duckling. When the calculation is complete, the “go to” block function will move the blue duckling to the calculated coordinates, as shown in Figure 8d.
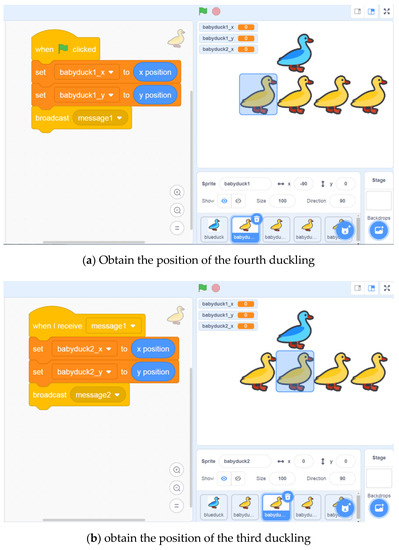
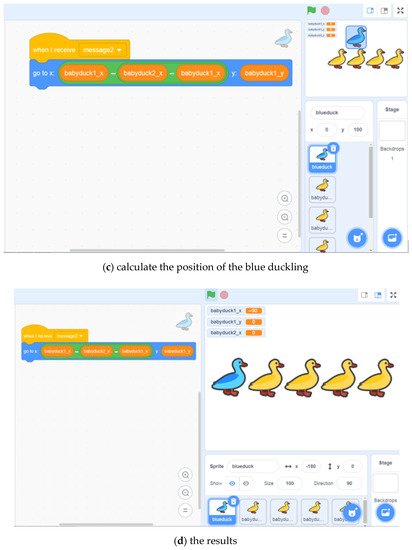
Figure 8. Arithmetic by using Scratch.
Compared with Scratch, the code is much easier to use in JLcoding. Since the coordinates of all objects have already been acquired, the user only needs to input the calculation formula into a coding area to calculate the position of the blue duckling. The code is shown in Figure 9. The algorithm in JLcoding is almost the same as Scratch. The program sets the X coordinate of the blue duckling to be (the X coordinate of the 4th duckling)—(the difference between the X coordinate of the 3rd duckling and the X coordinate of the 4th duckling), and the Y coordinate of the blue duckling will be the same as that of the 4th duckling. The execution results are shown in Figure 10, in which the blue duckling moves to the correct position.
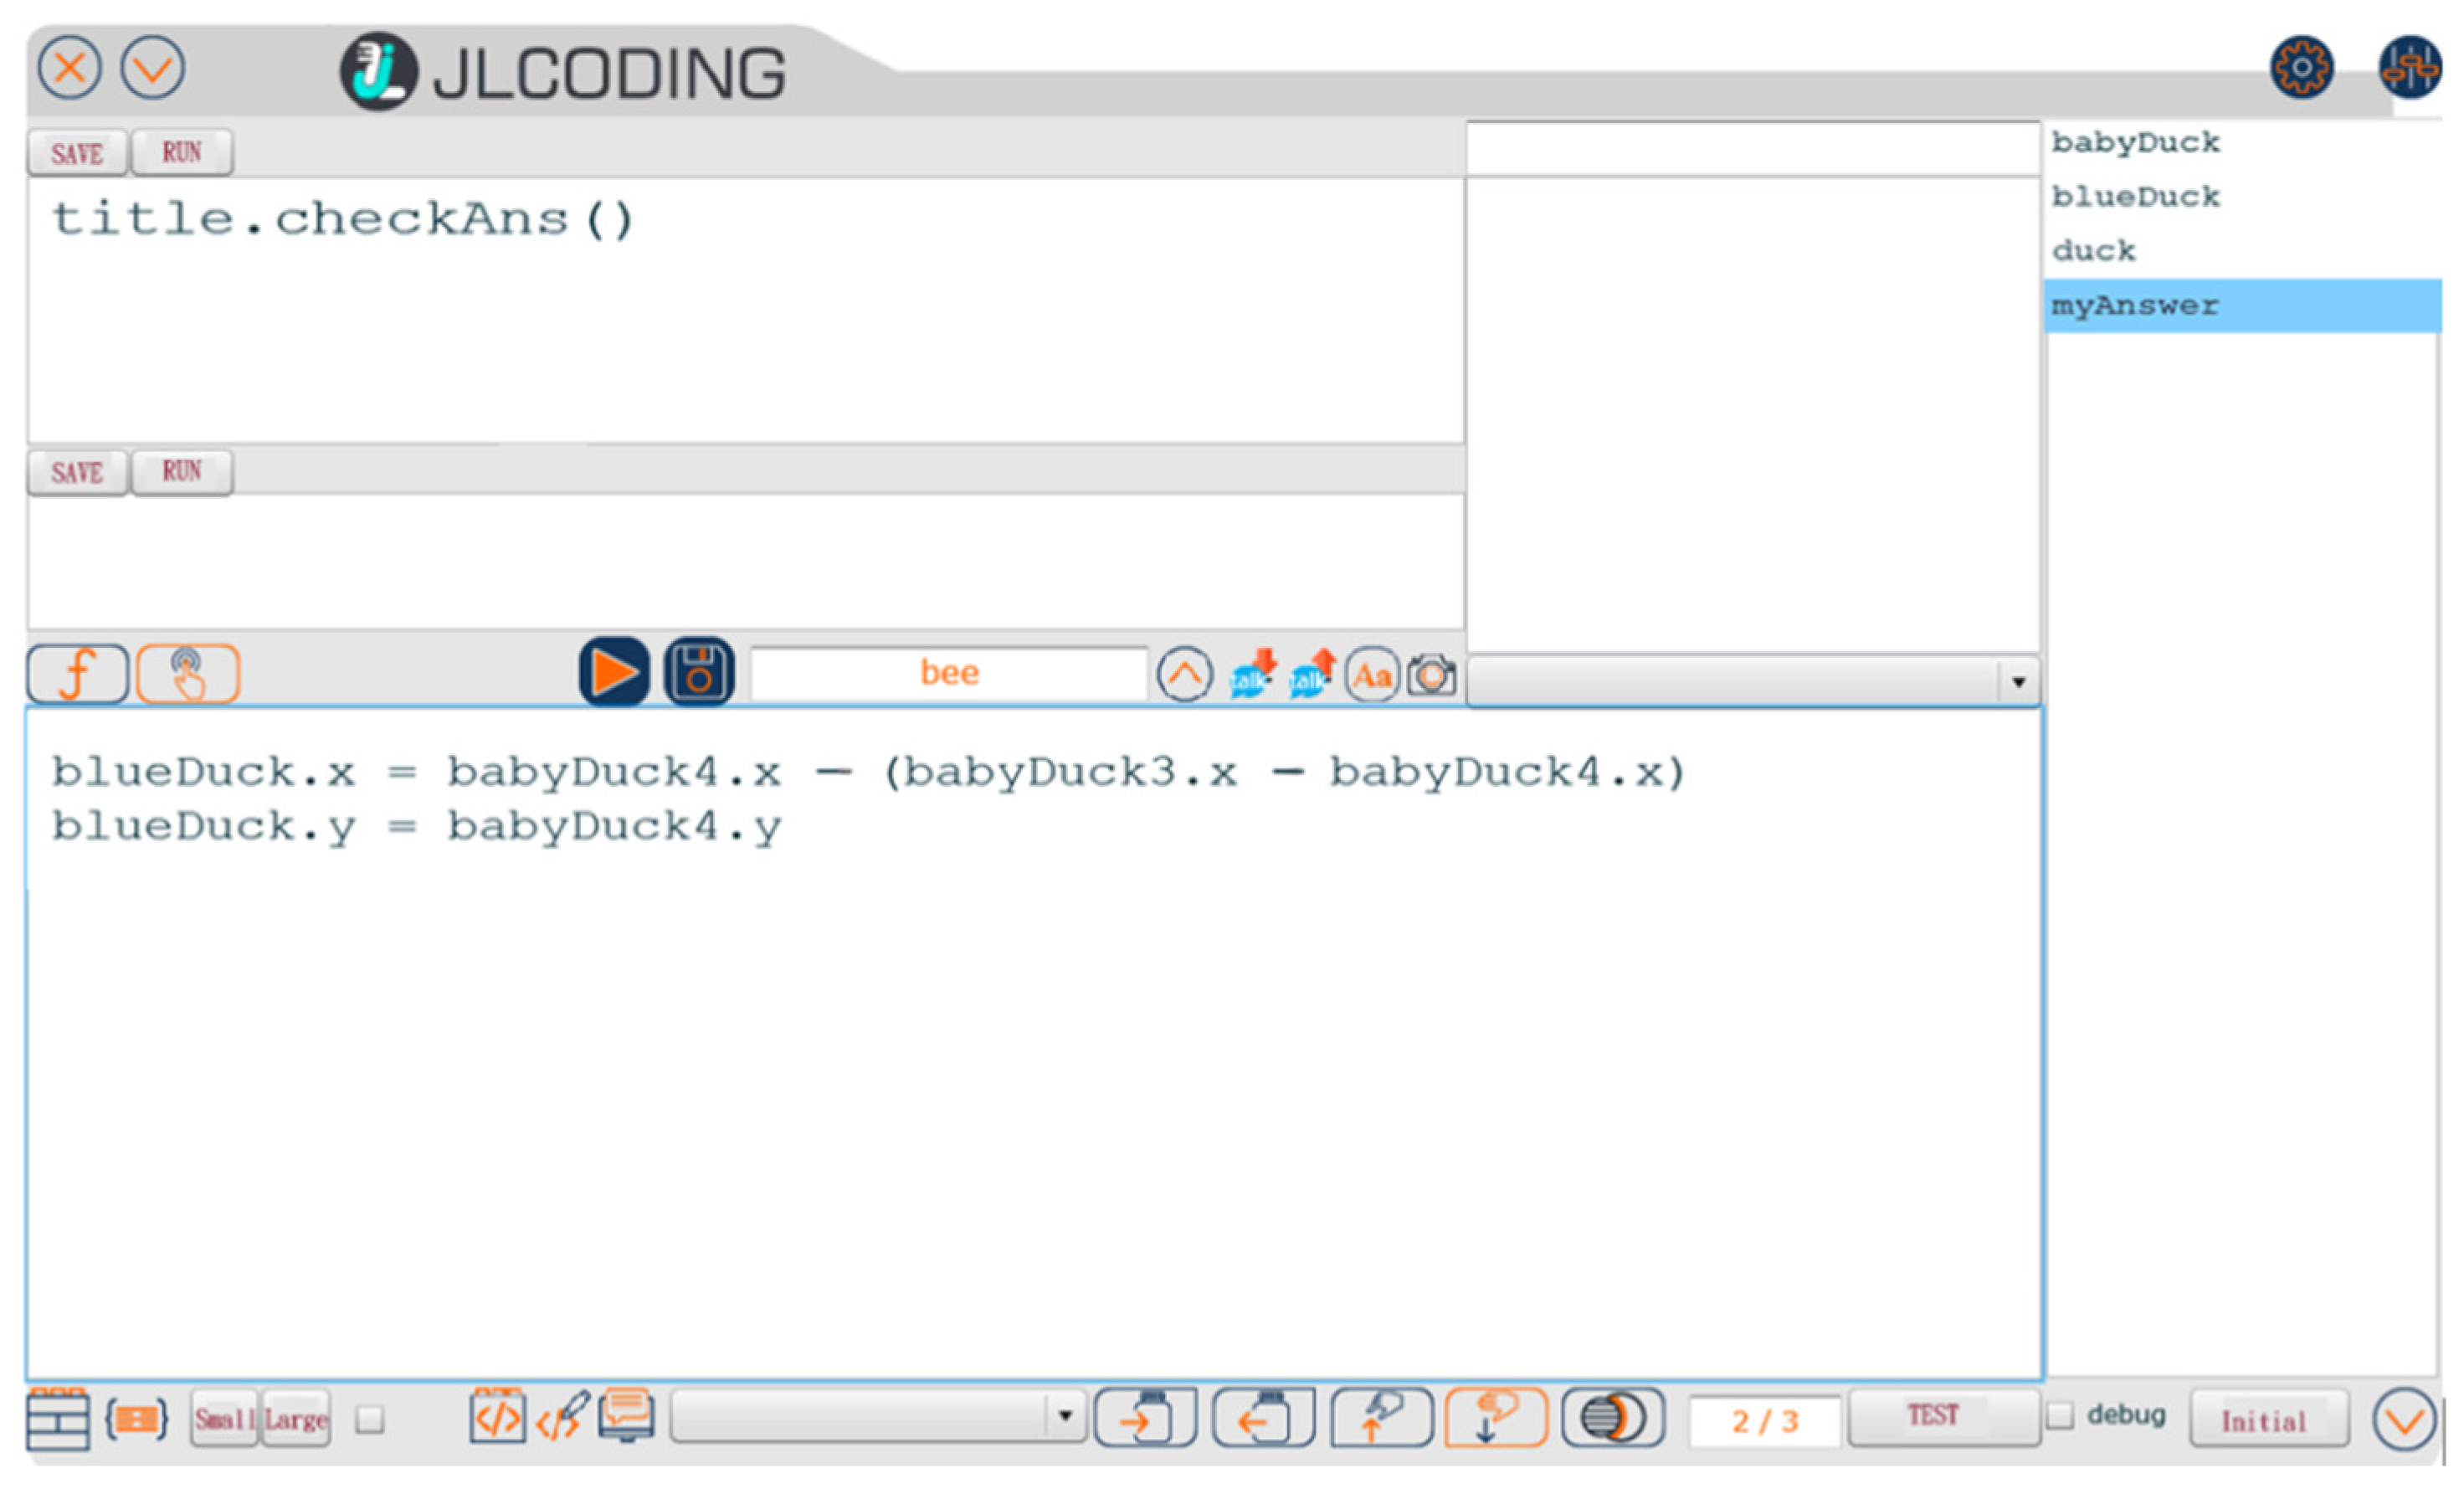
Figure 9. Arithmetic in JLcoding’s coding area.
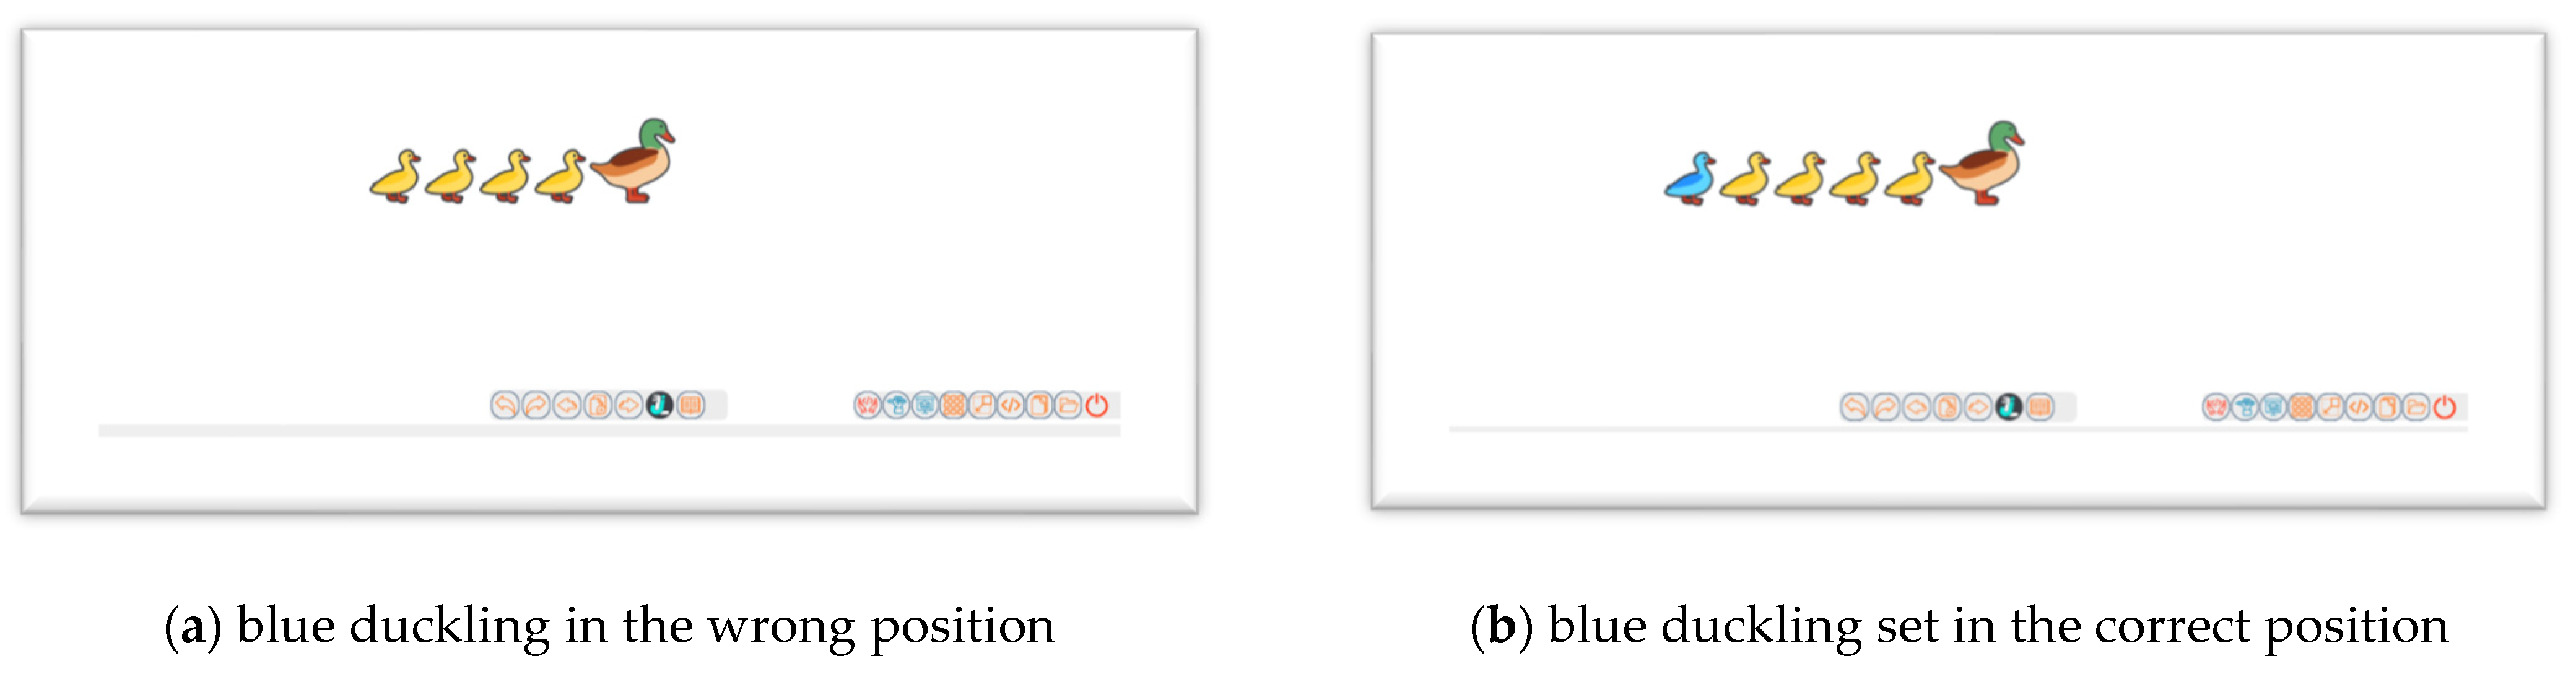
Figure 10. Arithmetic by using JLcoding.
3.4. Conditional
Conditional is a selection structure that determines the items to be executed according to the conditions specified in the code. Figure 11 shows a conditional decision to decide whether the bees or the butterflies will be moved to the flower.

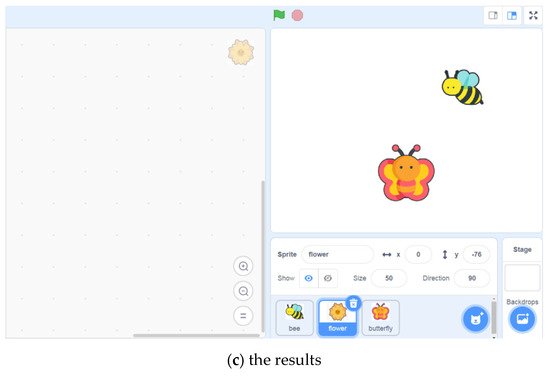
Figure 11. “If” condition rule to move the bee or the butterfly to flower by using Scratch.
The code in Figure 11a uses an “if/else” block as the main body and makes choices based on whether the size of the bee is greater than 50. If the condition rule is true, then “go to flower” will be executed. The bee will move to the flower. Otherwise, it will choose not to execute the go to block of the bee and only execute “broadcast message1” to drive the code of the butterfly in Figure 11b to move the butterfly to the flower. The final result is shown in Figure 11c.
In the JLcoding, the user inputs three strings, “if”, “else” and “end”, as the structure. The selection condition rule (bee.width > 50) is used to decide whether the bee or the butterfly will move to the flower. According to the “if it is true” of the selection condition, choose to use “bee.moveTo(flower)” to move the bee to the flower, or choose to use “butterfly.moveTo(flower)” to move the butterfly to the flower. Figure 12 shows the codes and Figure 13 shows the execution results.
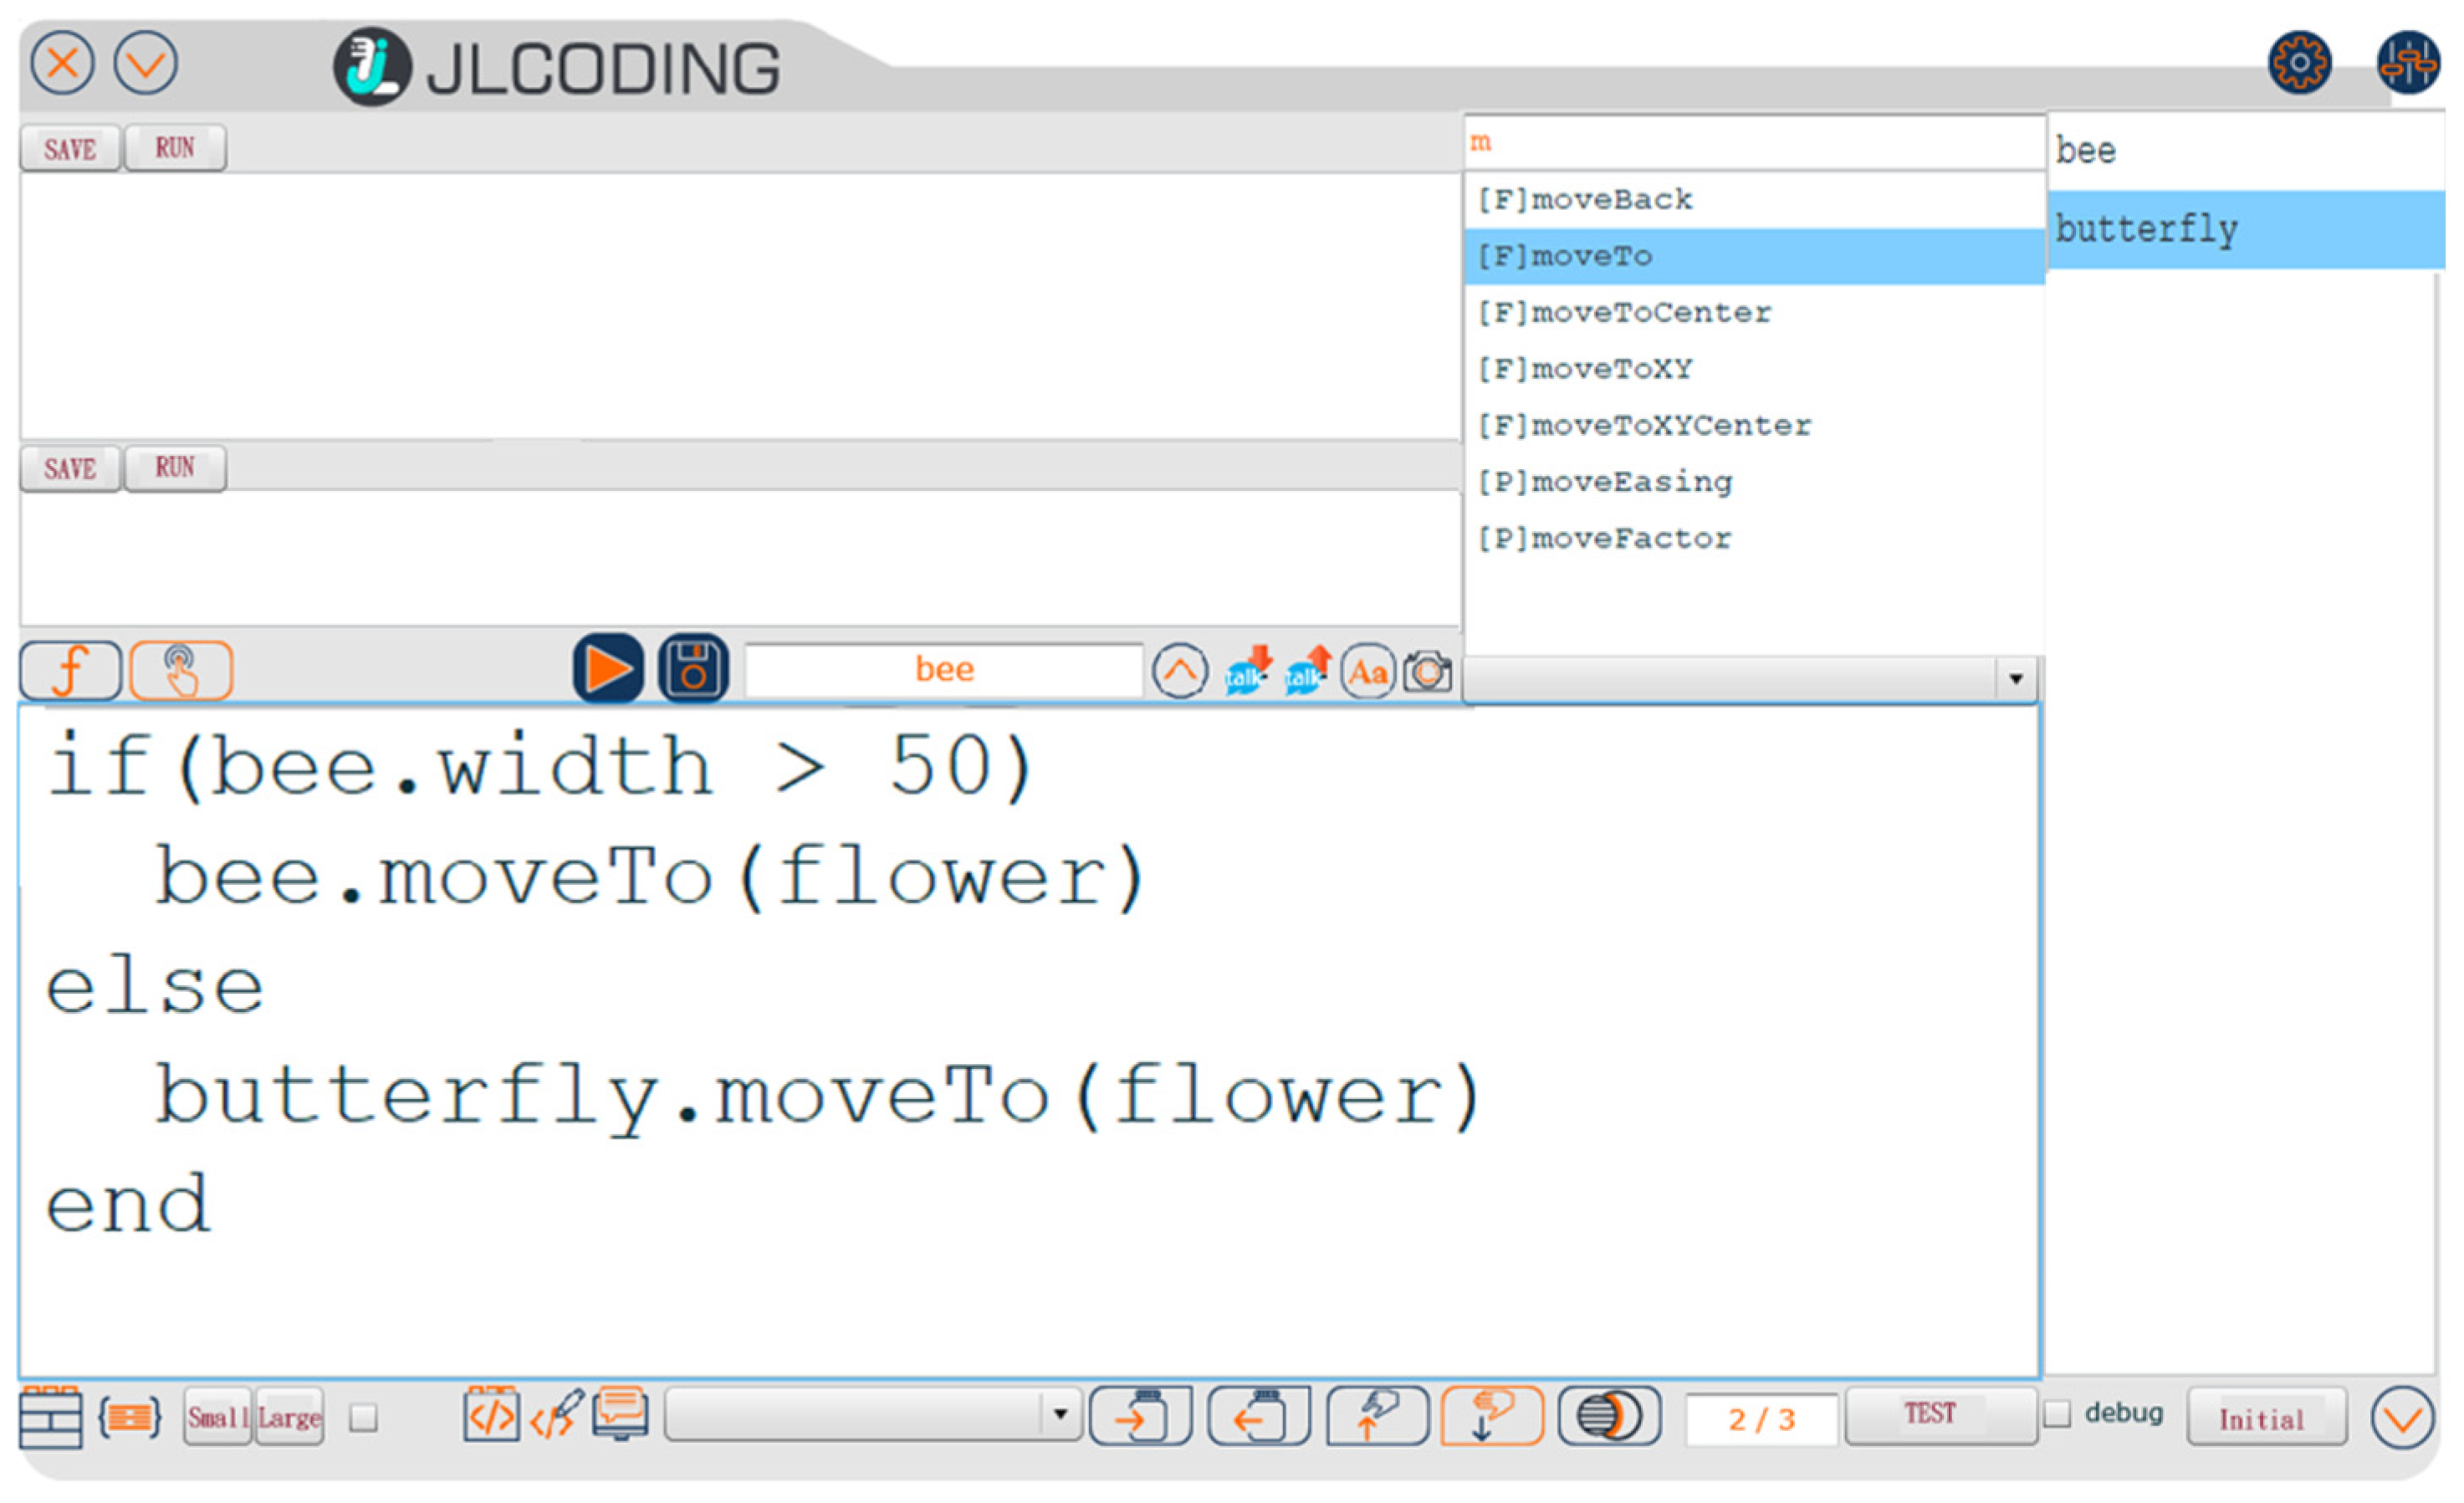
Figure 12. Conditional in JLcoding’s coding area.
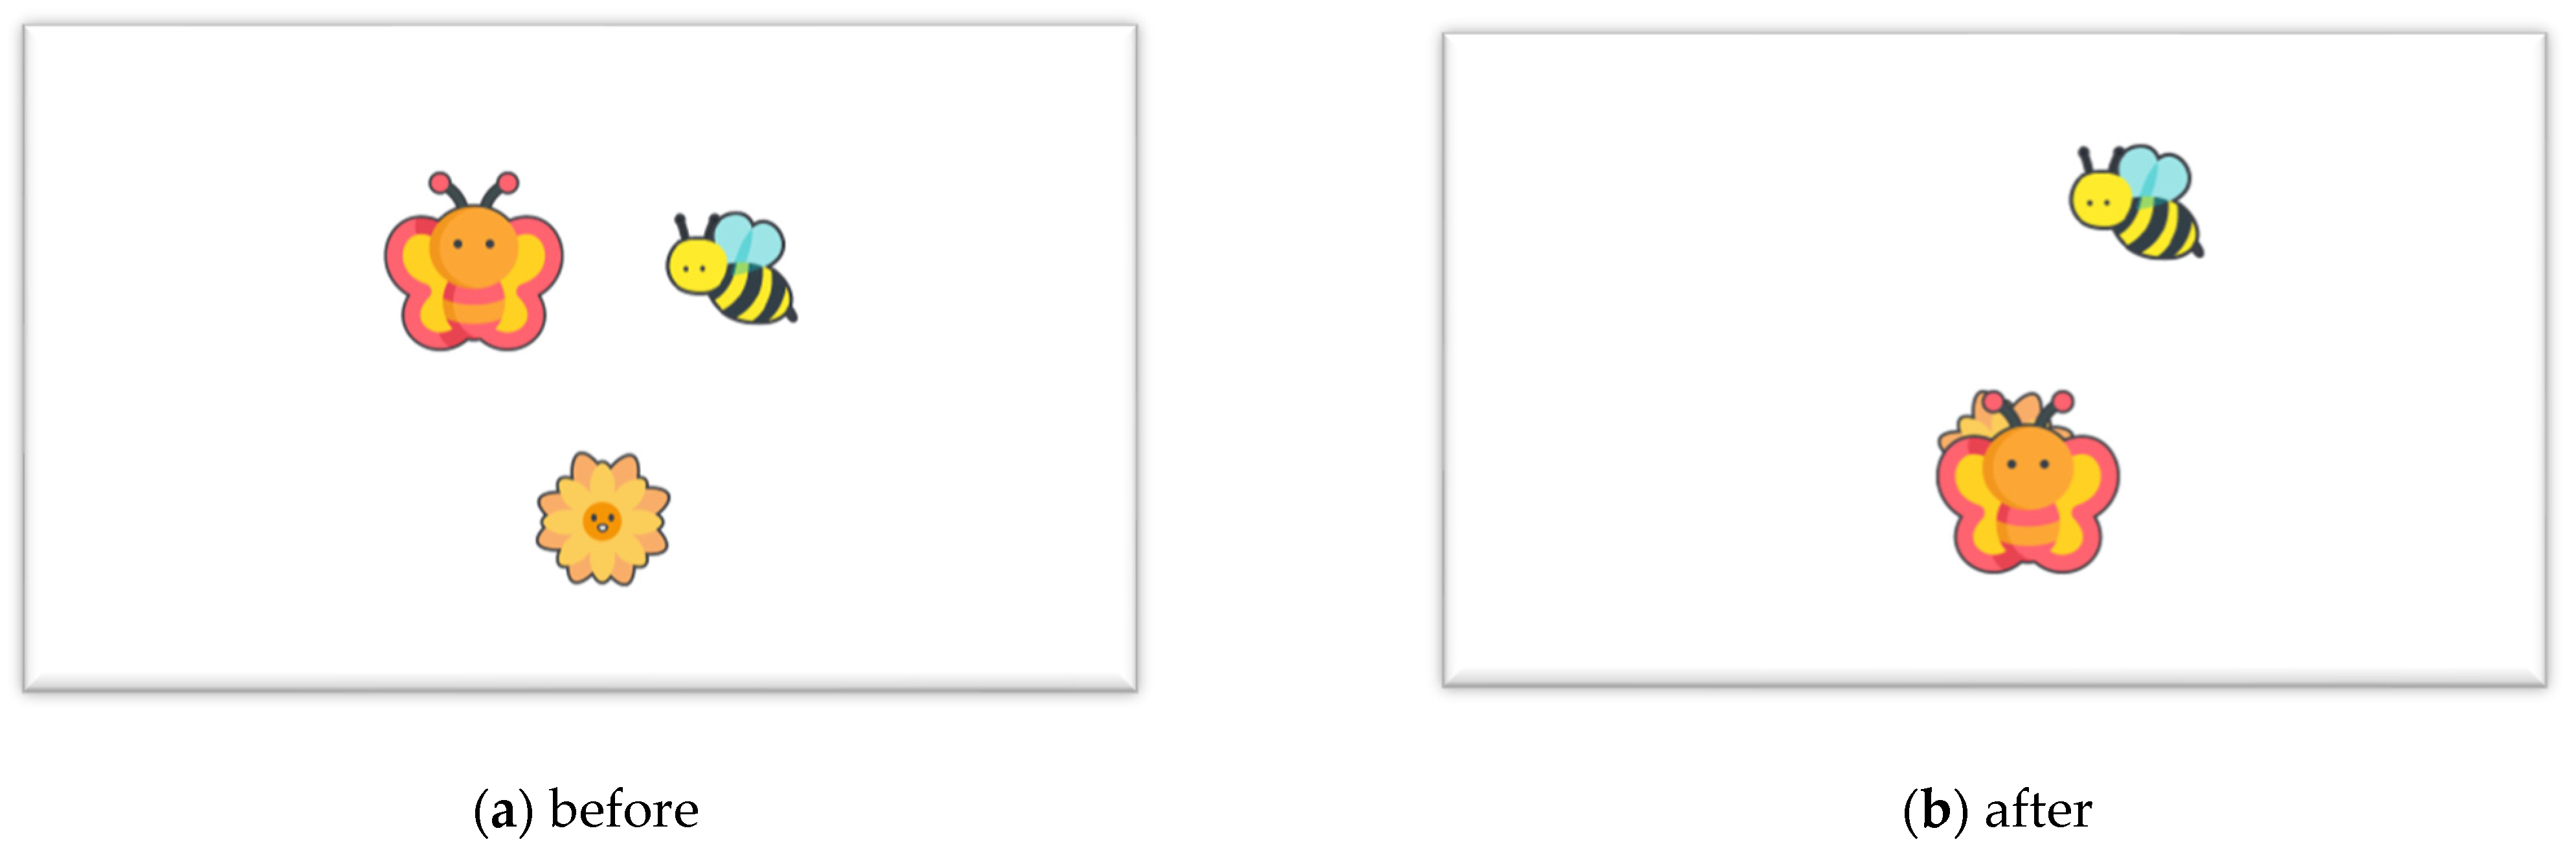
Figure 13. Select to move butterfly to flower by using JLcoding.
3.5. For Loop
The second example demonstrates how to generate several objects by using the “For loop.” In the Scratch environment, the block function “repeat” is used to perform the “For loop” operator. For each loop, the system generates one duck and moves it to a different position. Figure 14 shows the “repeat” example using Scratch.
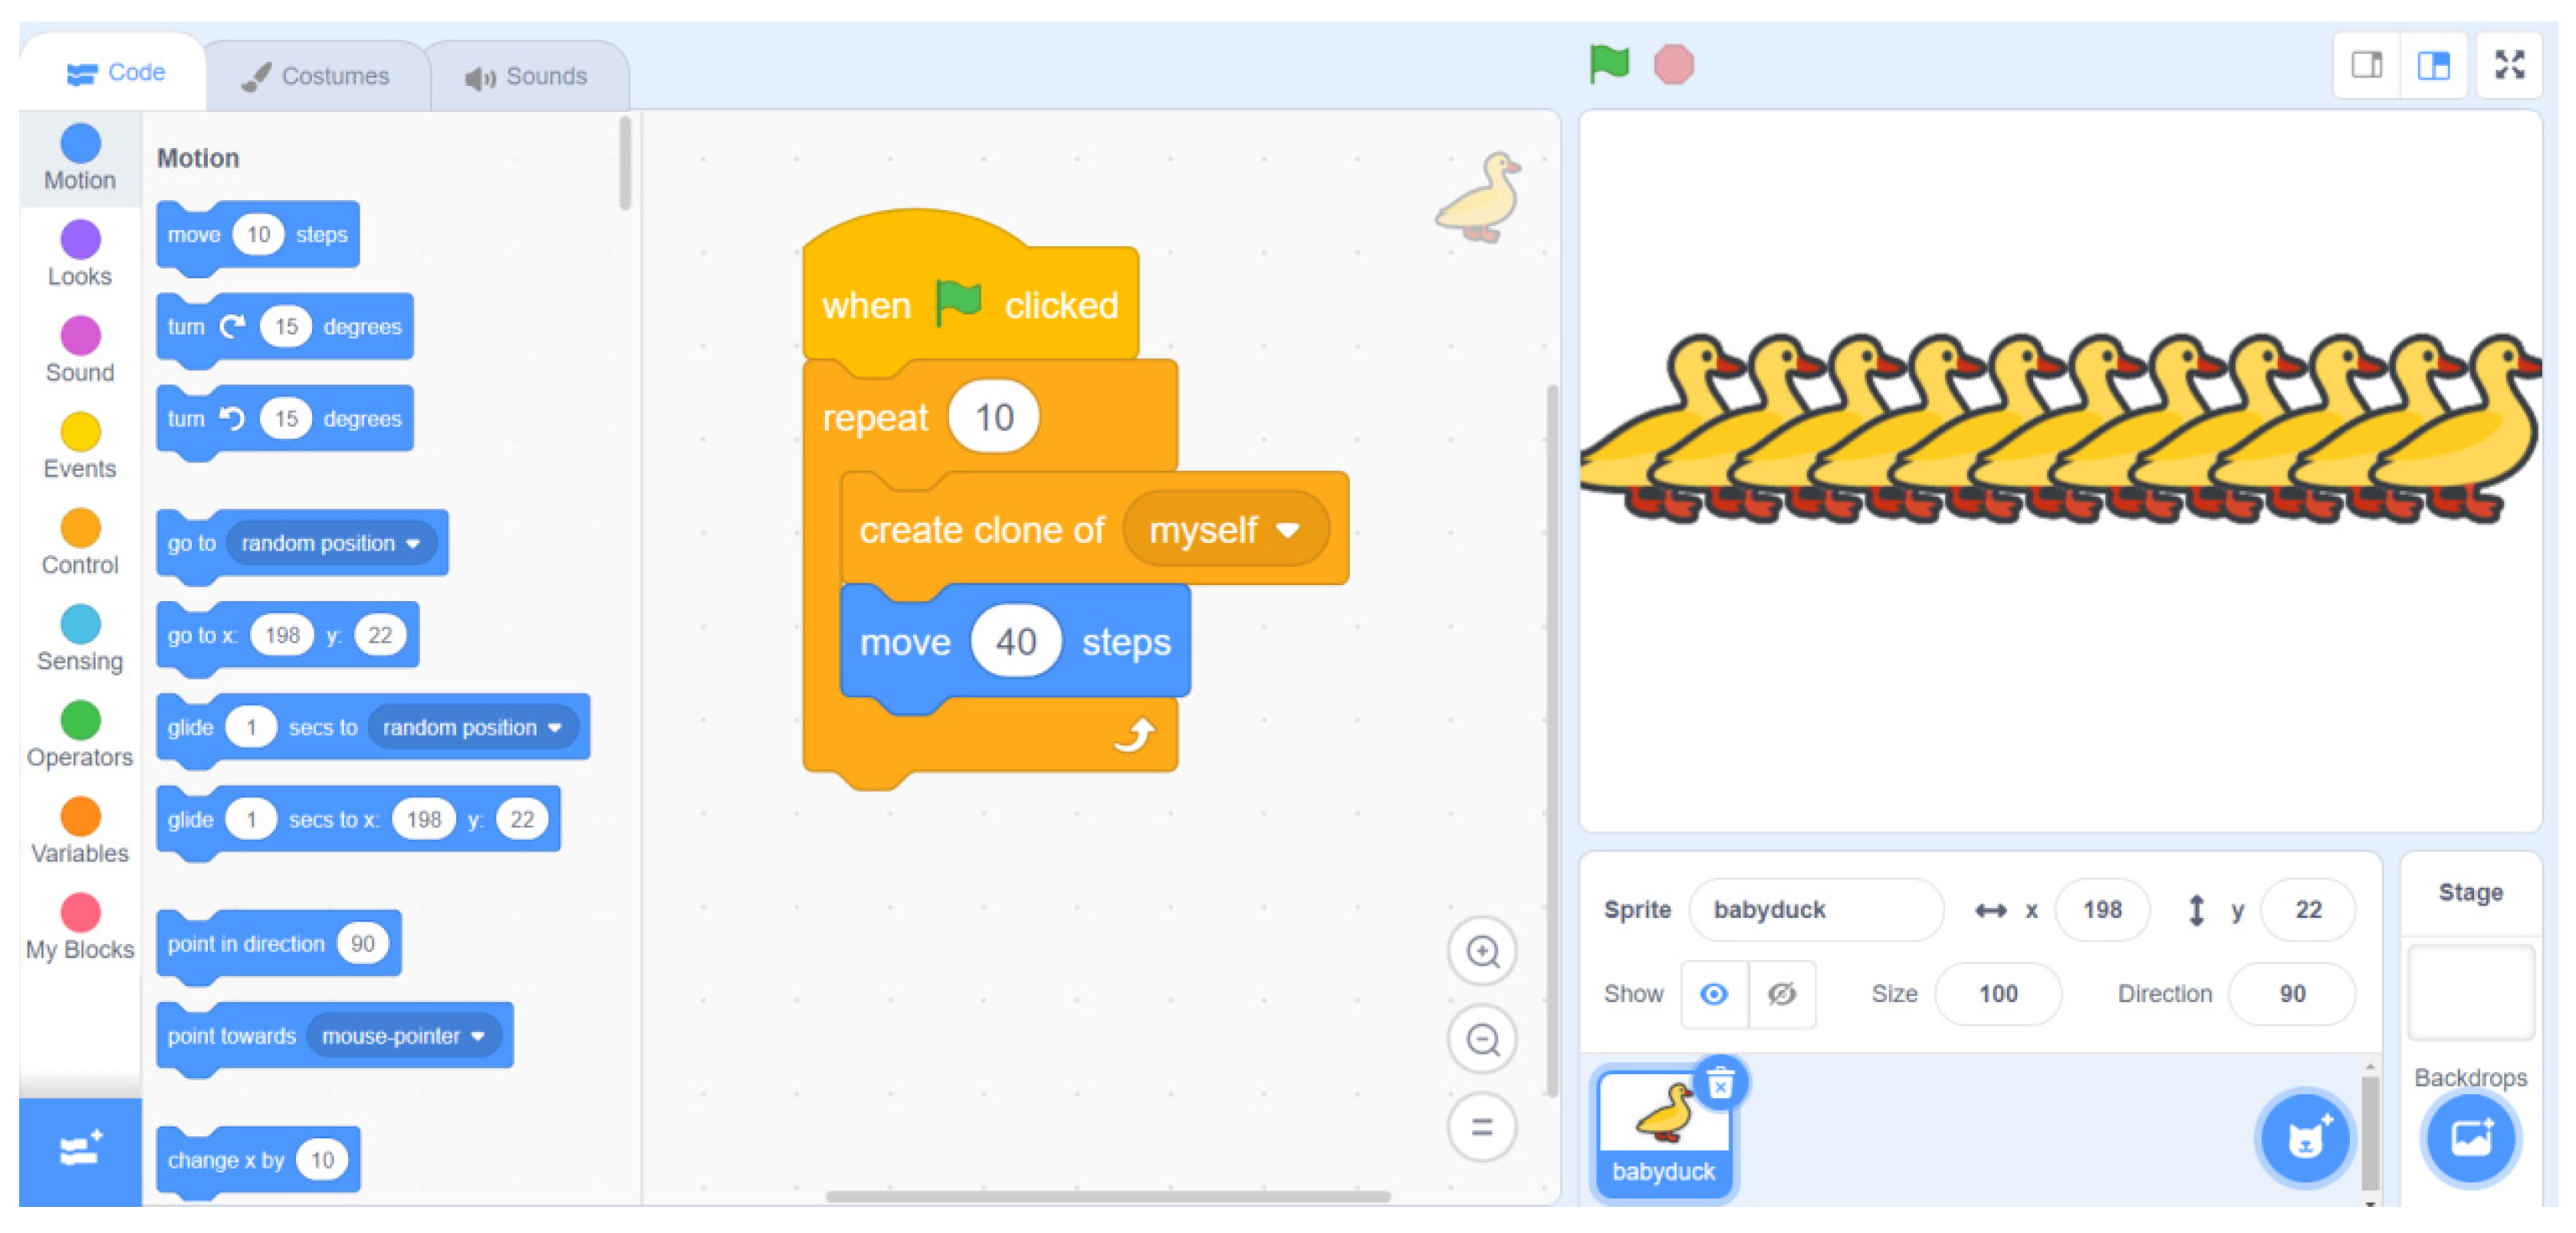
Figure 14. Generate 10 ducks by using Scratch.
Similar to Scratch, JLcoding uses the For loop structure, which contains for and ends keywords to perform the “For loop” operator, which is the same as the text-based language. The user types the keyword “for” in the function area, and JLcoding will generate the structure automatically. JLcoding uses “clone” to generate a new object and uses “object. x” to change the position. Figure 15 shows the running results using JLcoding.
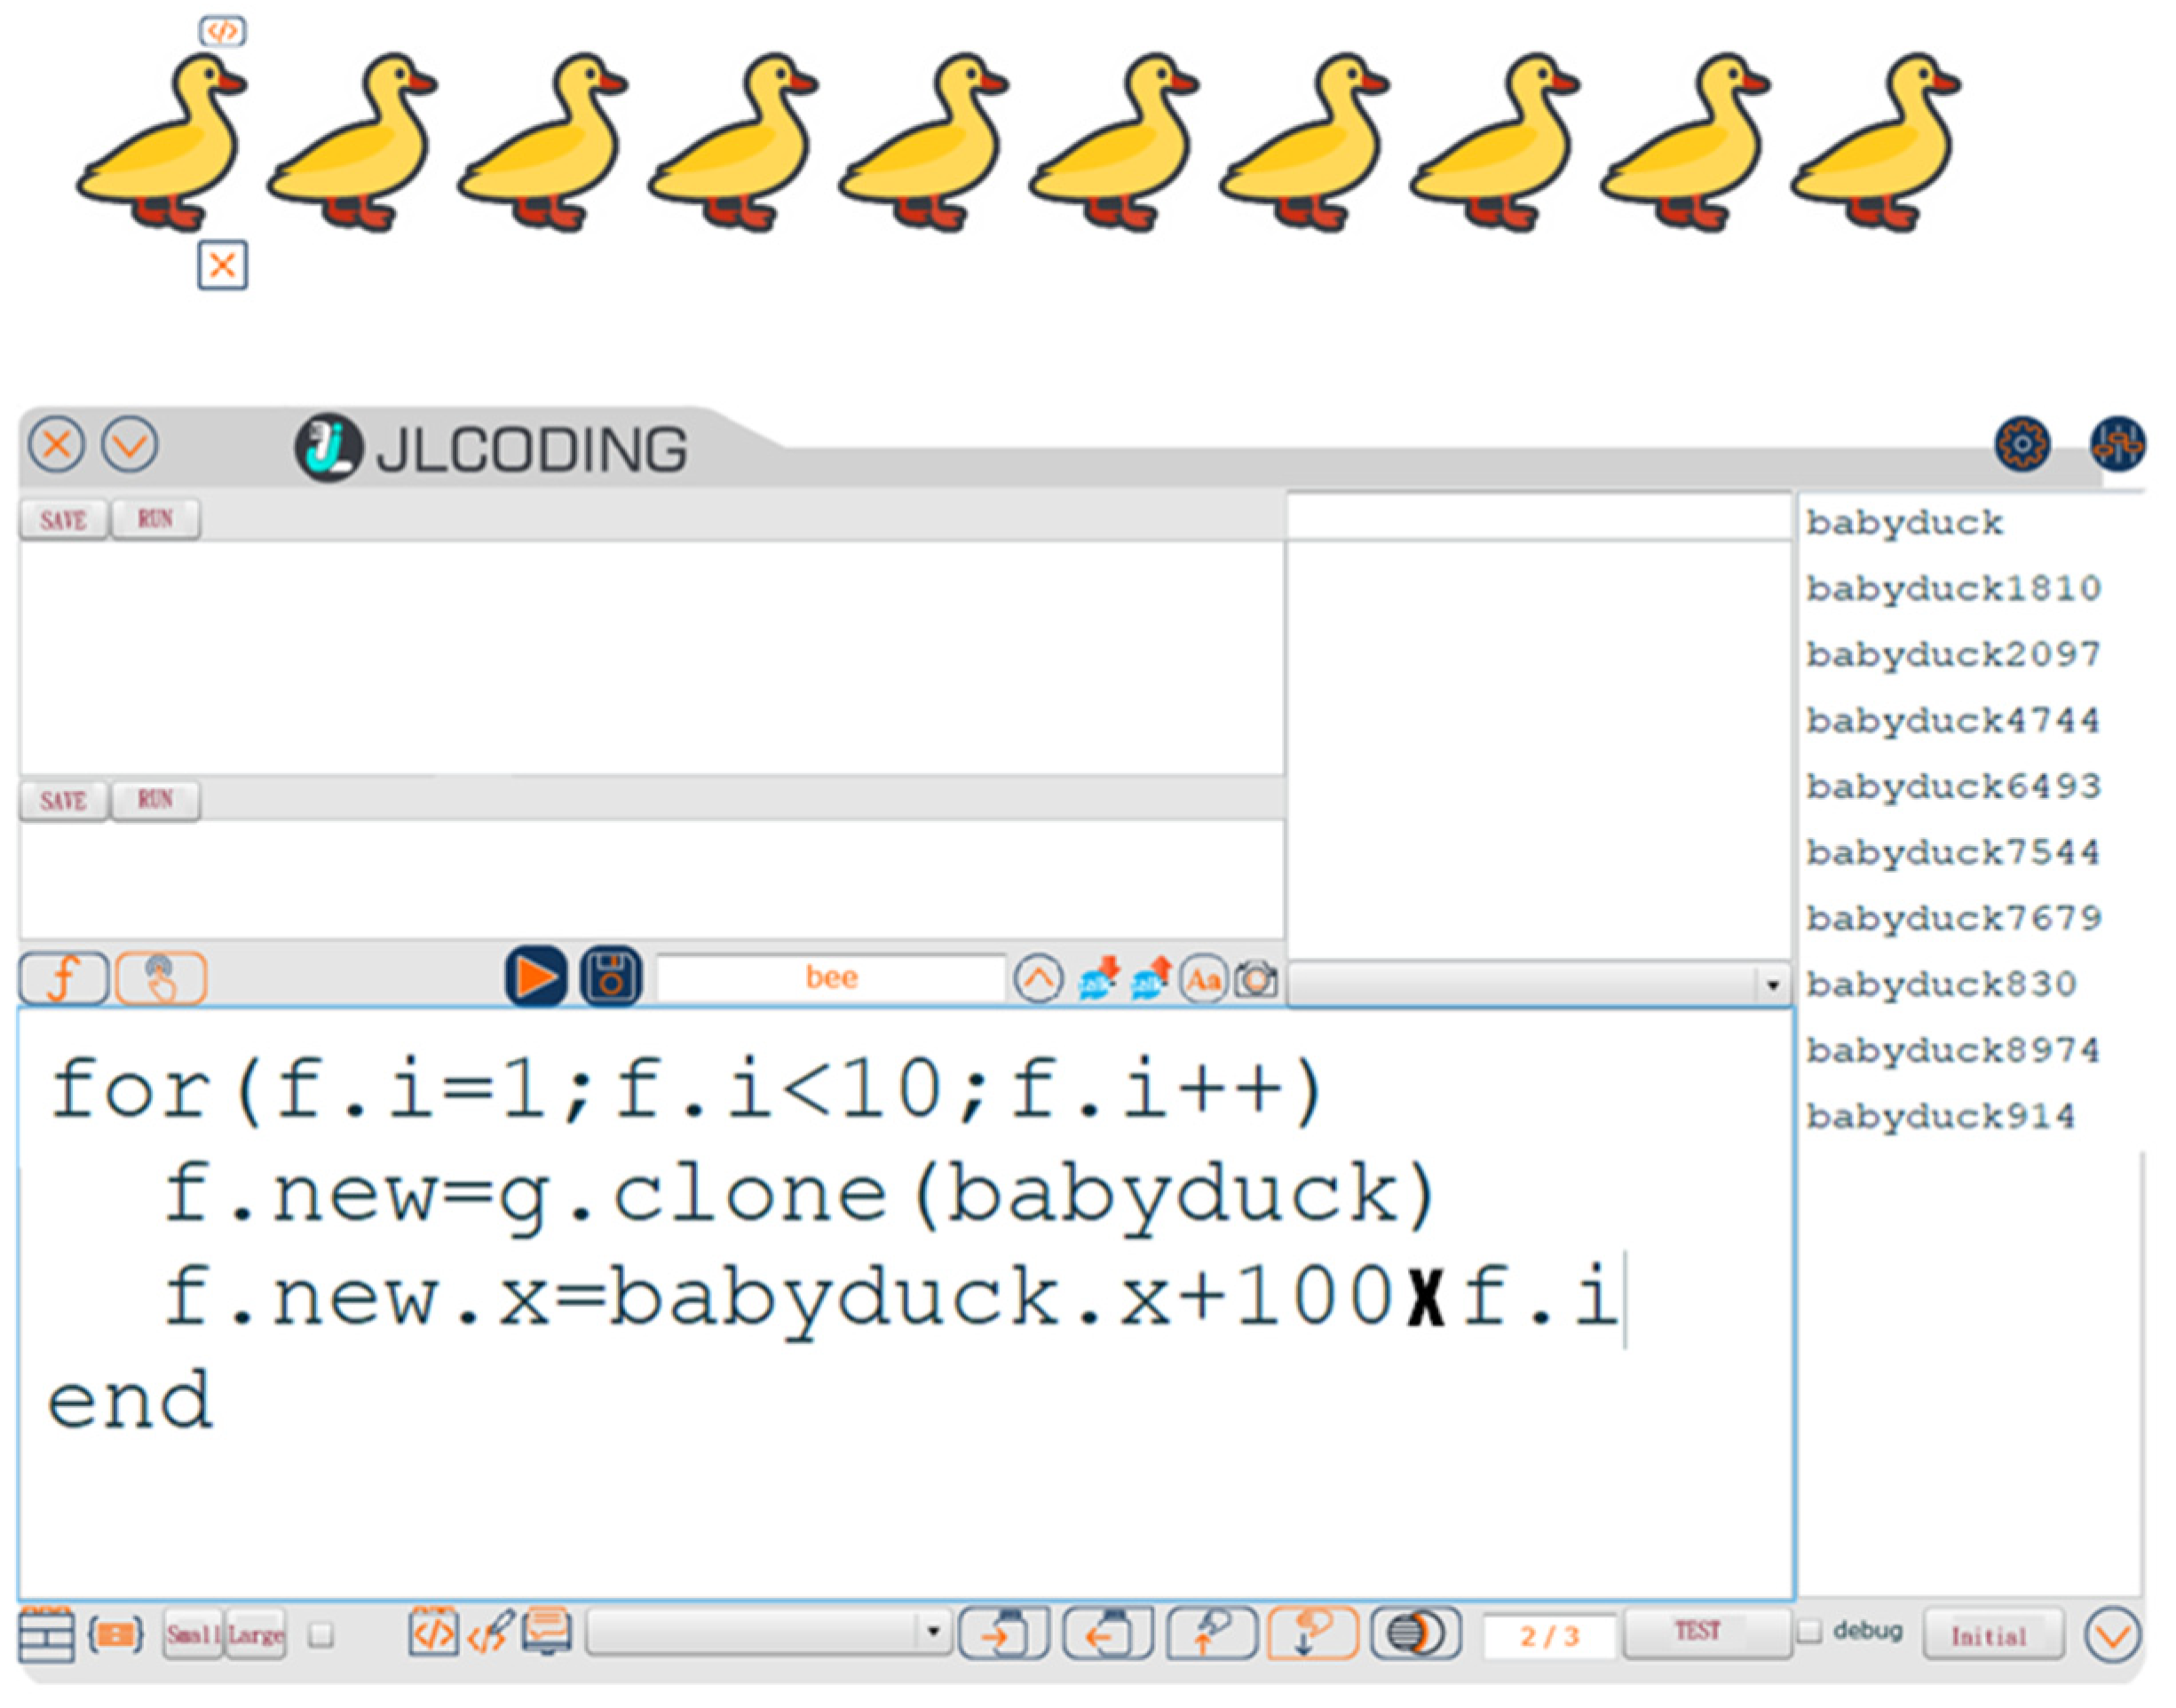
Figure 15. Generate 10 ducks by using JLcoding.
4. Features of JLcoding
JLcoding is a programming language that helps the student transforms from blocks to text-based programming. To avoid rejection by students who are learning text-based programming for the first time, JLcoding uses the concept of object-oriented programming similar to Scratch. Students put the character on the stage area and use the program to control it. Similar to Scratch, the stage area of JLcoding is the whole screen. An additional window is added to the coding area to prevent the coding area from squeezing the stage area. Thus, students can make more creations in the expanded stage area. The diagrams are shown in Figure 16 and Figure 17.
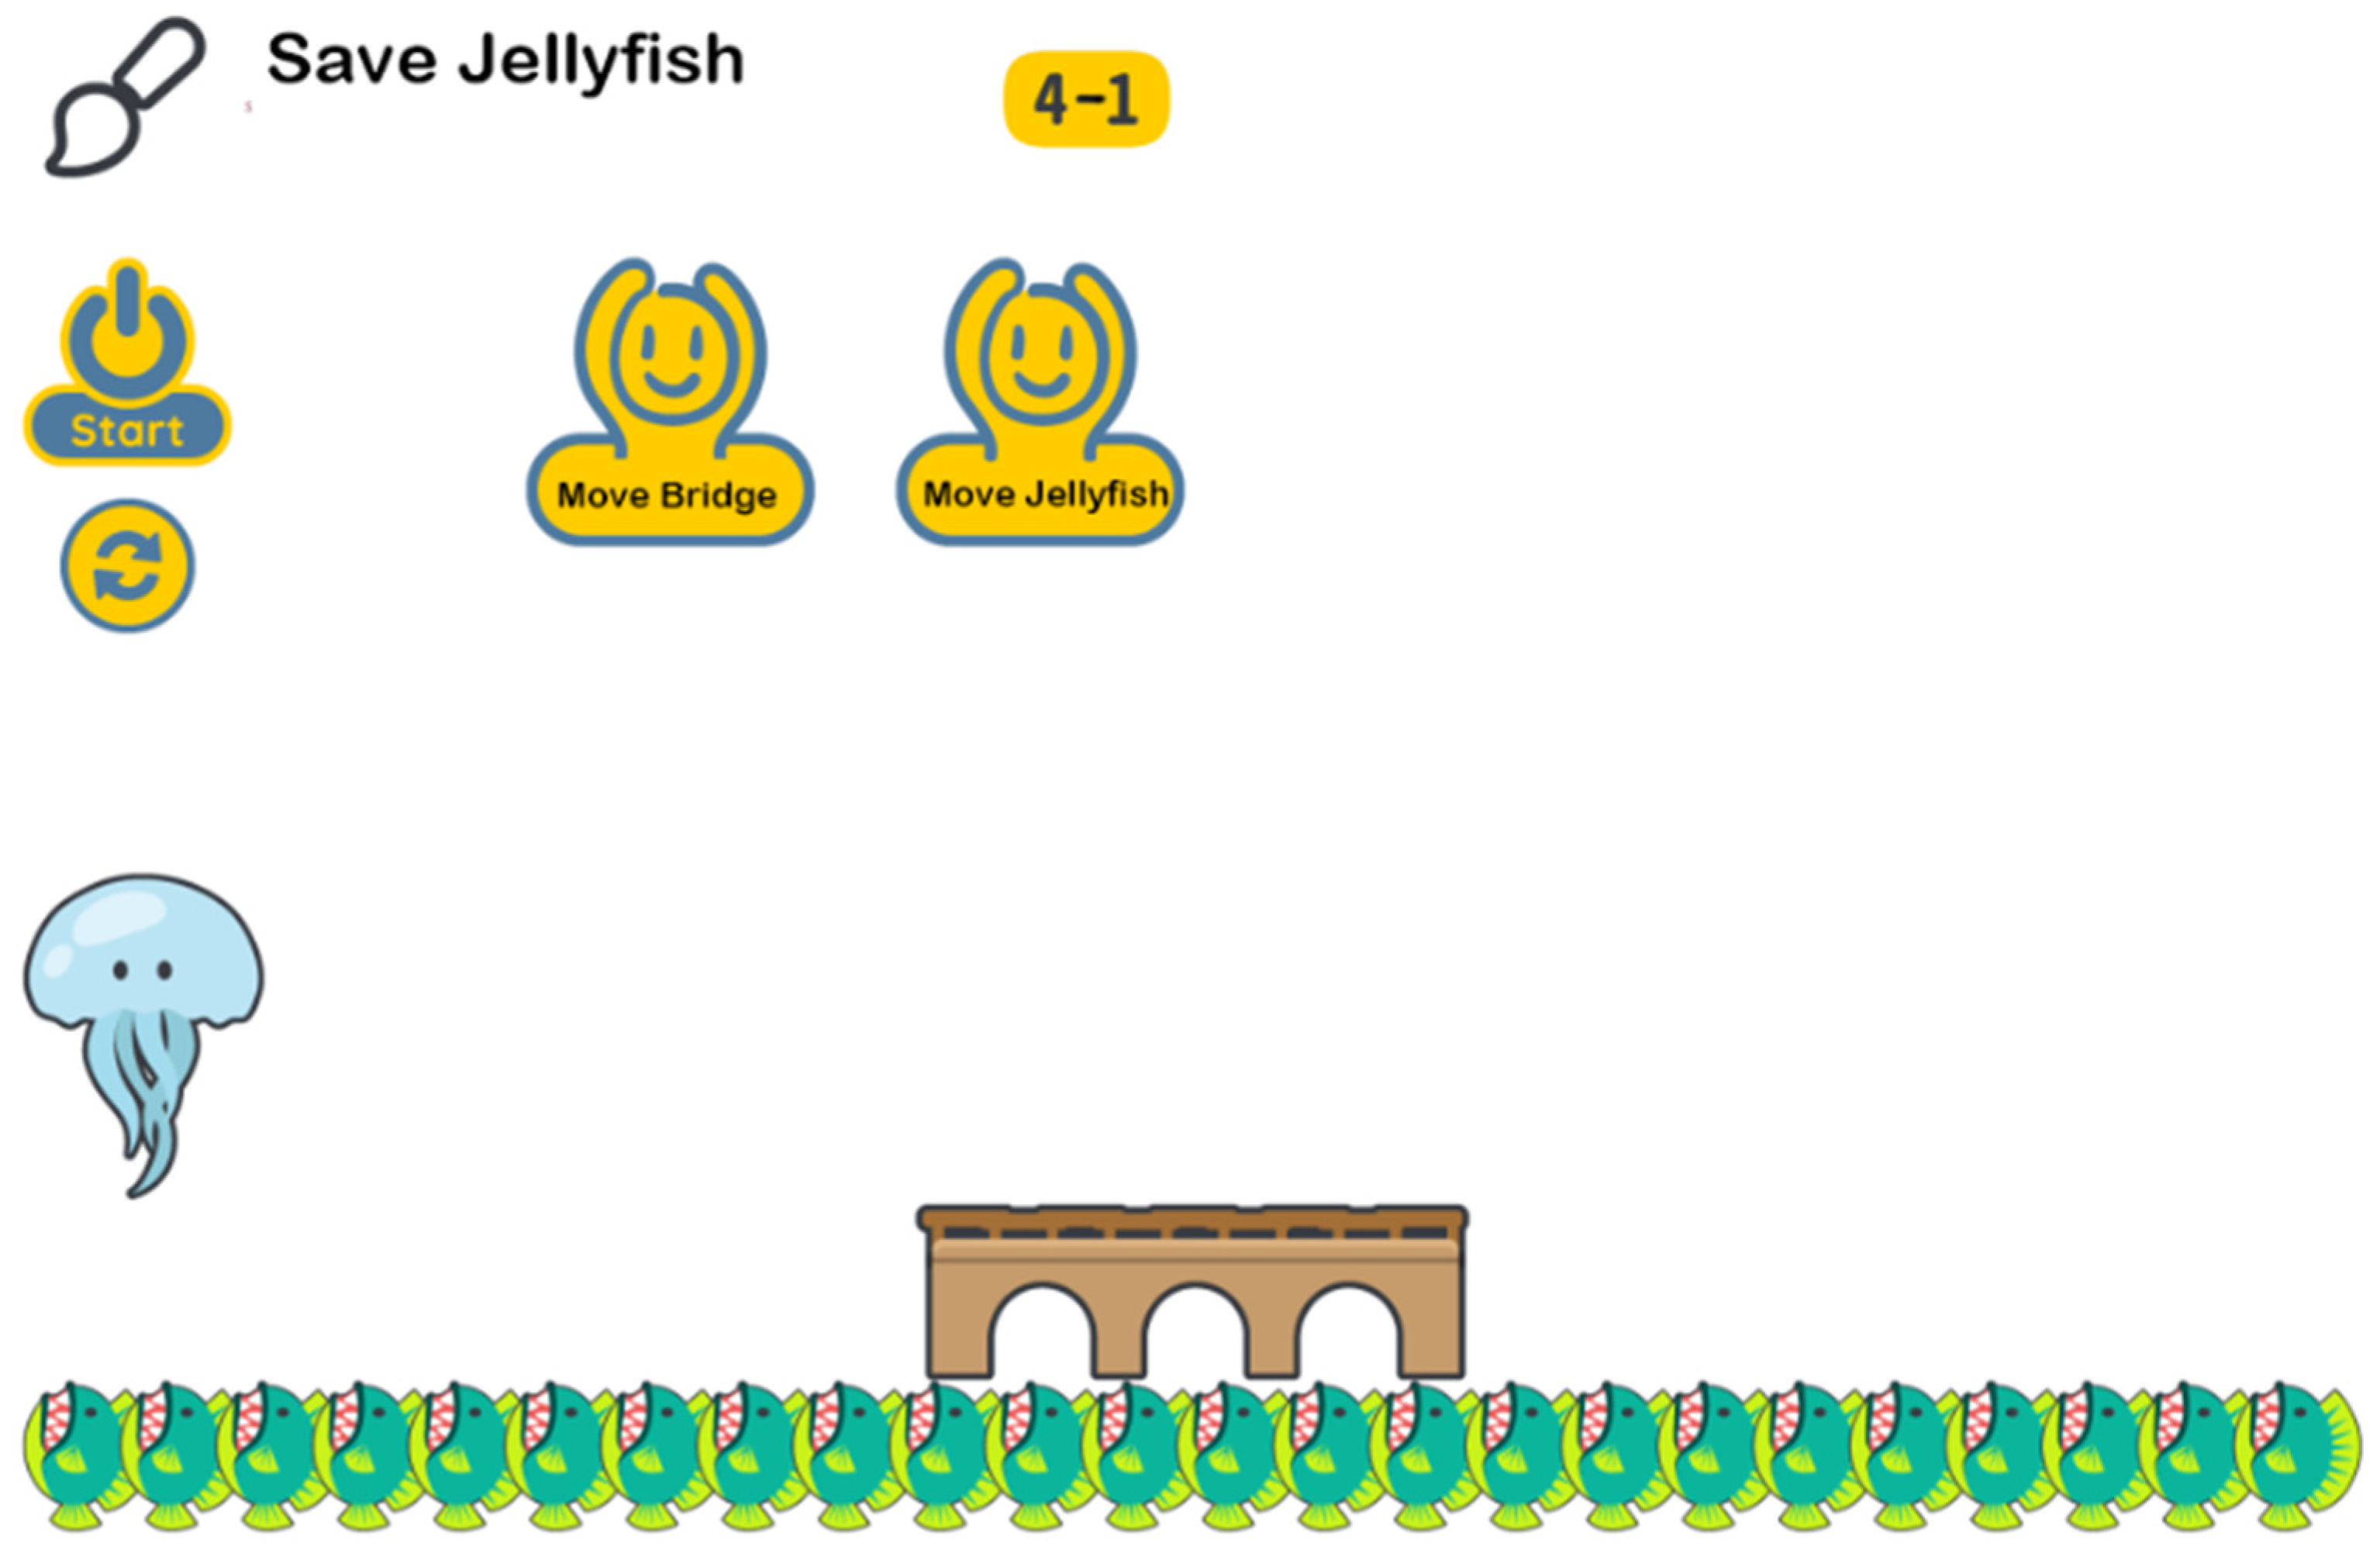
Figure 16. The stage area of JLcoding. The user needs to move the bridge and jellyfish to save jellyfish.

Figure 17. The coding window in front of the stage area.
Instead of dragging the block to generate the program, JLcoding allows the students to type some codes in the coding area to make students acquainted with the programming environment of text-based programming. To reduce students’ difficulty in memorizing codes, the function area provides hints to help students enter codes. Then, the students click the triangle button in the middle of the coding area to compile and execute the program.
Furthermore, JLcoding has built-in teaching courses and practice questions to prevent students using the system for the first time from having no idea how to start the programming procedure. The students can learn by themselves without using additional software. The course content includes object naming, coordinate settings, length and width settings, hexadecimal color code, object movement, rotation, collision, container, copy, and other functions, as well as learning how to use functions, variables, expressions, and conditional expressions. The course outline is shown in Table 1. Each course uses vivid pictures to illustrate the learning objectives and allows students to think of how to use the functions they learned when they practice after class. The textbook screen is shown in Figure 18 and Figure 19.
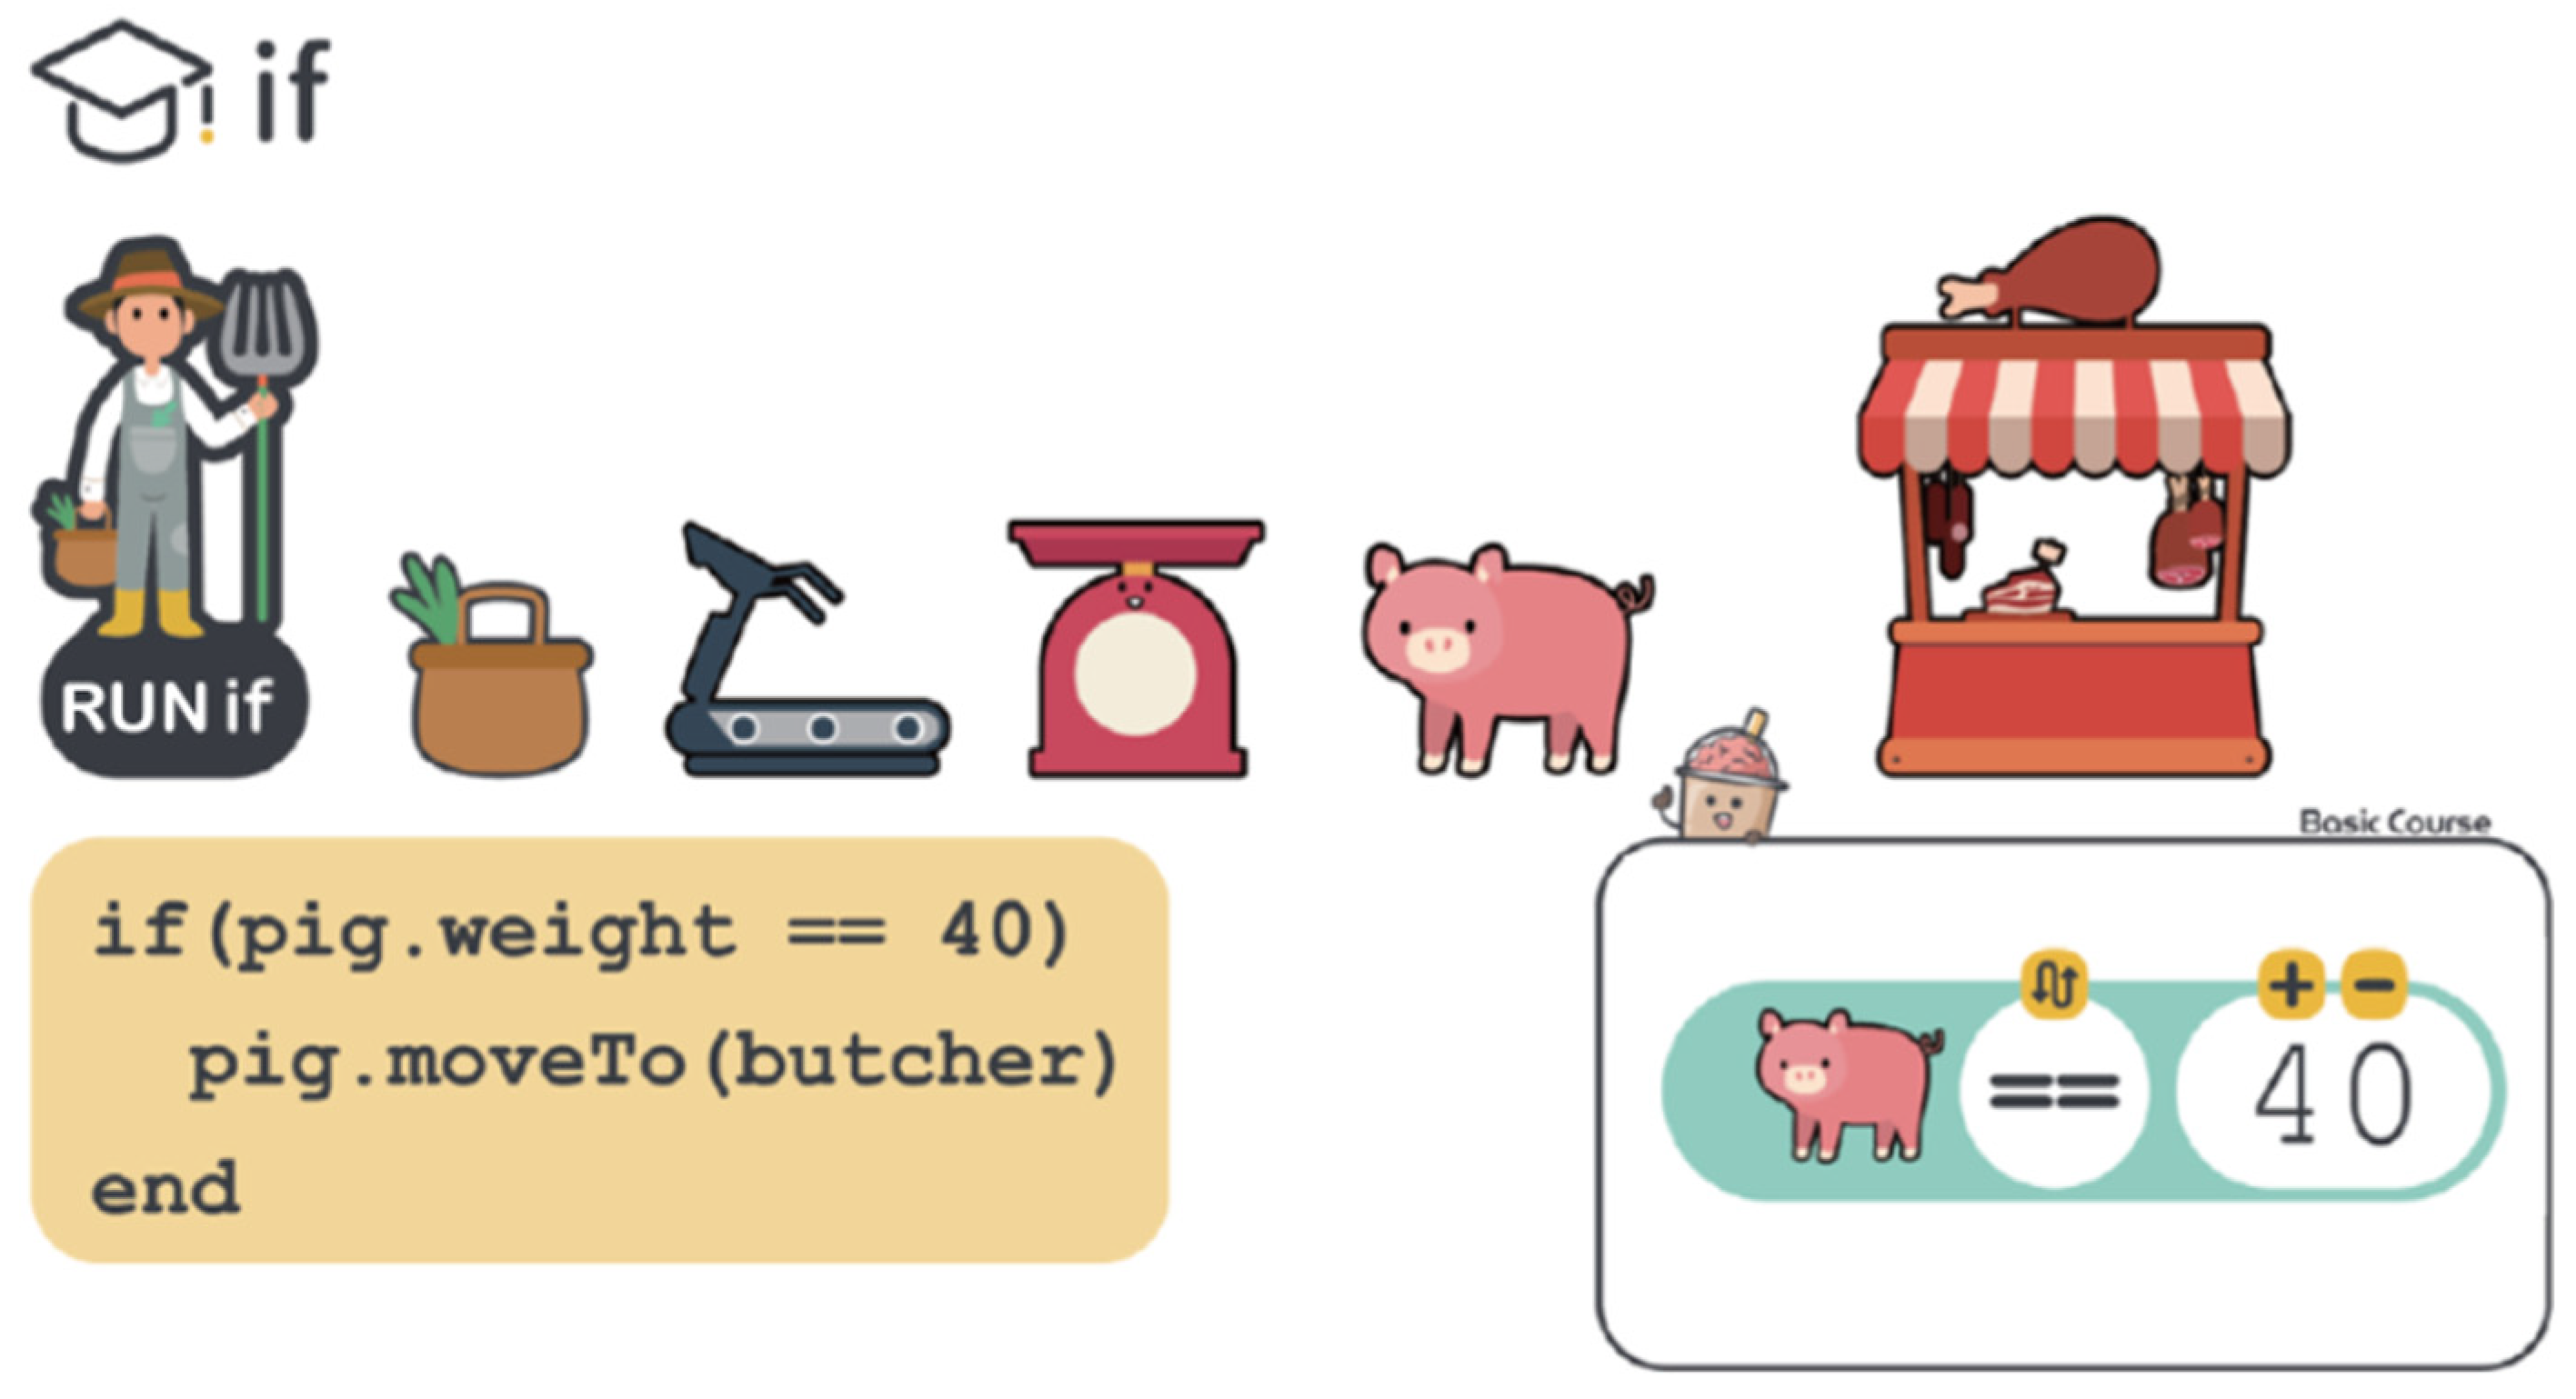
Figure 18. Built-in teaching of JLcoding.
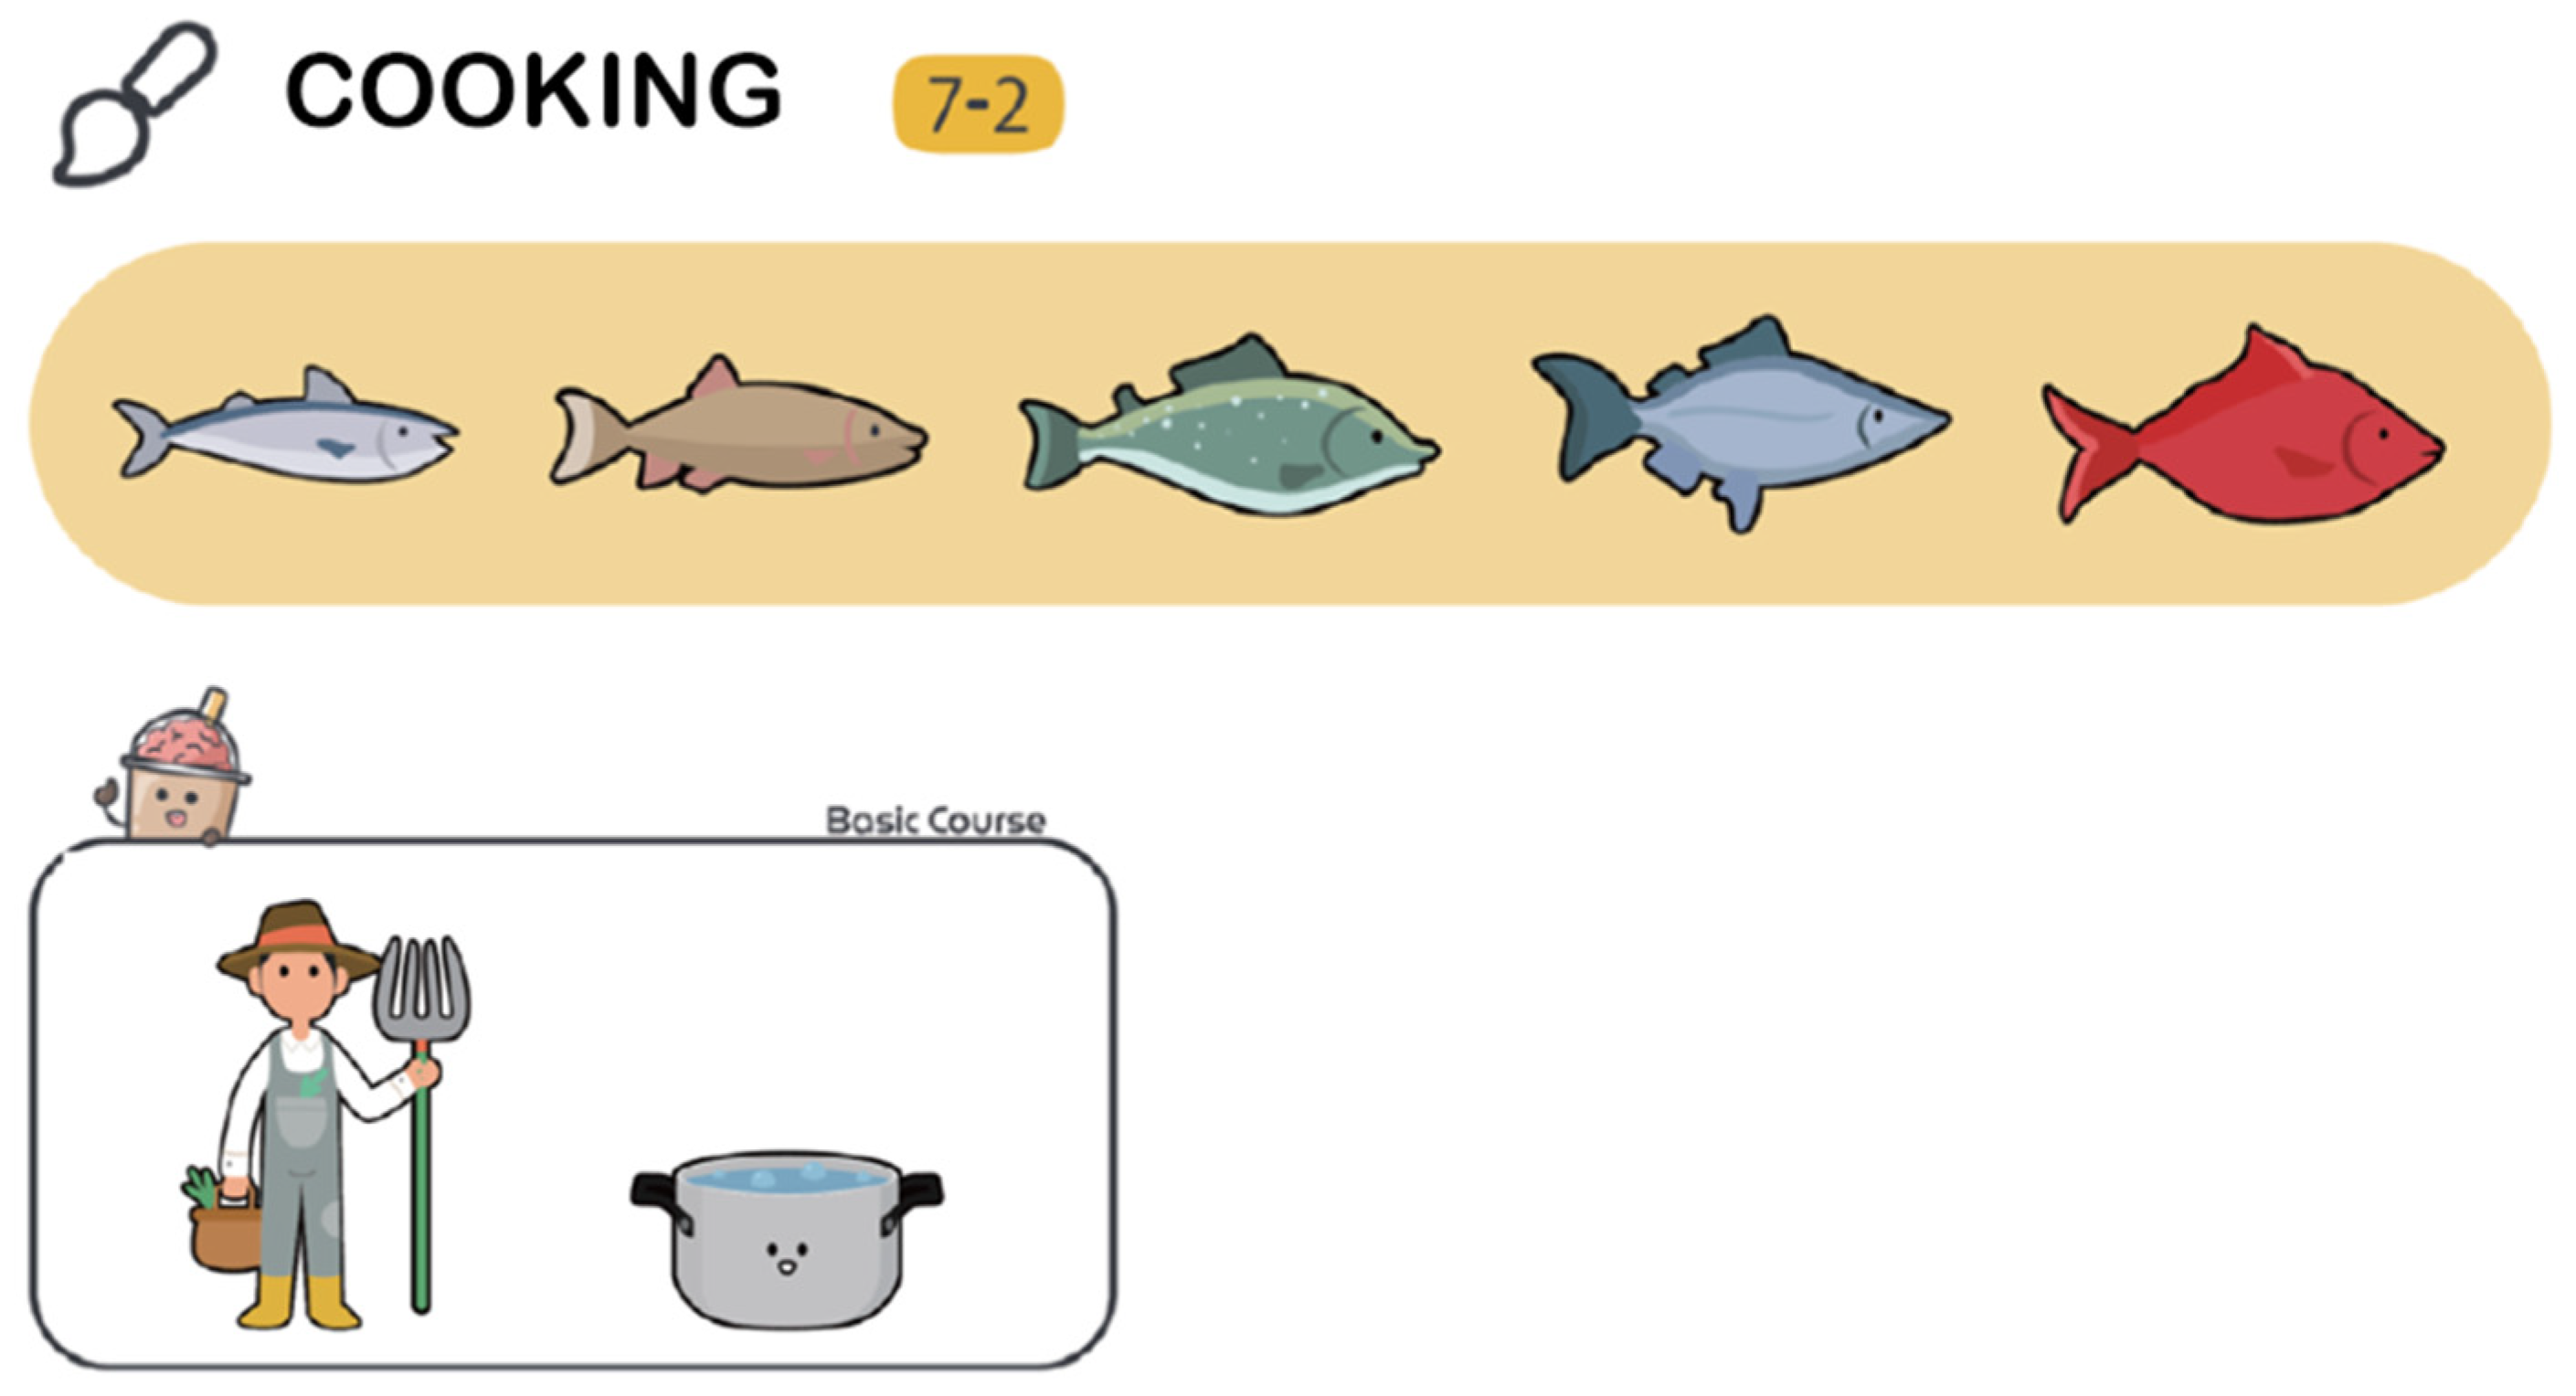
Figure 19. Built-in practice questions of JLcoding.
Table 1. Course outline of JLcoding.
| Course | Theme | Content |
|---|---|---|
| Basic Course 1 | Little blue duck leaving the team | 1. Understand JLcoding and system. 2. Learn how to set the position and coordinates of objects. |
| Basic Course 2 | Pigs will set sail | 1. Learn how to set the length and width of object. 2. Learn how to set the sizes of objects. |
| Basic Course 3 | Missing turtle eggs | 1. Learn how to set the color of objects. 2. Forward and turn of objects. |
| Basic Course 4 | Trapped jellyfish | 1. Movement and rotation of objects. |
| Basic Course 5 | Infinite bomb | 1. Learn how to use the code for copying objects. |
| Basic Course 6 | Pirate’s gold coin | 1. Learn how to set variables. 2. Arithmetic operations of variables. |
| Basic Course 7 | Delicious fish soup | 1. Learn how to use the code for If/else. |
Based on the above description of JLcoding and Scratch, the comparison between the two programming languages is shown in Table 2.
Table 2. The comparison between Scratch and JLcoding.
| Item | Scratch | JLcoding |
|---|---|---|
| Entry barrier | The difficulty of getting started is extremely low. Students can execute the program and see the effect without typing the code and dragging the building blocks directly with the mouse; however, when there are relatively problems, it is difficult to debug, and it is inconvenient to perform complex combinations of logical conditions. | There is a certain degree of difficulty in starting, but JLcoding redefines the original complex code into modern code that is easy to understand. With the program assistance function that comes with the JLcoding platform, it can greatly reduce the cost of learning to write code. |
| Creative space | The number of functions is limited. The limitations of the platform compress the space for creation. The student cannot freely create their own function. | A platform specially designed for teaching allows students to freely use a variety of materials and hundreds of rich built-in functions (APIs) to support students in designing games, APPs, small systems, etc. The platform can be connected to hardware or AI. Students’ creative field further expands to the Internet of Things (IOT) or artificial intelligence. |
| Teaching support | The design focuses on easy operation for students and supports a few necessary teaching auxiliary functions for teachers. When teachers use the program platform to teach, they usually need to open other auxiliary tools such as PPT. | JLcoding integrates teaching, learning, and practice. Teachers use the courseware and built-in auxiliary tools to teach on the platform to improve the teaching effect. Students use the student courseware to learn and can also practice directly on the platform, improving learning efficiency and effectiveness. |
| Programming environment | What you see is what you get (WYSIWYG), so that students can quickly see the results of the program; however, there is still the problem of separation of teaching, learning, and practice, which reduces the learning effect. | JLcoding achieves WYSIWYG and the integration of teaching, learning and practice. The teaching materials and courseware can be switched between teaching and learning smoothly without switching any software, and the programming environment has function prompts and detailed Chinese explanations. Remove language and format barriers. |
This entry is adapted from the peer-reviewed paper 10.3390/sym14071405
References
- Perkel, J.M.J. Julia: Come for the syntax, stay for the speed. Nature 2019, 572, 141–142.
- Bezanson, J.; Edelman, A.; Karpinski, S.; Shah, V.B. Julia: A fresh approach to numerical computing. SIAM Rev. 2017, 59, 65–98.
- Koolen, T.; Deits, R. Julia for robotics: Simulation and real-time control in a high-level programming language. In Proceedings of the International Conference on Robotics and Automation (ICRA), Montreal, QC, Canada, 20–24 May 2019; pp. 604–611.
This entry is offline, you can click here to edit this entry!