You're using an outdated browser. Please upgrade to a modern browser for the best experience.
Please note this is an old version of this entry, which may differ significantly from the current revision.
Subjects:
Computer Science, Interdisciplinary Applications
|
Computer Science, Artificial Intelligence
Augmented reality (AR) has been widely used in education, particularly for child education. This entry presents the design and implementation of a novel mobile app, Learn2Write, using machine learning techniques and augmented reality to teach alphabet writing.
- mobile app
- augmented reality
- machine learning
- education
- alphabet writing
1. Learn2Write App Architecture
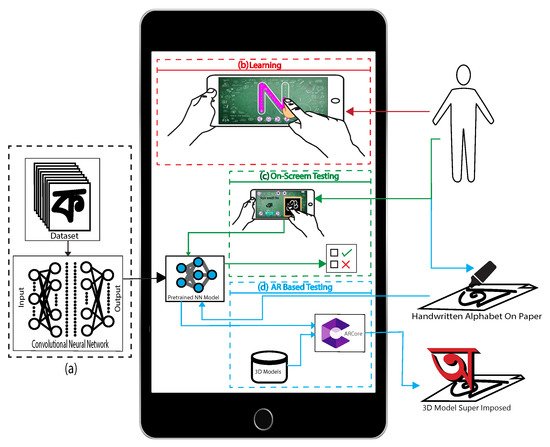
Figure 1 shows the architecture of our Learn2Write app. The app is developed with the Unity3D game engine, and C-sharp is the primary programming language used. The app does not require an internet connection to function because it includes all the 3D models of alphabets and the trained machine learning model. On the left side of Figure 1, the building of this deep learning model is shown. It is then converted to .nn model from .h5 format and integrated into the app. We used the Unity “Barracuda” library [37] to run our machine learning model.

Figure 1. Working procedure of our developed app. (a) Deep learning model creation with CNN and saving the model. (b) On-screen learning with the tracing method. (c) On-screen testing based on the deep learning model. (d) AR-based testing with ARCore to handle 3D models and interaction with deep learning-based testing.
The app has three important features: alphabet learning, on-screen testing, and augmented reality testing. In the learning module (Figure 1b), the learner can choose an alphabet, and step-by-step instructions are presented to teach the user how to write that alphabet. In the on-screen test module (Figure 1c), the learner is asked to write a specific alphabet using a finger on the mobile screen and the trained machine learning model is used to test whether the written alphabet is correct or not. In augmented reality testing (Figure 1d), the learner writes a given alphabet on paper and the app captures a photo of the paper to apply the machine learning model to test. The app places a 3D model of the detected alphabet in AR to make the testing session more enjoyable.
1.1. ARCore and 3D Models
ARCore SDK [38] is one of the modern solutions of marker-less augmented reality. To use marker-less technology, it is required to detect a surface first. The surface can be horizontal or vertical. ARCore can easily detect both surfaces. It can also refer to a flat table or chair surface.
ARCore aims to build augmented reality applications to enrich the real world with additional 2D or 3D digital information using a smartphone or tablet [39]. To use the ARCore [38] enabled application, it is essential to install an additional library, which can be downloaded from the Google Play store. There are three main features of ARCore [38,39]:
-
Tracking: allows the phone to understand and track its position relative to the world;
-
Environment Understanding: allows the phone to detect the size and location of all types of surfaces, such as horizontal, vertical, and angled surfaces like the ground, a coffee table, or walls;
-
Light Estimation: this allows the phone to estimate the environment’s current lighting conditions.
We have created a 3D model for each letter in the Bangla and English alphabet. Our models are created by Maya [40]. Figure 2 shows our developed 3D models samples of the English and Bangla alphabet and digits.

Figure 2. Screenshots of sample 3D models used in our app. (a) English alphabet. (b) English digit. (c) Bangla alphabet. (d) Bangla digit.
1.2. Machine Learning Models
The heart of this application is a machine learning model. We have considered five state-of-the-art deep learning architectures and conducted an empirical study (see Section 5) to select the best architecture for training our model. In this section, we briefly introduce those architectures. BornoNet [21] and EkushNet [22] are state-of-the-art models for Bangla handwritten character classification. DenseNet [23], Xception [24], and MobileNetV2 [25] are prominent deep learning architectures.
BornoNet [21] consists of 13 layers with 2 sub-layers: Convolutional, pooling, and fully connected layers, as well as dropout as a regularization method, are used to construct this network. It has three dropout layers to prevent overfitting. It uses ReLU activation. The final output layer has softmax activation.
EkushNet [22] has a total of 23 layers including 10 sub-layers. This model has a convolutional layer, a max-pooling layer, and a fully connected layer. Different regularization methods such as batch normalization and dropout are used. After the fifth layer, the network is divided into two sections—one has four layers and the other has six. These 2 sections are merged on the 16th layer. The final layer requires some output nodes with softmax activation.
DenseNet [23] is a densely connected CNN where each layer is connected to all the previous layers. Thus, it creates a very dense network. It requires fewer parameters than equivalent traditional CNNs.
Xception [24] architecture is made up of 36 convolutional layers. Except for the first and last modules, the 36 convolutional layers are divided into 14 modules with linear residual connections surrounding them. In a nutshell, the Xception architecture is a depth-wise separable convolution layer stack with residual connections. The pointwise convolution is followed by a depth-wise convolution in the Xception.
MobileNetV2 [25] architecture is specially designed for mobile and embedded vision applications with reduced computation. It is a lightweight architecture. It uses depth-wise convolution followed by pointwise convolution, called depth-wise separable convolution instead of normal convolution. This change reduces the number of parameters, thereby reducing the total number of floating-point multiplication operations. However, there are some sacrifices of accuracy. MobileNetV2 is made up of two types of blocks. One is a one-stride residual block. Another option for downsizing is a block with a stride of two. Both blocks have three layers—1 × 1 convolution with ReLU is the first layer, the depth-wise convolution is the second layer, and another 1 × 1 convolution is used in the third layer.
2. App Description
The AR app consists of two main features—one is learning and the other is testing. The testing module determines whether the user can write a given character independently. There are two testing features in the app—on-screen testing and AR-based testing. The on-screen testing and learning are done by the guided learning section. It provides instructions to draw an alphabet on the screen. This part does not require augmented reality. A normal Android phone can run this part of our app very smoothly. However, in AR-based testing, we have used a marker-less AR technology called ARCore SDK. AR-based testing allows students to check their written alphabet in the real-world environment. For this part, the app needs white paper or a board. The learner has to write the alphabet on paper or board. They have to detect the surface first; after detecting the surface, they need to put the camera close to the written alphabet. They then need to tap on the mobile screen to check whether it is right or wrong. The app collects the texture from the AR camera. Our machine learning model will evaluate the textures and provide an index of the written alphabet. Then by using the ARCore engine, a 3D model will appear on the screen. This part of our app is only supported by devices that can run ARCore SDK [41].
The instructions in this app, both voice, and text are in the Bangla language by default. Users can choose between Bangla and English from the homepage by tapping on the language button (Figure 3).

Figure 3. The first screen of the app - option to change app language.
2.1. Learn Writing
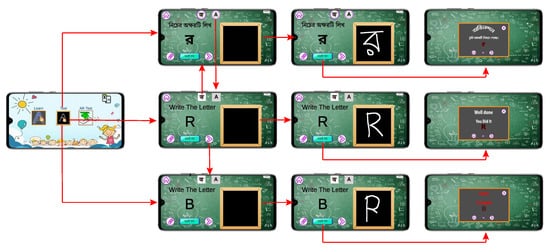
The learner can switch between Bangla vowels, consonants, digits, English alphabets, and digits. By clicking the learn button on the landing page, the user enters the learning module. The first page of this module contains categories as described above and lists of characters to select. The user can select any of them to switch categories. By clicking on a character, another page opens where the user can trace over the given gray lines to learn to write the character. Figure 4 shows the complete workflow of the learning module. After completing the tracing, a pop-up message with sound effects congratulates the user for success. The user can erase and rewrite or skip.

Figure 4. Screenshots of learning module workflow.
2.2. Testing
Both test systems in this app are based on the deep neural network. In both cases, the image of the written letter is sent to the model, which evaluates it and predicts a result.
2.2.1. On-Screen Testing
By clicking the middle button of the landing page, the user enters the on-screen test module. Here, the user can switch between Bangla and English languages. As shown in Figure 5, the user is presented with a random character to write. When the user presses the check button after completing the writing, the neural network takes the image and predicts a result. The result is matched with the given character and a pop-up is shown accordingly. The user can continue for as long as they want and skip characters.

Figure 5. Screenshots of the on-screen testing module.
2.2.2. AR-Based Testing
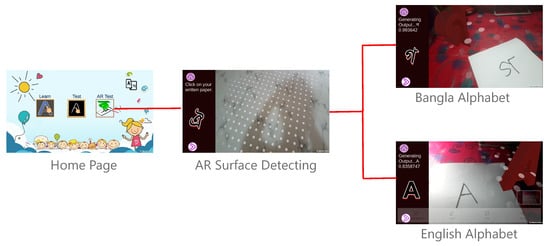
By clicking the right-side button on the landing page, the user enters the AR-based testing scene where they can test their writing and see the result in the AR environment (see Figure 6). At first, when the scene is loaded, the AR camera will be turned on and a pop-up appears on the screen to assist the user. The user must locate a surface. Any surface will work in our case, but a white surface with no texture variants will not work. The surface is detected by the ARCore on its texture variants. After detecting a surface, the user will see some white dots on the plane, indicating how much area is detected. Then the user will see a random alphabet on the screen and, needs to write it on white paper with a black marker. After writing this alphabet, the user needs to touch the screen to evaluate the letters.

Figure 6. Screenshots of AR-based testing module.
The app takes a screenshot of a certain area from our app screen. Then the system resizes the image and sends it to the ML model, which returns the best probability of letter index. This index identifies which 3D model and letter to show on the screen. If the index of our random alphabet and the user’s writing match, the app displays a 3D model of our alphabet on the screen. We instantiate the 3D model where the user touched. If our machine learning model’s index and current display image index do not match, we display a pop-up dialogue informing the user that the writing is incorrect.
This entry is adapted from the peer-reviewed paper 10.3390/computers11010004
This entry is offline, you can click here to edit this entry!
