Guided wave ultrasonic testing (GWUT) method is an effective method for long-distance inspection of inaccessible and coated structures from a single point of testing. It propagates inspection wave all through the structure without point-to-point scanning, hence, minimizes inspection drudgery and enhances work throughput per day.
- ultrasonic guided wave
- guided wave ultrasonic testing
- Temperature effect
- Lamb wave
1. Introduction
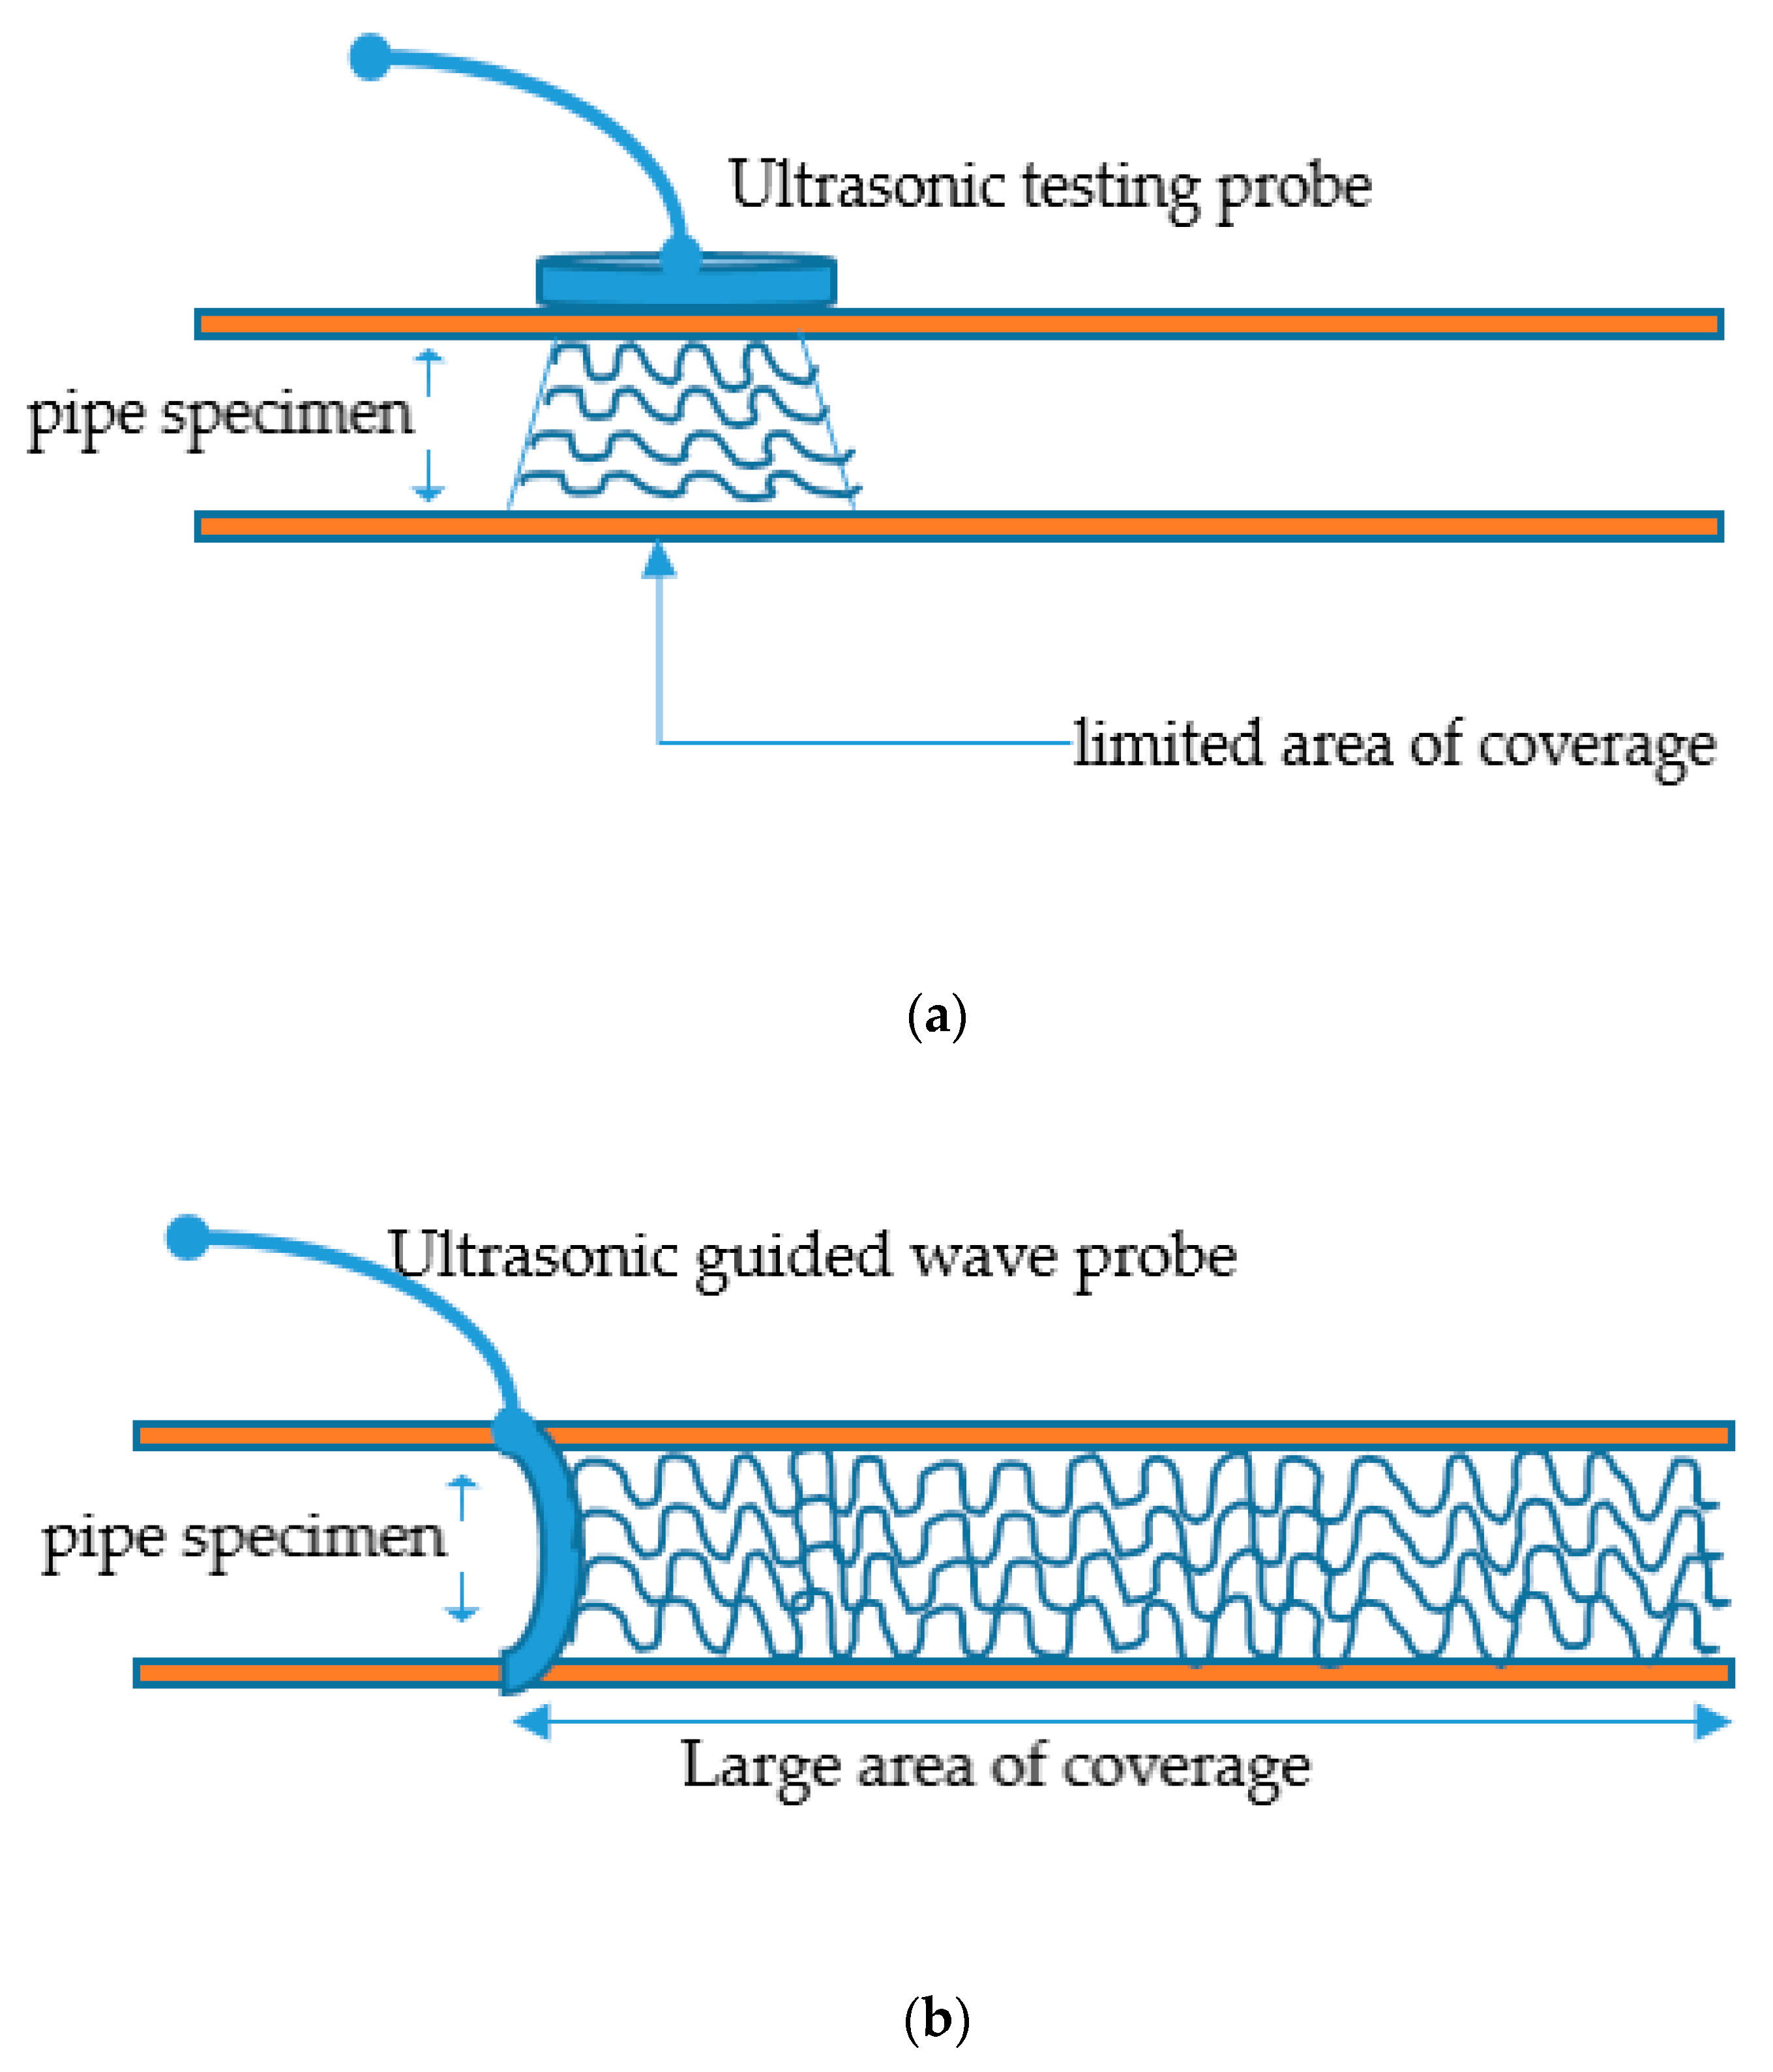
The conventional ultrasonic testing (UT) whose frequency is dependent on the thickness of the inspecting structure is different from GWUT of frequency range 20 kHz through 15 MHz or more in rare cases [12,13][1][2]. The UT is a high-frequency pulse-echo inspection technique for deep penetration into structural thickness [14][3]. It covers a limited area of the structure, unlike the GWUT that propagates a long-distance structure, as shown in Figure 1Figure 1a,b.

In GWUT or long-range ultrasonic testing, LRUT, transducer probes are networked in an effective array manner to emit wave signals of predefined frequency [14][3]. The signal’s low-frequency nature allows the elastic wave to be guided and propagated a long distance at the expense of sensitivity. At the same time, inspection at high frequency is detrimental to distance coverage and power. The high-frequency wave signals are mostly used to study microscale changes in the material structure like corrosion. In contrast, low-frequency signals are majorly used to inspect and detect macroscale defects in the material structures. Most studies on the application of GWUT have focused on individual damage inspection under varying conditions. However, the phenomenon of coexistence of combined damage on structures and its effect on GWUT parametric features under varying conditions are yet to be studied.
2. Effect of Environmental Conditions on Guided Wave and Ultrasonic Parametric Features
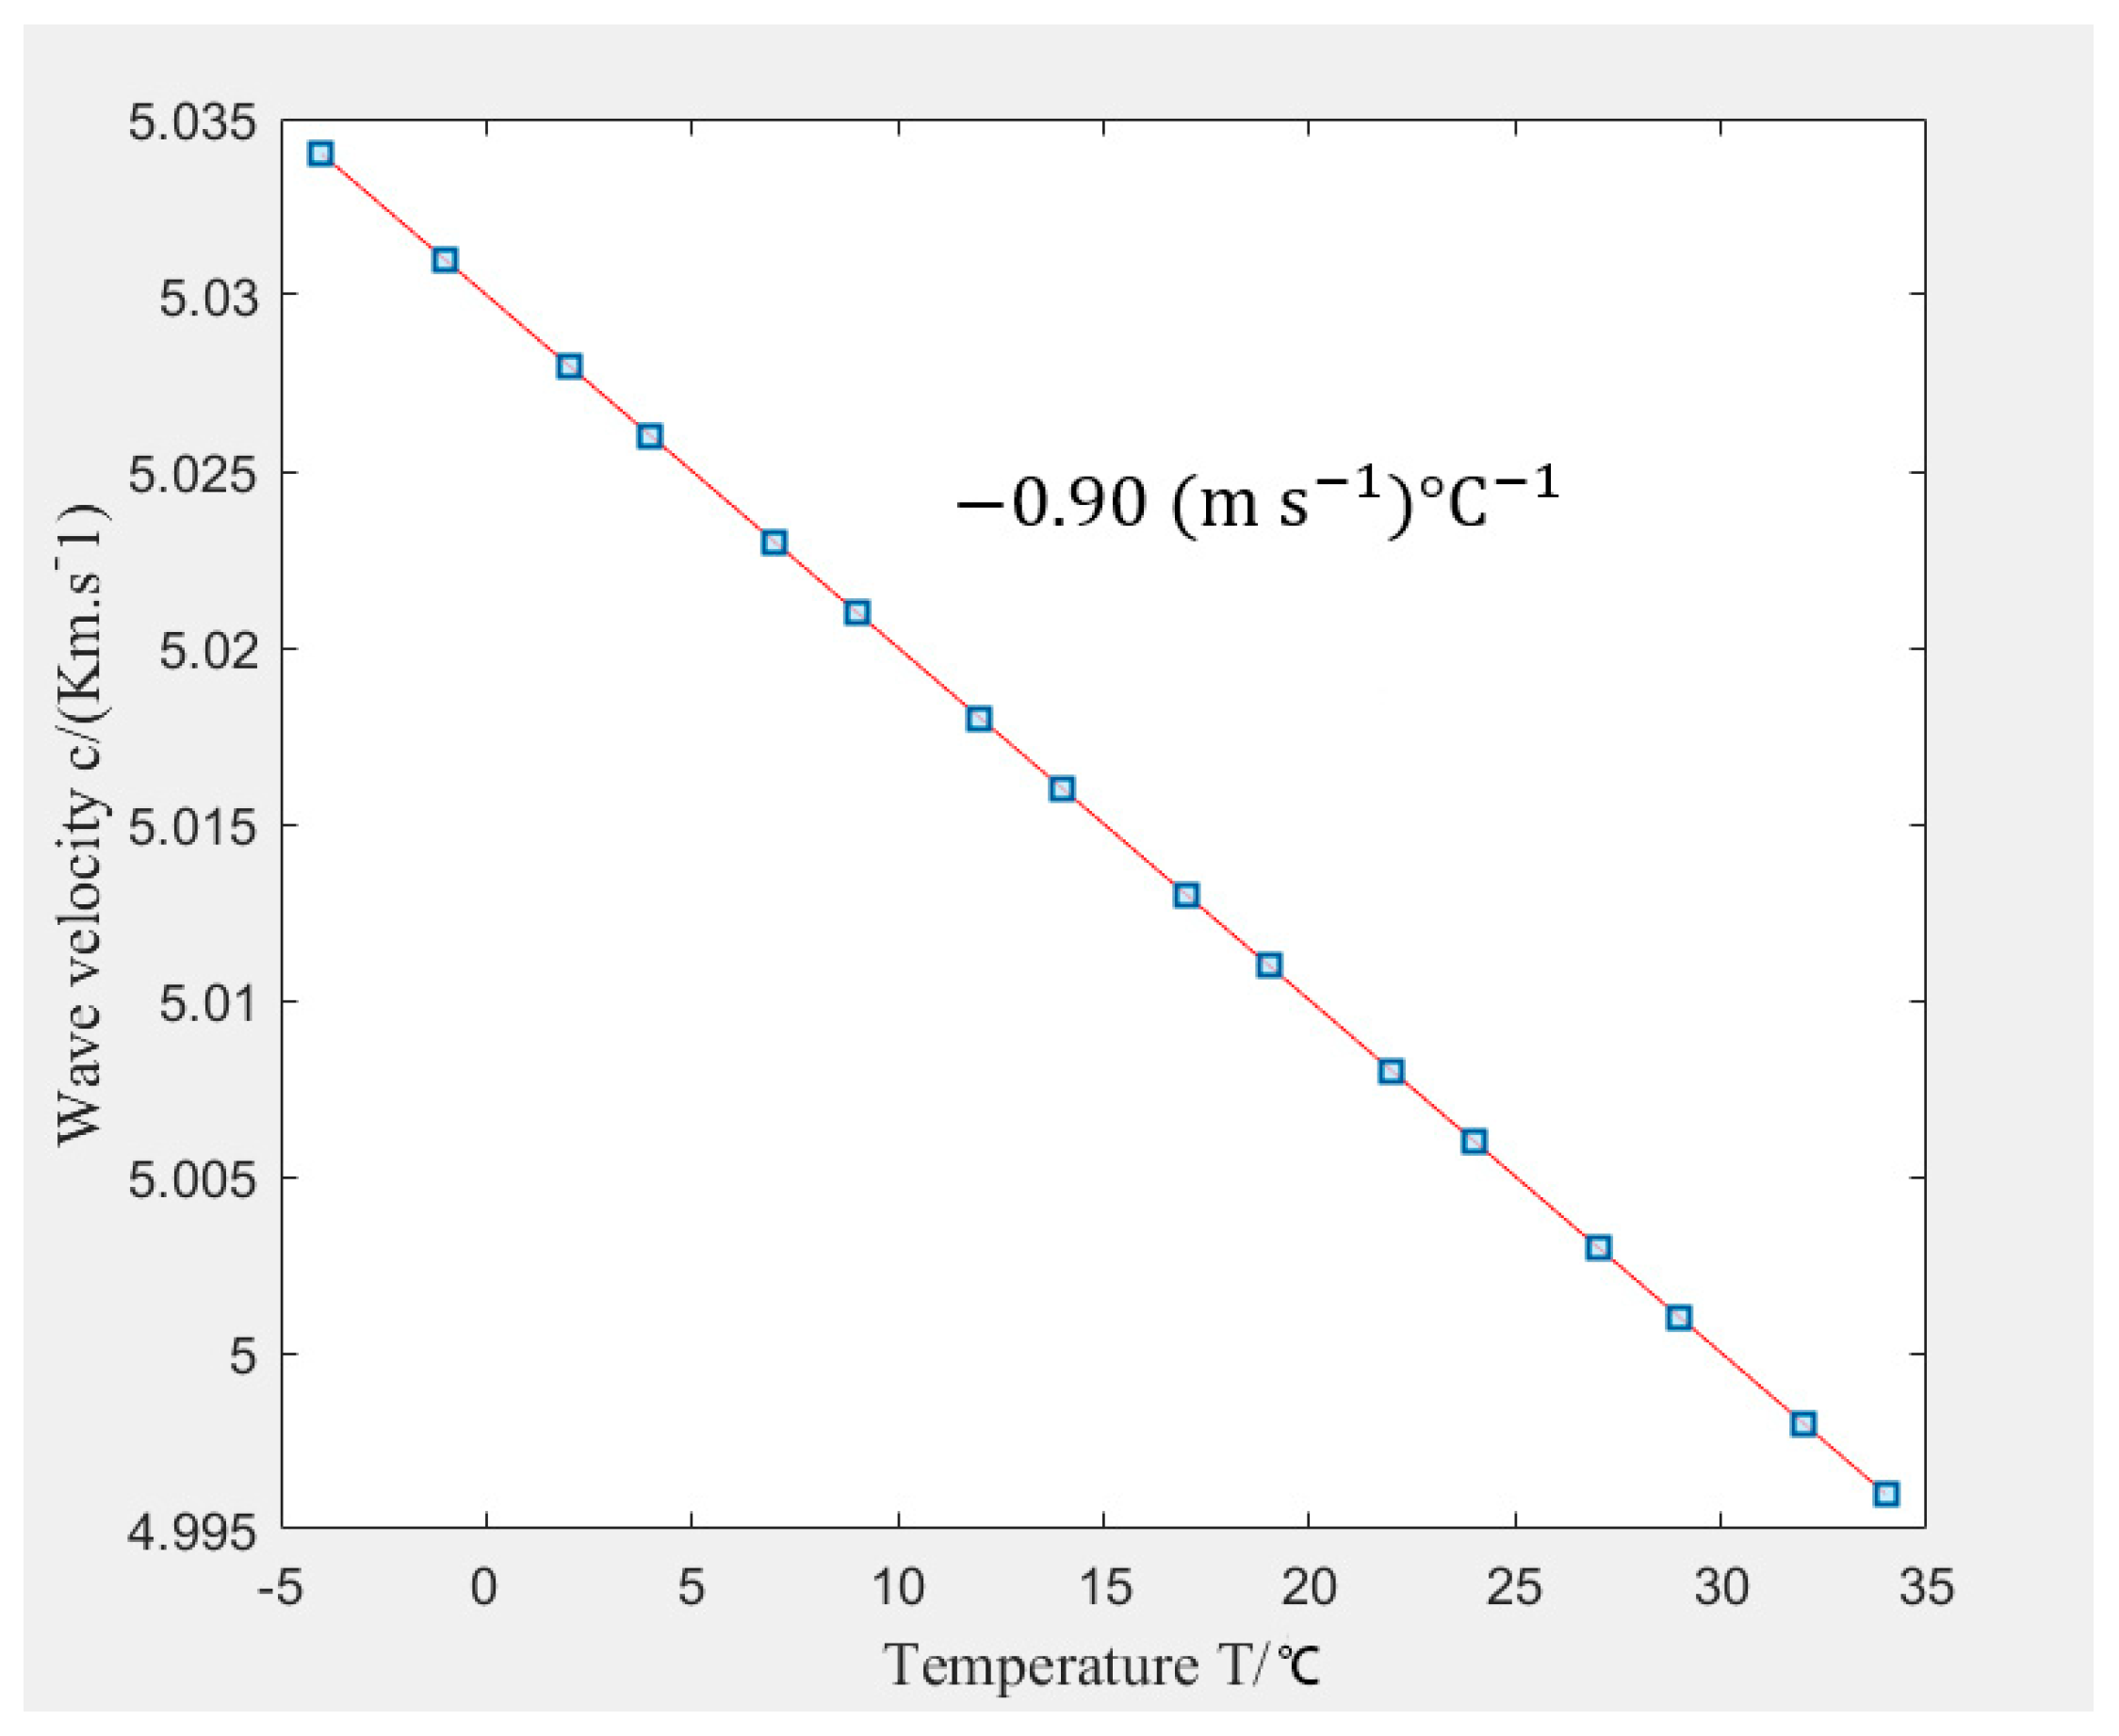
Environmental factors vary uncontrollably and interact with installed asset structures. This interaction results in guided wave parameter variation, especially during thermal expansivity [122][4]. Since metallic structures are an excellent medium for propagating the inspecting wave and serve as host for the sensors, the effect of environmental variation on the metal could be transferred on the sensor directly or indirectly hence causing variation in the parametric features of the sensor signals. These variations mostly result in masking damage signals of structural response, thereby allowing failure to occur. Studies have been carried out to investigate the ambient temperature variation on the ultrasonic guided wave (host) and the transducers (actuator and sensor). In [123][5], Cawley made a comparison study of crack formation effect on the resonant frequency and impact of the beam’s length on the resonant frequency. The result showed that the change caused by 2% depth cut of the crack was 40 times smaller than that caused by a 2% increase in the beam’s length. The effect of temperature on UGW has been widely studied. In [124][6], Lui Zenghua et al. investigated the effect of temperature (−4 °C to 34 °C) on lamb wave, L (0,1) propagating on steel. The wave velocity was reported to vary inversely to increase in temperature, as shown in Figure 11Figure 2. The retardation rate of the velocity was recorded to be 0.9 m/s for every degree of increase in temperature.
Figure 112. Temperature effect on Lamb wave velocity (R) [124][6].
Compensating for the environmental effects on wave information signal is an approach to mitigate temperature and improve the positive probability of flaw detection in the structure. Different techniques have been applied to this effect, such as optimal baseline selection, baseline signal stretch technique, linear discriminant analysis [26,136,137][7][8][9]. As earlier mentioned, variation in temperature results in ultrasonic phase shift or delay in the signal arrival, reducing the sensitivity, and probability of damage detection. In the absence of temperature, determining the damage and its location would be a simple statistical evaluation between the baseline waveform signal and the current monitored signal. In [26][7], combined optimal baseline selection (OBS) and baseline signal stretch (BSS) techniques were used to suppress and compensate for the distorted information signal due to temperature variation. The results revealed that a combination of OBS and BSS performed better than simple subtraction method and OBS method. The compensation techniques have temperature range (Table 4Table 1) beyond which they are unreliable. Also, the size of the temperature reference signal interval attributes the ease of calculation process and the reference data set’s size.
Table 41. Temperature range and interval of some existing compensation technique.
| Compensation Method | Temperature Range | Maximum Compensation Interval | Reference Signal Interval |
|---|---|---|---|
| BSS | 5–40 °C | 5 °C | 0.1 °C |
| OBS | 22–32 °C | 10 °C | 0.1 °C |
| BSS + OBS | 21.5–31.5 °C | 10 °C | 0.5 °C |
In [136][8], the effect of temperature and flow rate of fluid in working pipeline acquired using principal component analysis techniques and Fourier transform, (FT) were used to classify the damage situation of the pipeline through linear discriminant analysis (LDA). The approach achieved an average of 98% damage detection accuracy. In [137][9], a modified baseline signal stretch (MBSS) method was used to enhance the damage detection of complex signals due to large temperature variation effect with fewer baseline data set. The improvement was on selecting and applying a range of stretch factors instead of using all at a given time, thereby retaining a minimum value of the residual envelope. It was validated experimentally on a plate structure. The study revealed that MBSS could detect damage in a structure at a higher temperature variation, hence it has more comprehensive application than BSS, as shown in Table Table 52.
Table 52. Summary of result indicating the largest temperature change for which the damage could be accurately localized by applying temperature correction methods.
3. Conclusions
The sensor’s choice for asset integrity monitoring depends primarily on the structure’s nature and the targeted flaw. Different ultrasonic parametric features are used in determining the existence of flaw or damage in the structure. However, it is pertinent that it must be highly responsive to the intended flaw, otherwise a high rate false detection alarms is bound to occur and reliability of the structure would be jeopardized.
In contrast with the conventional ultrasonic inspection technique, an inspection of a large structure area from a test point is possible with GWUT. This improvement brings about a reduction in the cost of structural assessment and the amount of time required to inspect its health state. Although at the expense of ease of interpretation, the ability of guided wave ultrasonic technique to generate multi-mode waves is a good characteristic that aids in monitoring and detecting sundry damage in the structure.
From the DI reviewed works, it was observed that damage indices in time-domain are mostly used to monitor the existence of macroscale damage in structures. These are cracks and other damage that have developed and could significantly reflect or scatter the propagating wave. The microscale damage under breathing crack mechanism results in higher harmonics formation and makes signal interpretation difficult in time-domains. In such a situation, frequency-domain DI is mostly adopted to diagnose and interpret its existence.
Additionally, DI’s effectiveness is a function of its responsiveness to the presence and variation of damage while being robust to unwanted interfering signals. However, most of the DIs depend mainly on pristine structure values to be reasonably accurate, which is difficult to obtain from the existing asset that are many years old. All the DIs are mono damage identifier or mono severity indicator and unfit to define much damage at a time.
The influence of temperature in damage detection and localization is still a challenge. However, different temperature compensation techniques exist but at the expense of high computational cost and reference to pristine values which are not readily available. The effect of varying temperature on waveforms results in a time shift of the inspecting signal with a high probability of missing flaw detection at an elevated temperature. The influence could worsen at high temperature and large defect size leading to system unreliability. Thermal conductivity is perceived as a key factor in ultrasonic attenuation under temperature variation and the ultrasonic velocity’s proportionality behaviour with temperature. Temperature variation is the only environmental factor considered in most of the studies, whereas the monitoring system could be affected by other environmental factors when deployed to the field.
Study on the effect of crack or breathing crack in a corroded area on GWUT parameters under varying temperature influences is yet to be studied. Situations are abounding where corrosion activities may cover cracks, and structure diagnosis would reveal the existence of corrosion. This could cause misinformed asset reliability and unscheduled system failure. Also, damage detection in the dynamic stressed thin plate under the influence of thermomechanical condition has not been explored using GWUT. Most metallic structures are subjected to dynamic stress and environmental conditions while in service. These two conditions are detrimental to damage detection in structures using GWUT. Leveraging the potentialities of GWUT for structure health inspection, determining the effect of these combined conditions is significant in deciding damage severity, location, and orientation in a structure. Understanding the dynamics of these aforementioned challenges with respect to ultrasonic guided waves will open a new research discussion. The solution will increase the effectiveness of GWUT in achieving informed and reliable damage detection in metallic assets.
References
- Ensminger, D.; Bond, L.J. Ultrasonics: Fundamentals, Technologies, and Applications, 3rd ed.; CRC Press Taylor & Francis Group: Boca Raton, FL, USA, 2011.
- Riveiro, B.; Solla, M. Non-Destructive Techniques for the Evaluation of Structures and Infrastructure; CRC Press: Boca Raton, FL, USA, 2016.
- Dhutti, A.; Kanfoud, J.; Gan, T.H.; Hernandez, B.; Mudge, P. IPERM: A guided wave pipeline monitoring tool for oil & gas industry. In Proceedings of the 9th European Workshop on Structural Health Monitoring, EWSHM, Manchester, UK, 10–13 July 2018.
- Zai, B.A.; Khan, M.; Khan, K.; Mansoor, A. A novel approach for damage quantification using the dynamic response of a metallic beam under thermo-mechanical loads. J. Sound Vib. 2020, 469, 115134.
- Cawley, P. Long range inspection of structures using low frequency ultrasound. In Proceedings of the DAMAS 97: Structural Damage Assessment Using Advanced Signal Processing Procedures, Sheffield, UK, 30 June–2 July 1997; pp. 1–17.
- Liu, Z. Temperature Dependence of Ultrasonic Longitudinal Guided Wave Propagation in Long Range Steel Strands. Chin. J. Mech. Eng. 2011, 24, 159–166.
- Moll, J.; Fritzen, C.-P. Guided waves for autonomous online identification of structural defects under ambient temperature variations. J. Sound Vib. 2012, 331, 4587–4597.
- Eybpoosh, M.; Berges, M.; Noh, H.Y. Toward characterizing the effects of environmental and operational conditions on diffuse-field ultrasonic guided-waves in pipes. In Proceedings of the Sensors and Smart Structures Technologies for Civil, Mechanical, and Aerospace Systems, San Diego, CA, USA, 10–13 March 2014.
- Salmanpour, M.S.; Khodaei, Z.S.; Aliabadi, M. Guided wave temperature correction methods in structural health monitoring. J. Intell. Mater. Syst. Struct. 2016, 28, 604–618.


